Repair Asphalt Roof — DIY Fix Guide by Damage Type, Cost & When to Replace (2026)
Quick Answer: Can You Repair an Asphalt Roof Yourself?
Yes — replacing 1–5 missing shingles, sealing cracks with roofing cement, re-adhering lifted edges, and resealing exposed flashing are all DIY-able with basic tools. Materials cost $20–$150. Professional repair runs $150–$1,500 depending on damage scope. Call a roofer when: the leak source is unknown, the deck has soft spots, the roof is steeper than 6:12 pitch without safety gear, or the roof is over 20 years old with widespread damage — repair won't be economical.
Damage Type Quick Reference — DIY or Pro?
| Damage Type | DIY or Pro | Urgency | Primary Material | Typical DIY Cost |
|---|---|---|---|---|
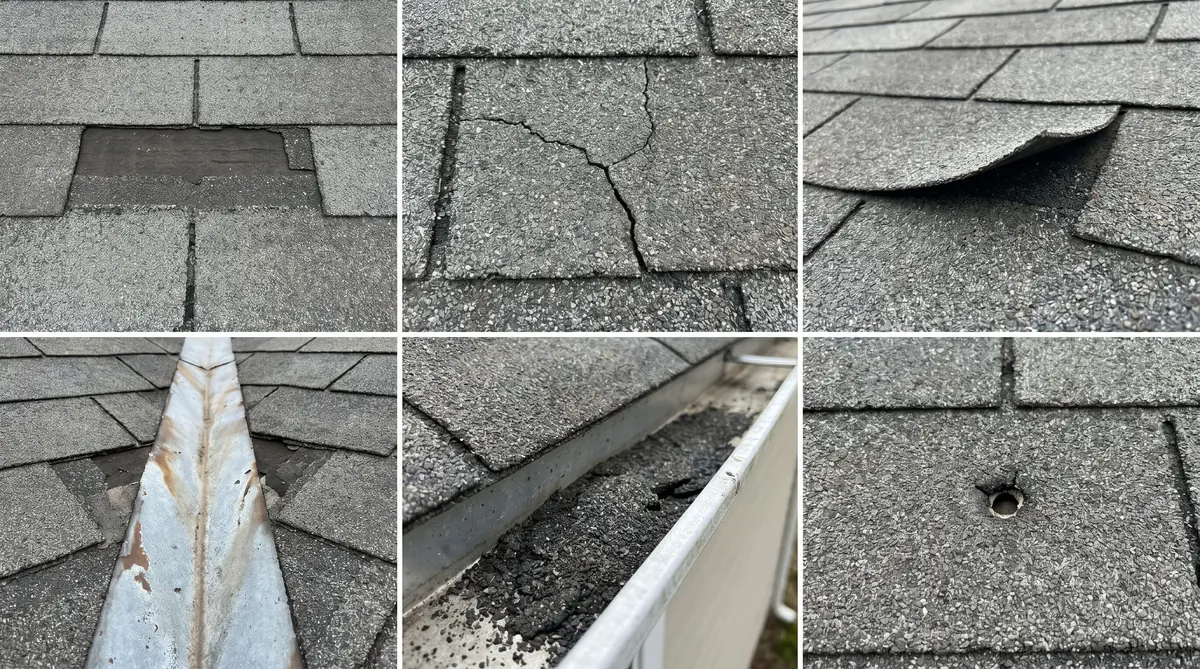
| Missing shingle (1–5) | DIY | High — water entry risk | Replacement shingles + roofing nails | $15–$50 |
| Cracked / split shingle | DIY | Moderate | Roofing cement + granules | $10–$20 |
| Lifted / curled shingle edges | DIY | Moderate | Roofing cement | $8–$15 |
| Exposed or lifted flashing | DIY (minor) / Pro (major) | High — most leak source | Butyl caulk + flashing tape | $15–$40 |
| Granule loss (localized) | DIY monitor / Pro if widespread | Low–moderate | Roofing cement + granules | $10–$20 |
| Small puncture / hole (<2") | DIY | High | Self-adhesive flashing tape + roofing cement | $15–$30 |
| Active leak, unknown source | Pro required | Urgent | Full inspection needed | $150–$400 (pro) |
| Deck rot / soft spots | Pro required | Urgent | Deck replacement + shingles | $500–$2,000 (pro) |
| Widespread granule loss / end of life | Replace — don't repair | Plan within 1–2 years | Full replacement | $8,000–$20,000 (pro) |
Materials & Tools You'll Need
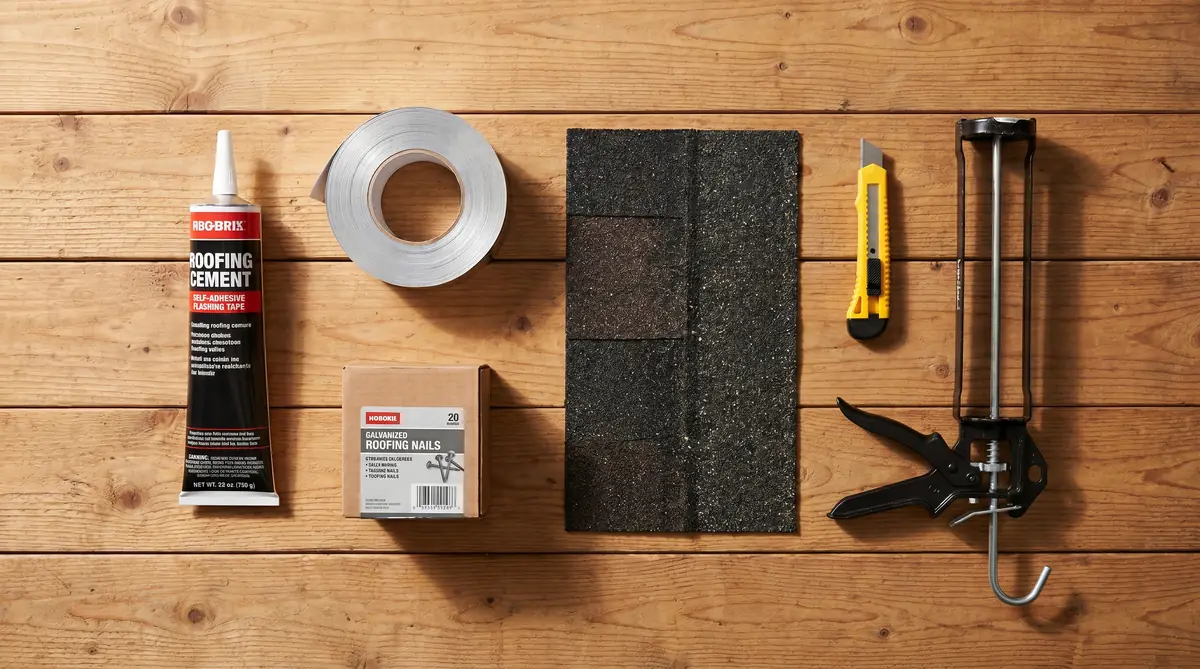
Roofing Cement (Plastic Roof Cement)
Thick black asphalt-based sealant for bonding shingles, sealing cracks, re-adhering lifted edges, and covering nail heads. Applied with a putty knife or caulk gun. Buy a tube-style applicator for precision work; a can with trowel for covering larger areas. Use fibered roofing cement for crack repairs — it contains glass fibers that bridge gaps and resist cracking better than unfibered versions.
Replacement Shingles
Bring a sample of your existing shingle (or a clear photo) to the home improvement store to match style (3-tab vs architectural) and color as closely as possible. Exact color match is rarely possible on aged roofs — new shingles are brighter but weather to blend within 6–12 months. Buy a full bundle (33 sq ft) even if you only need a few shingles — leftover shingles store well for future repairs.
Self-Adhesive Flashing Tape
Peel-and-stick waterproof tape for sealing around vents, pipes, and small punctures. Butyl-based tape (Grace Ice & Water Shield, Henry, Protecto Wrap) provides the best adhesion and temperature flexibility. Apply to a clean, dry surface for best bond — use a roller to press out air pockets. Laps should overlap at least 2 inches and point downhill (upper piece laps over lower piece).
Butyl Caulk / Polyurethane Sealant
Used for sealing the joints between flashing and masonry (chimney, wall), around vent boots, and anywhere metal meets shingle or deck. Do not use silicone on asphalt shingles — silicone prevents future paint adhesion and doesn't bond well to asphalt. Use butyl-rubber or polyurethane roofing caulk (Geocel, Sashco, Tremco) for roofing applications.
Tools Checklist
- Flat pry bar (for removing nailed shingles without tearing)
- Hammer + 1.75–2 inch galvanized roofing nails
- Utility knife with hook blade (for cutting shingles cleanly)
- Caulk gun (for tube-style roofing cement and sealant)
- Putty knife / trowel (for spreading roofing cement from a can)
- Stiff brush (for cleaning surface before repair)
- Chalk line (for aligning replacement shingles)
- Safety: non-slip shoes, roof safety harness + anchor for pitches above 4:12, rubber-soled footwear only
Repair by Damage Type — Step-by-Step
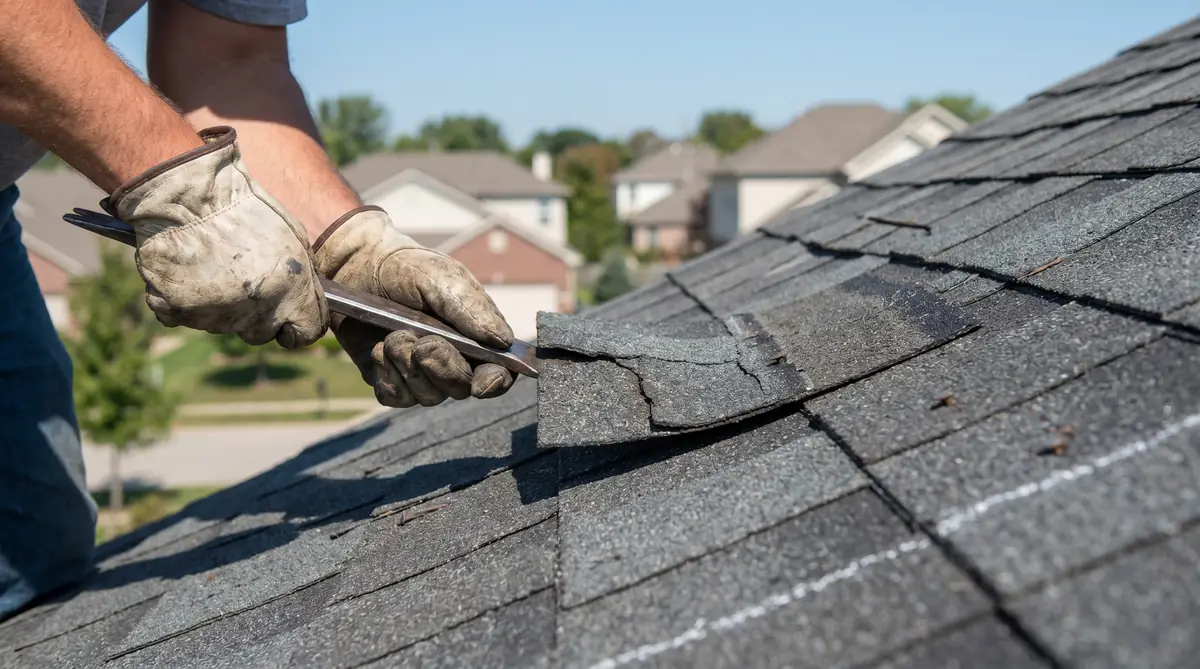
Repair 1: Replacing a Missing Shingle
-
Lift the overlapping shingles above the gap
Use a flat pry bar to gently lift the tabs of the shingles in the row above the missing one. Work carefully — cold shingles crack; warm them slightly with a heat gun in cold weather before bending.
-
Remove any remaining nail stubs
Pop out any roofing nails left in the deck from the missing shingle. Use the pry bar under each nail head and lever it out. Never drive old nails flush — they'll pop back through and puncture the new shingle from below.
-
Slide the new shingle into position
Align the new shingle with the shingles on either side — butt edges flush, exposure consistent. The top edge should align with the nail strip of adjacent shingles. Check the chalk line alignment before nailing.
-
Nail through the nail strip — 4 nails per shingle
Drive 4 nails through the nail strip (the reinforced band 1 inch above the shingle tab cutouts). Place nails 1 inch from each side edge and 2 nails evenly spaced between. Never nail through the exposure tab — those nails will be exposed to weather and cause leaks.
-
Seal the overlapping tabs above
Apply a golf-ball-sized dab of roofing cement under each tab corner of the shingles above to re-adhere them over your new shingle. Press firmly for 30 seconds. This step is skipped by many DIYers and is why their repairs lift in wind — don't skip it.
Repair 2: Sealing a Cracked or Split Shingle
- Clean the crack with a stiff brush — remove debris, granules, and any loose material from the crack edges.
- Apply roofing cement under the crack: Lift the shingle slightly and spread roofing cement under both sides of the crack, then press the shingle flat.
- Apply roofing cement over the crack: Spread a thin, even layer over the crack surface, extending 1 inch beyond the crack on each side.
- Cover with granules: Press matching granules (save some from your gutters, or buy a bag) into the wet roofing cement. This protects the cement from UV degradation — roofing cement left exposed will crack within 1–2 seasons.
- Seal the edges: Run a bead of roofing cement along all four edges of the repaired area to prevent water wicking under the patch.
Repair 3: Re-Adhering Lifted or Curled Shingle Edges
- Wait for a warm day: Shingles become pliable above 60°F. Attempting to flatten cold, brittle shingles cracks them. If it's cold, use a heat gun on low setting for 30–60 seconds per shingle to soften.
- Apply roofing cement under the lifted edge: Use a caulk gun to squeeze a bead of roofing cement under the lifted portion, covering the full length of the lift.
- Press firmly and hold: Flatten the shingle edge down and hold with firm hand pressure for 60 seconds. Place a brick or board on top and let cure for 24 hours in warm weather.
- Seal the edge: Run a thin bead of roofing cement along the now-pressed edge to seal it against wind uplift.
Repair 4: Resealing Exposed or Lifted Flashing
- Clean the flashing surface: Wire brush away rust, old caulk residue, and debris. The surface must be clean and dry for any sealant to bond.
- Remove failed caulk completely: Old cracked caulk must come out — applying new caulk over old is the most common roofing repair mistake. Use a utility knife and stiff brush.
- Apply butyl caulk to the flashing joint: Run a continuous bead into the joint between flashing and masonry or shingle. Smooth with a wet finger or putty knife to press into the gap.
- Cover with self-adhesive flashing tape for larger gaps: For gaps wider than ¼ inch, press a strip of butyl flashing tape over the joint before caulking. Upper piece laps over lower piece.
- Check adjacent shingles: Lift and inspect the shingles immediately adjacent to the flashing. Water that entered through the flashing may have gotten under nearby shingles — re-seal those with roofing cement as needed.
Repair 5: Patching a Small Hole or Puncture (Under 2")
- Clean the area around the hole — remove granules and debris for 3 inches in all directions.
- Cut a piece of self-adhesive flashing tape 4 inches larger than the hole in each direction.
- Peel the backing and press the tape firmly over the hole, centering it. Use a roller or the back of a spoon to press out all air pockets from center outward.
- Apply roofing cement over the tape edges, extending 1 inch beyond the tape perimeter.
- Cover the roofing cement with granules to protect from UV.
Cost Breakdown — DIY vs Professional
| Repair Type | DIY Materials | Professional Cost | DIY Savings |
|---|---|---|---|
| Replace 1–3 missing shingles | $20–$50 | $150–$350 | $100–$300 |
| Seal cracked shingles (5–10) | $15–$30 | $150–$300 | $120–$270 |
| Re-adhere lifted edges (section) | $10–$20 | $100–$250 | $80–$230 |
| Reseal chimney flashing | $20–$50 | $200–$500 | $150–$450 |
| Patch small hole / puncture | $15–$35 | $150–$300 | $115–$265 |
| Replace 10–20 shingles (section) | $80–$180 | $400–$1,000 | $220–$820 |
| Active leak investigation + repair | Risky DIY — pro recommended | $200–$600 | — |
| Full roof replacement (1,500 sq ft) | Not DIY-recommended | $8,000–$18,000 | — |
How to Inspect Your Roof Safely
-
Start from the attic
On a sunny day, go into the attic with the lights off. Look for pinpoints of daylight coming through the decking — these are penetration points. Inspect insulation for wet or stained spots, and rafters for water staining or mold. The leak source is typically 2–6 feet uphill from where you see staining.
-
Inspect gutters for granules
Excessive granule accumulation in gutters is the primary sign of an aging asphalt roof. Some granule loss is normal; a thick layer of black/grey granules after every rain indicates the shingles are near end-of-life — repair becomes uneconomical.
-
Inspect from the ground with binoculars first
Before climbing, scan the roof from the ground. Look for obvious missing shingles, dark patches (wet or damaged areas), lifted edges, and visible flashing gaps. Mark locations before climbing so you can go directly to problem areas.
-
Climb safely — harness on pitches above 4:12
Use a properly footed extension ladder. Wear non-slip rubber-soled footwear. On any roof with a pitch greater than 4:12 (4 inches rise per 12 inches run), use a roof safety harness anchored to a ridge hook. Never work on a wet roof — wait 24 hours after rain.
-
Inspect flashing first — it causes 90% of leaks
Check all penetrations: chimney, vents, skylights, valleys, and wall intersections. Look for cracked caulk, gaps between flashing and masonry, rust, or lifted flashing edges. If flashing looks intact everywhere, then check the shingle field for missing or damaged shingles.
-
Check for soft spots in the deck
Walk carefully across the roof (stay near rafters / ridge). Any area that feels soft or spongy underfoot indicates deck rot — the plywood sheathing has been saturated and structurally compromised. This requires professional repair involving shingle removal and deck replacement before reshinging.
Repair vs Replace — Decision Guide
| Factor | Repair Makes Sense | Replace Instead |
|---|---|---|
| Roof age | Under 15 years (3-tab) / under 20 years (architectural) | Over 20 years (3-tab) or over 25 years (architectural) |
| Damage extent | Under 25% of shingles affected | Over 25–30% of shingles damaged, curled, or granule-bare |
| Deck condition | Deck is solid — no soft spots | Soft spots, rot, or sagging deck present |
| Number of leaks | 1–2 isolated leak points | Multiple leaks appearing simultaneously |
| Repair cost vs replacement | Repair cost under 30% of replacement cost | Repair cost exceeds 30–40% of full replacement cost |
| Insurance | Isolated storm damage, adjuster approves repair | Adjuster totals the roof after hail or wind event |
| Energy efficiency | Not a primary concern currently | High energy bills and poor attic ventilation — new roof with proper underlayment and ventilation is worthwhile |
If you're approaching the replacement threshold, read our asphalt shingle roof replacement guide for full cost breakdown and what to expect from a re-roofing project.
- Caulking over old failed caulk — new caulk on top of cracked old caulk doesn't bond properly and fails in one season. Always remove all old caulk before applying new.
- Using silicone caulk on asphalt shingles — silicone doesn't adhere to asphalt and prevents future repairs from bonding. Use butyl or polyurethane roofing sealant only.
- Leaving roofing cement exposed to UV — uncovered roofing cement becomes brittle and cracks within 1–2 years. Always cover with granules or a shingle patch.
- Nailing through the shingle tab instead of the nail strip — exposed nail heads are direct water entry points. All nails must go through the nail strip hidden under the overlapping shingle.
- Working on a wet or frozen roof — wet shingles are dangerously slippery; frozen shingles shatter when walked on. Always wait for dry, above-freezing conditions.
- Patching over deck rot — placing new shingles over soft or rotted decking just delays the inevitable and can mask worsening structural damage. Replace the deck section before reshinging.
- Doing repairs on a steeply pitched roof without a harness — falls from roofs are among the leading causes of home DIY fatalities. If the pitch feels unsafe, it is — hire a contractor.
Frequently Asked Questions
Can I repair an asphalt roof myself?
Yes for minor repairs: replacing 1–5 shingles, sealing cracks, re-adhering lifted edges, resealing flashing. Call a pro when the leak source is unknown, the deck has soft spots, the pitch is too steep for safe access, or the roof is near end-of-life.
How much does it cost to repair an asphalt roof?
DIY materials: $20–$150 for most common repairs. Professional repair: $150–$400 for minor work, $400–$1,500 for larger sections or flashing jobs. Full replacement: $8,000–$20,000+ depending on size and material.
How do I find a roof leak?
Start in the attic — look for daylight, wet insulation, or water staining on rafters. Trace stains uphill (water travels along rafters). Outside: inspect flashing first (90% of leaks originate at penetrations), then look for missing or cracked shingles.
What materials do I need to repair an asphalt roof?
Core materials: roofing cement ($8–$15), matching replacement shingles ($1–$4 each), 1.75–2 inch galvanized roofing nails, butyl caulk ($8–$18), and self-adhesive flashing tape ($15–$35). Tools: flat pry bar, hammer, utility knife, caulk gun, putty knife, stiff brush.
How do I replace a missing shingle?
Lift overlapping shingles above the gap, remove nail stubs, slide the new shingle into position, nail through the nail strip (4 nails per shingle), then apply roofing cement under the tabs above to re-adhere them. Full steps in the guide above.
When should I replace instead of repair?
Replace when: the roof is over 20 years old with widespread damage, more than 25–30% of shingles are affected, the deck has soft spots, multiple leaks are appearing simultaneously, or repair costs exceed 30–40% of replacement cost.
What is roofing cement used for?
Bonding and sealing shingles — sealing cracks, re-adhering lifted edges, covering nail heads, and temporarily patching small holes. Use fibered roofing cement for crack repairs. Always cover roofing cement with granules to protect from UV breakdown.
How long does an asphalt shingle roof last?
3-tab shingles: 15–20 years. Architectural (dimensional) shingles: 25–30 years. Premium impact-resistant: 30–50 years. Lifespan depends on climate, attic ventilation, installation quality, and maintenance history. Annual inspections and prompt minor repairs significantly extend service life.
Related Guides
References: National Roofing Contractors Association (NRCA) · Asphalt Roofing Manufacturers Association · OSHA Residential Roofing Safety