DIY Asphalt Driveway — Can You Pave It Yourself? Honest Guide (2026)
Can You DIY an Asphalt Driveway?
Yes — but the method matters. A full hot-mix asphalt (HMA) driveway paved entirely by one person is extremely difficult: HMA must be spread and compacted within 30–45 minutes before it cools, which requires a paving machine and vibratory roller that most homeowners don't have.
The realistic DIY options are: asphalt millings (best full-driveway DIY option), cold-mix bags (patches and small areas only), or semi-DIY — you handle base prep and grading, a contractor pours and paves the HMA. Semi-DIY can save $1,000–$2,500 on a standard driveway.
DIY vs Hiring a Contractor — Side by Side
| Factor | Full DIY (Millings) | Full DIY (HMA Bags) | Semi-DIY | Hire Contractor |
|---|---|---|---|---|
| Material cost (600 sq ft) | $600–$1,200 | $1,500–$3,000 | $400–$800 (base only) | Included |
| Total cost (600 sq ft) | $800–$1,800 | $1,700–$3,400 | $1,200–$2,800 | $1,800–$4,200 |
| Equipment needed | Plate compactor, rake | Tamper, rake | Compactor for base | None |
| Surface quality | Good — gravel-like finish | Poor for full driveway | Professional HMA finish | Professional HMA finish |
| Lifespan | 10–20 years | 3–7 years | 20–25 years | 20–30 years |
| Skill level | Moderate | Easy | Moderate (base only) | None required |
| Time | 1–2 weekends | 1 day | 1 weekend + contractor day | 1–2 days |
3 DIY Asphalt Driveway Approaches
1. Asphalt Millings
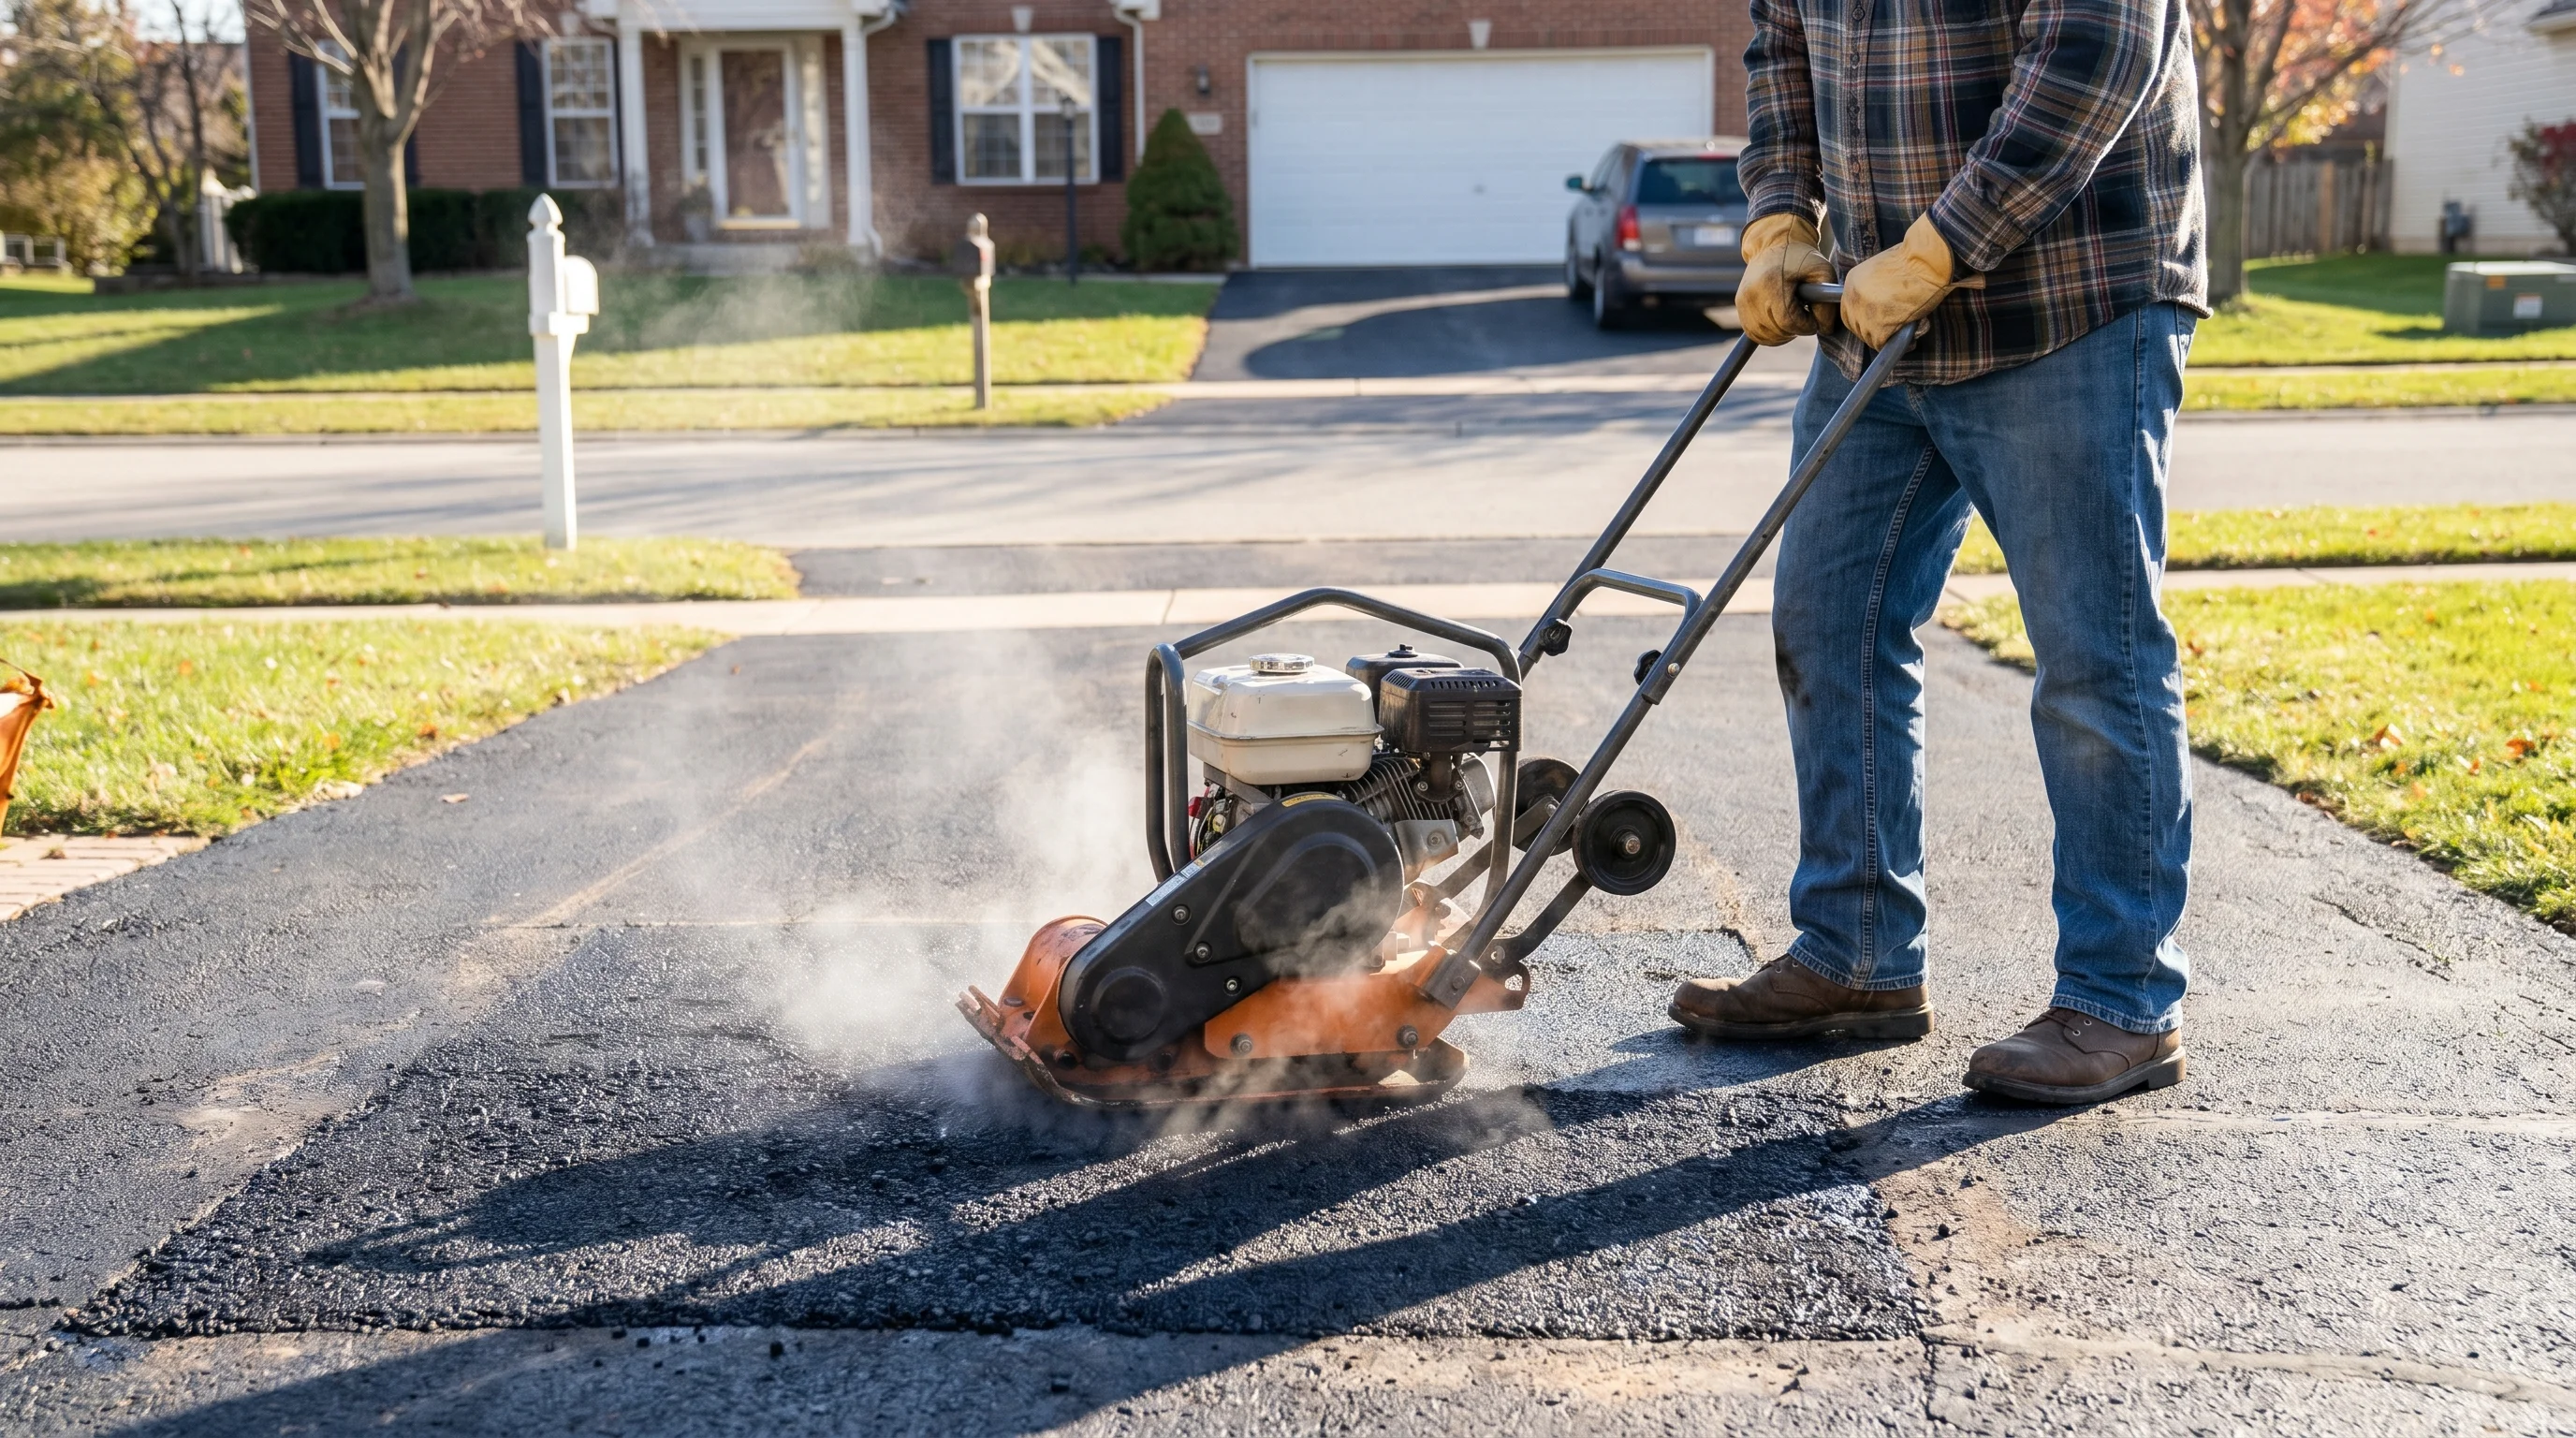
Recycled asphalt crushed and screened — compacts into a firm, dark surface similar in look to HMA. Best full-driveway DIY option. Needs a plate compactor.
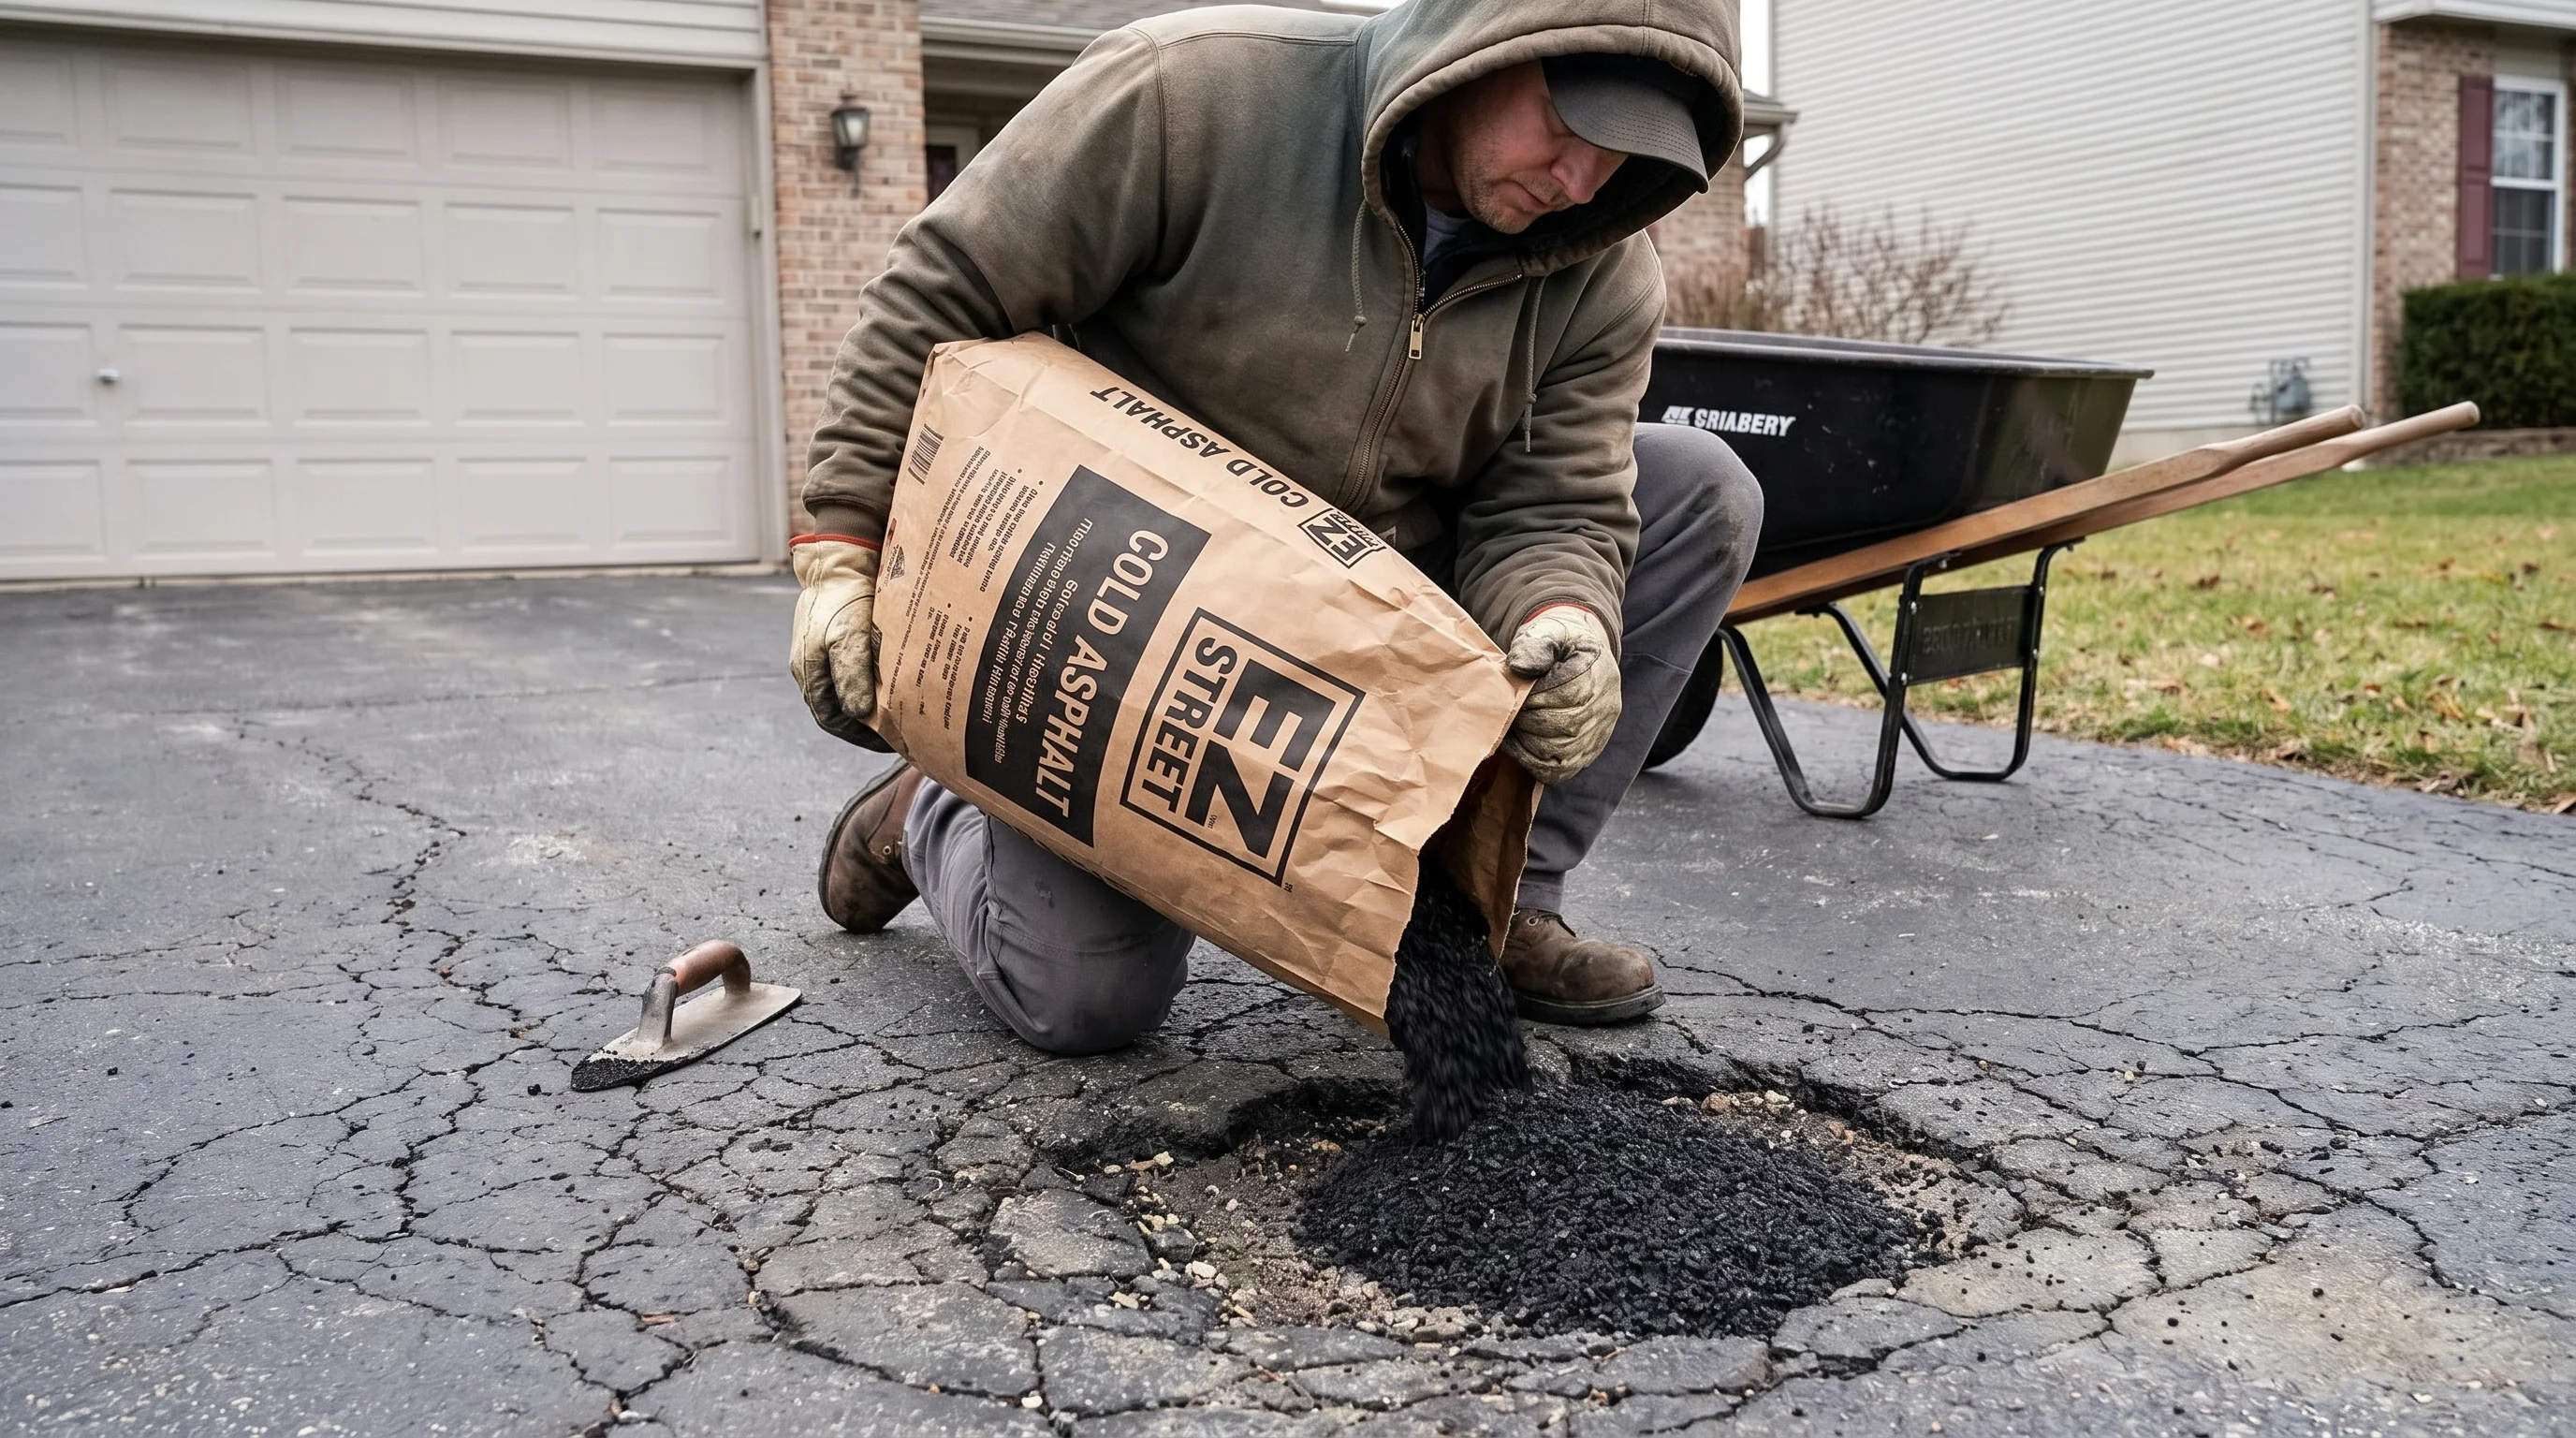
2. Cold-Mix Bags
Pre-mixed asphalt sold in 50 lb bags at hardware stores. Easy to apply, no equipment needed. Best for patches, potholes, and small repairs — not for full driveways.
3. Semi-DIY (Base Prep Only)
You excavate, grade, and compact the gravel base yourself. A contractor handles HMA delivery and paving. Saves $1,000–$2,500 while delivering a professional finish.
Tools & Equipment You Actually Need
| Tool / Equipment | Purpose | Rent or Buy | Approx. Cost |
|---|---|---|---|
| Plate compactor | Compacting base gravel and asphalt surface | Rent | $80–$150/day |
| Single-drum vibratory roller | Proper HMA compaction (required for hot-mix) | Rent | $250–$400/day |
| Asphalt lute / aluminum rake | Spreading and leveling HMA or millings | Buy | $40–$80 |
| Steel hand tamper | Compacting edges and tight areas | Buy | $25–$50 |
| Wheelbarrow | Moving material around the site | Buy/rent | $60–$120 |
| Landscape rake | Rough grading of base material | Buy | $25–$50 |
| String line + stakes | Setting grade and slope for drainage | Buy | $10–$20 |
| Garden hose / water source | Wetting base before compaction | Existing | — |
8-Step DIY Asphalt Driveway Installation (Millings Method)
-
1
Mark the driveway boundaries and check for underground utilities
Call 811 (US Dig Safe) before any excavation. Mark the driveway edges with stakes and string line. Plan for a 1–2% cross slope (about 1/4 inch per foot) to drain water away from the house and off the sides.
-
2
Excavate to proper depth
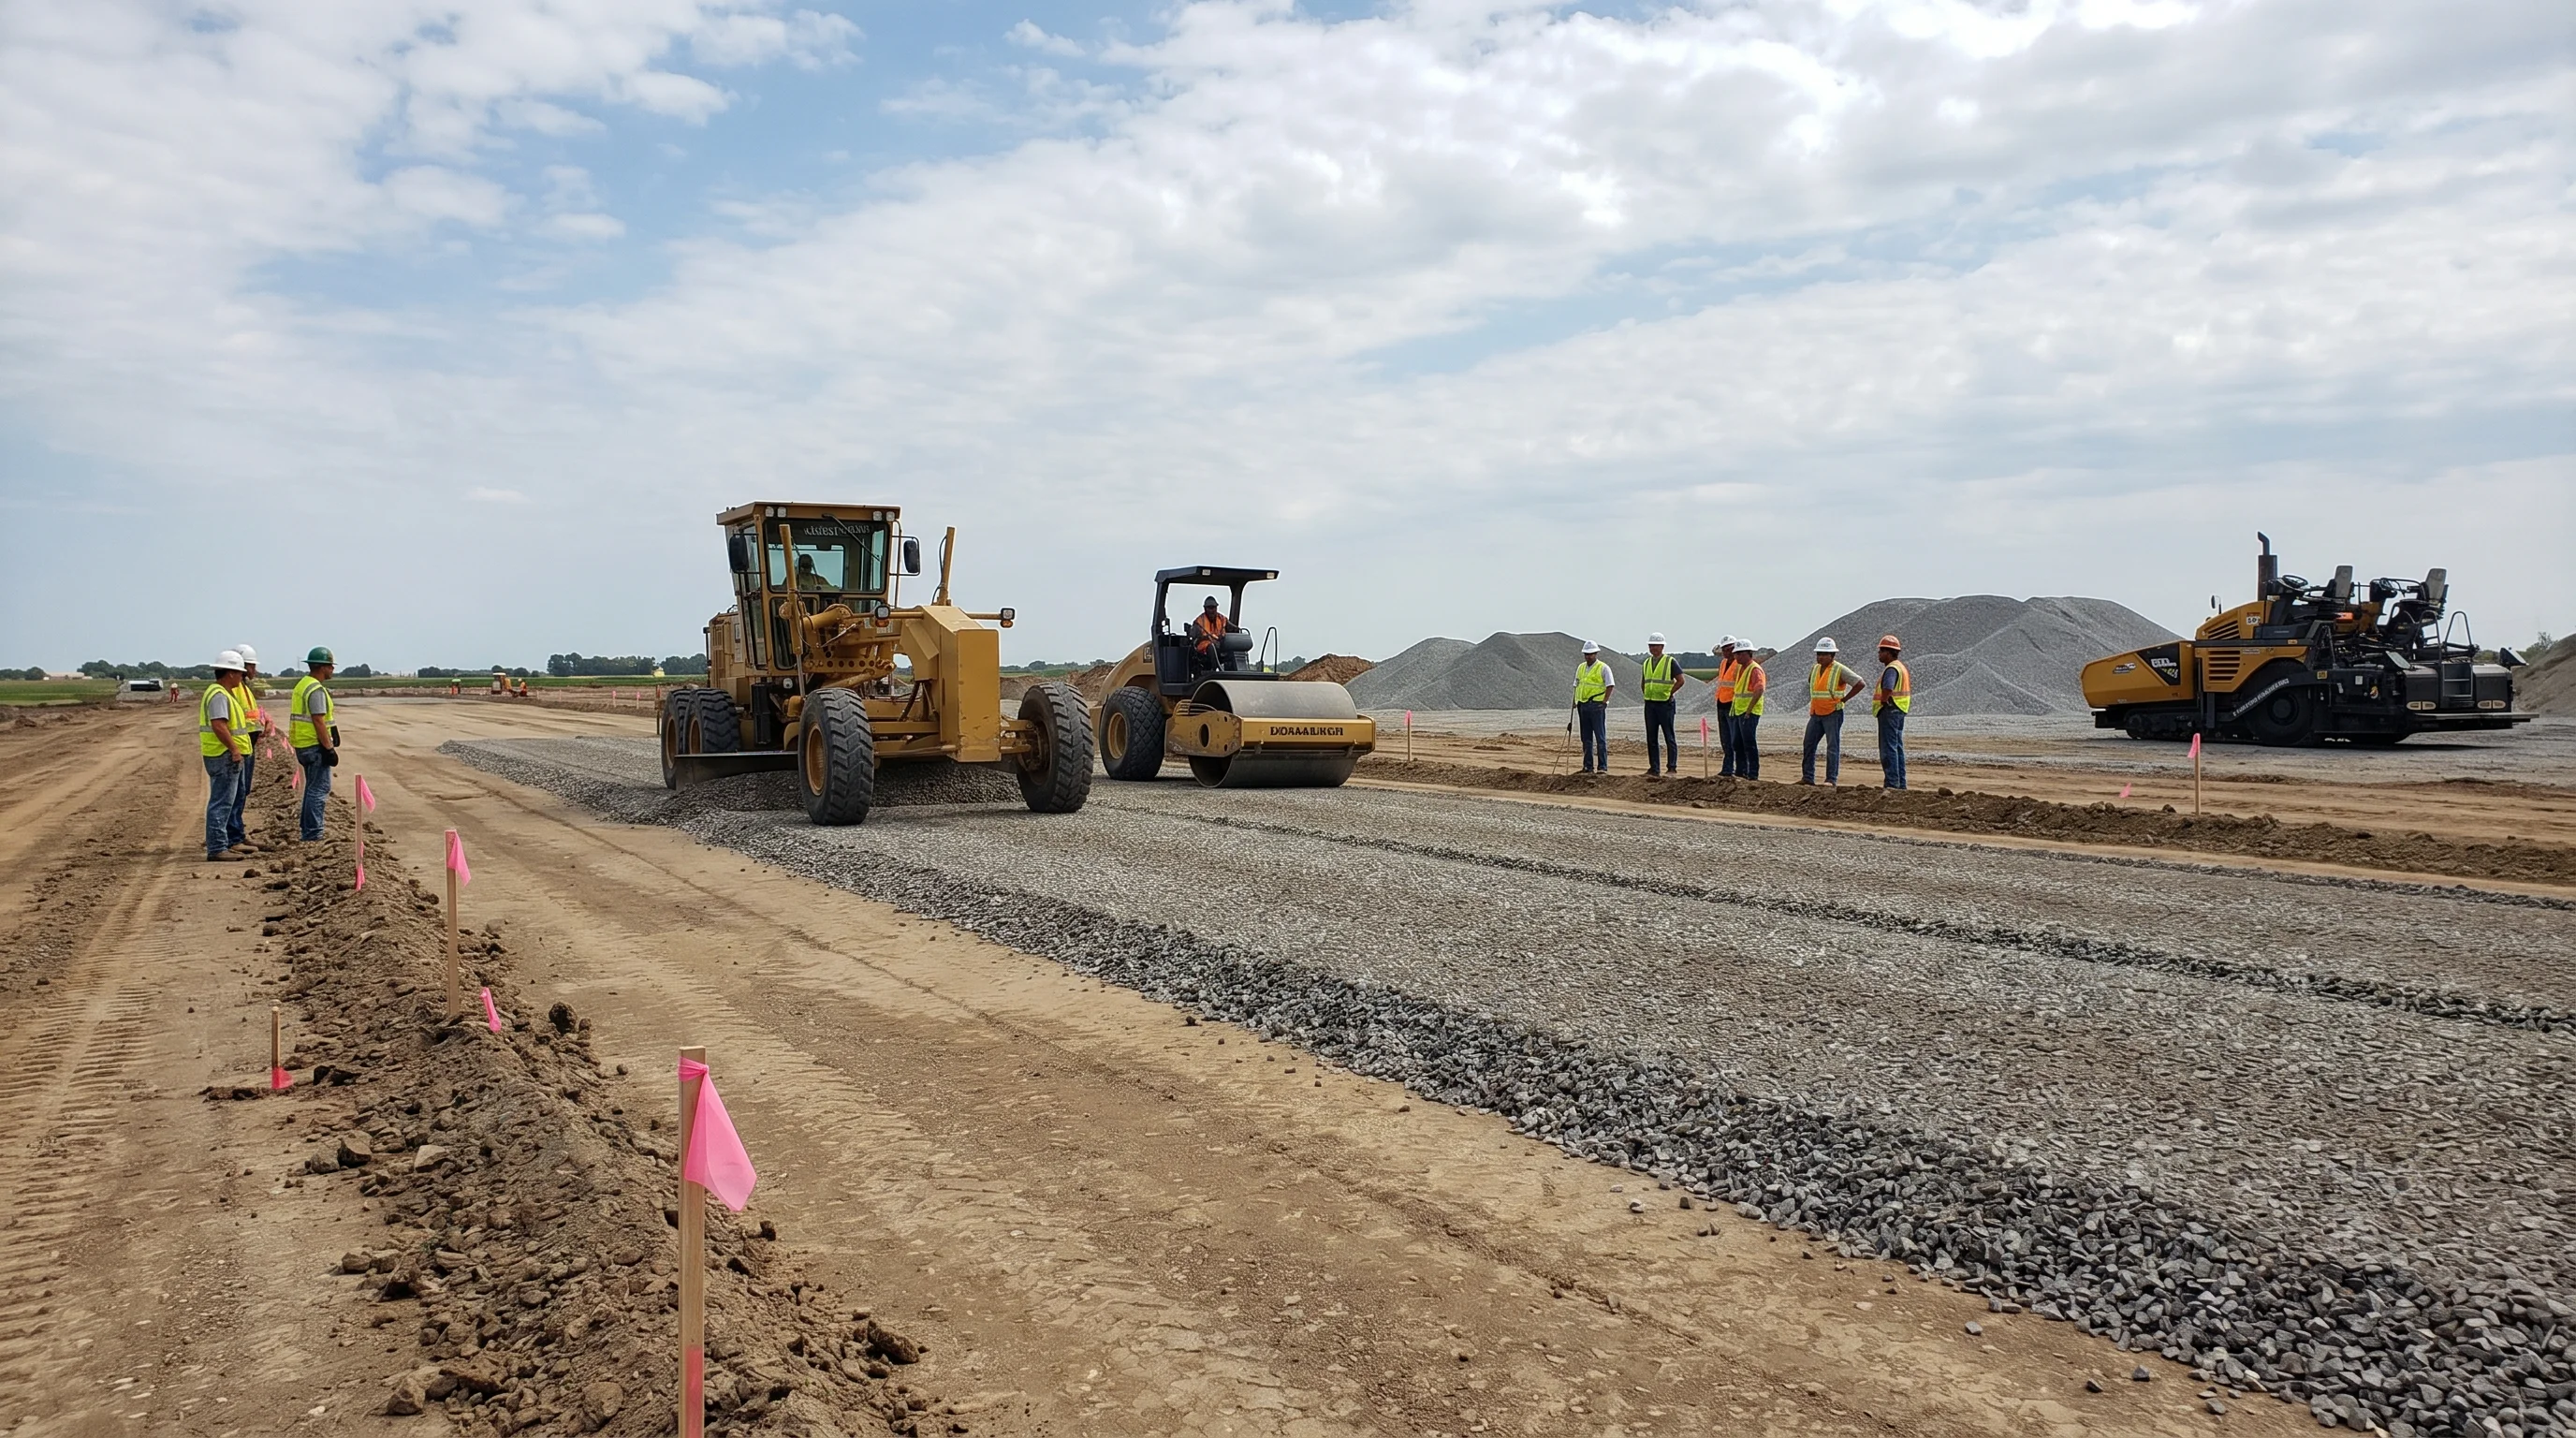
Remove existing soil, sod, and vegetation to a depth of 8–10 inches — 4–6 inches for the gravel base plus 3–4 inches for the asphalt millings surface layer. Use a skid steer or mini excavator (rent for $300–$500/day) for anything larger than a small driveway. Haul excavated material off-site or use it as fill elsewhere on the property.
-
3
Install and compact the gravel base
Spread 4–6 inches of compacted crushed gravel base (Class 2 or Class 3 aggregate). Compact in 2-inch lifts with a plate compactor — do not try to compact the full 6 inches in one pass. Wet the surface lightly before compacting. The base should be firm enough that a vehicle does not leave tire impressions. This step is the most important — a weak base causes premature failure regardless of what you put on top.
-
4
Order and deliver asphalt millings
Order millings from a local asphalt recycler, quarry, or aggregate supplier. You need approximately 1.5–2 tons per 100 sq ft at 3-inch compacted depth. A standard 600 sq ft driveway requires 9–12 tons. Order 10–15% extra for waste and edge tapering. Arrange delivery to the site — millings are typically delivered by dump truck in 10–20 ton loads.
-
5
Spread millings evenly across the surface
Use a landscape rake and asphalt lute to spread millings to a uniform depth of approximately 4 inches loose (will compact to roughly 3 inches). Work in sections from one end of the driveway to the other. Keep the surface as even as possible — high spots will remain high, low spots will remain low after compaction.
-
6
Compact the millings with a plate compactor
Make 3–4 passes with the plate compactor in overlapping strips. Lightly mist the surface with water before the first pass to help the millings bind together. The surface will darken and firm up as the asphalt binder in the millings activates under compaction pressure. On hot days, the binder becomes more pliable — ideal compaction conditions. Compact edges by hand with a steel tamper.
-
7
Check grade and fill low spots
After the first compaction pass, walk the surface and identify any low spots or uneven areas. Add millings to low spots, rake level, and re-compact. A 10-foot straightedge or long level helps identify depressions. The finished surface should have no standing water after a light rain — water should sheet off to the sides.
-
8
Allow to cure and apply sealant (optional)
Allow the millings surface to cure for 2–4 weeks before applying any sealant. During this time, vehicle traffic actually helps compact and bind the surface further. After curing, an asphalt emulsion sealer can be applied to reduce dust and improve appearance. Re-compact any areas that develop soft spots after the first few weeks of traffic.
Common DIY Mistakes and How to Avoid Them
| Mistake | Why It Fails | How to Avoid |
|---|---|---|
| Skimping on base depth | Surface cracks and settles within 1–3 years | Minimum 4 inches compacted gravel base — 6 inches for clay soils |
| Not compacting in lifts | Deep lifts don't compact fully — soft pockets remain | Compact in 2-inch lifts maximum for both base and surface |
| Ignoring drainage slope | Water pools on surface, accelerates cracking and erosion | Maintain 1/4 inch per foot minimum cross slope away from structures |
| Using cold-mix for full driveway | Under-compacts, stays soft, deteriorates in 2–4 years | Use millings for full driveway; cold-mix for patches only |
| Skipping the 811 dig-safe call | Risk of hitting buried utilities — gas, water, electric | Call 811 at least 3 business days before any excavation |
| Paving over soft or wet subgrade | Settlement and cracking regardless of surface quality | Allow subgrade to dry fully; add geotextile fabric if needed |
| Not compacting the edges | Edges crumble and break away first | Hand-tamp all edges firmly; berm up edges slightly for containment |
- You have time and are comfortable with physical labor but want a professional HMA finish
- Your driveway is larger than 800 sq ft — base prep savings scale with size
- You have access to a skid steer or mini excavator (rental or neighbor)
- You want to save $1,000–$2,500 without sacrificing surface quality or lifespan
- The existing base is already solid — you only need surface preparation
Tell the contractor you've handled excavation and base compaction. Get them to inspect the base before paving — most will do this at no charge and it protects both parties.
HMA leaves the plant at 275–325°F and must be placed and compacted before it cools to approximately 175°F — a window of roughly 30–45 minutes depending on ambient temperature. A full 600 sq ft driveway requires spreading 9–12 tons in that window, then immediately compacting with a vibratory roller before the material stiffens. Without a paving machine to spread uniformly and a roller for compaction, the result will be uneven, under-compacted, and significantly less durable than contractor-placed HMA. The equipment rental cost (roller alone: $250–$400/day) also erodes the savings versus hiring out.
Full Cost Breakdown — 600 sq ft Driveway
| Item | DIY (Millings) | Semi-DIY | Hire Contractor (HMA) |
|---|---|---|---|
| Excavation / removal | $0 (self) | $0 (self) | $300–$600 |
| Gravel base (4" compacted) | $250–$500 | $250–$500 | Included |
| Surface material | $600–$1,200 (millings) | Included in contractor | Included |
| Equipment rental | $150–$300 | $150–$300 | $0 |
| Contractor labor + HMA | $0 | $800–$2,000 | $1,200–$3,000 |
| Total estimate | $800–$1,800 | $1,200–$2,800 | $1,800–$4,200 |
| Expected lifespan | 10–20 years | 20–25 years | 20–30 years |
Frequently Asked Questions
Can you DIY an asphalt driveway?
Yes, with the right approach. Asphalt millings compacted with a rented plate compactor is the most achievable full-driveway DIY — it produces a firm, dark surface for $800–$1,800 on a standard 600 sq ft driveway. Full hot-mix asphalt DIY is extremely difficult without a paving machine and roller. Semi-DIY (you do base prep, contractor paves) is the best balance of savings and quality.
What equipment do you need to pave an asphalt driveway yourself?
At minimum: a plate compactor (rent for $80–$150/day), asphalt rake or lute, steel hand tamper for edges, and a wheelbarrow. For hot-mix HMA you also need a single-drum vibratory roller ($250–$400/day) — without it, compaction will be inadequate. A skid steer helps significantly for base grading on larger driveways.
How much does a DIY asphalt driveway cost?
A DIY asphalt millings driveway on a 600 sq ft site costs approximately $800–$1,800 in materials and equipment rental. A contractor installing hot-mix asphalt on the same site costs $1,800–$4,200. The gap is smaller than most expect because equipment rental (compactor, roller) adds up quickly on DIY hot-mix jobs.
Can you use cold-mix asphalt for a full driveway?
Not recommended. Cold-mix bags are designed for temporary patches and repairs, not full driveway installation. The material doesn't compact or cure as firmly as hot-mix, and a full driveway built from cold-mix will be soft, prone to rutting, and deteriorate quickly. Asphalt millings are a far better full-driveway DIY option.
How thick should a DIY asphalt driveway be?
The surface layer should be a minimum of 2–3 inches compacted depth. Below that, a 4–6 inch compacted gravel base is essential. Total structure depth of 6–9 inches minimum. Skimping on the base is the most common cause of early failure — the surface is only as good as what's underneath it.
How long does a DIY asphalt driveway last?
A properly installed asphalt millings driveway lasts 10–20 years. A semi-DIY approach with contractor-placed HMA lasts 20–25 years. Full hot-mix DIY without a roller typically lasts 10–15 years. Sealcoating every 3–5 years extends surface life regardless of installation method.
Do you need a permit to pave a driveway yourself?
It depends on your municipality. Many areas require a permit for new driveway installation — particularly where the driveway connects to a public road (curb cut permit). Resurfacing an existing driveway typically does not require a permit. Check with your local building department before starting to avoid fines or required removal.