Asphalt Driveway Maintenance — Complete Annual Schedule, Costs & DIY Guide (2026)
Quick Answer
Four tasks keep an asphalt driveway alive: annual inspection (spring and fall), crack filling as soon as cracks appear, sealcoating every 3–5 years, and prompt pothole repair. DIY annual cost: $50–$300. Done consistently, a properly installed driveway lasts 25–30 years instead of 10–15.
Why Maintenance Matters More Than the Install
A new asphalt driveway starts degrading the day it's paved. UV radiation oxidizes the bitumen binder, turning the surface from black to gray and making it brittle. Water infiltrates micro-cracks, freezes in winter, and expands — widening cracks into potholes. Without intervention, this cycle destroys a structurally sound driveway in a decade.
The math is simple: $150–$300 in annual maintenance prevents $5,000–$12,000 in premature replacement. Maintenance doesn't just preserve appearance — it preserves the base layer, which is the expensive part of any driveway.
Annual Maintenance Schedule
🌱 Spring (March–May)
- Full inspection after winter
- Fill all cracks over 1/8 inch
- Repair frost heave damage
- Clean oil and salt residue
- Check and clear drainage
☀️ Summer (June–August)
- Apply sealcoat (if due)
- Monitor for soft spots in heat
- Clean any new oil stains promptly
- Check edges after heavy rain
🍂 Fall (September–November)
- Second inspection before winter
- Fill any new cracks before freeze
- Clear leaves (trap moisture)
- Check sealcoat condition
- Repair potholes before frost
❄️ Winter (December–February)
- Use plastic shovels (not metal)
- Avoid rock salt — damages asphalt
- Use sand or calcium chloride instead
- Note damage locations for spring repair
| Task | Frequency | Best Timing | DIY Cost | Time Required |
|---|---|---|---|---|
| Full visual inspection | 2× per year | Spring & fall | $0 | 20–30 min |
| Surface cleaning | 1–2× per year | Spring, after winter | $10–$30 | 1–2 hours |
| Crack filling | As needed | Spring or fall, above 50°F | $10–$40/crack | 1–3 hours |
| Oil stain treatment | As needed | Immediately after spill | $10–$25 | 30–60 min |
| Sealcoating | Every 3–5 years | Summer (65–85°F) | $80–$200 | 4–6 hours |
| Pothole repair | As needed | Spring, above 40°F | $15–$50 | 1–2 hours |
| Edge restraint check | 1× per year | Spring | $0–$30 | 30 min |
| Drainage inspection | 1× per year | After heavy rain | $0 | 15 min |
Spring Inspection Checklist
The spring inspection is the most important maintenance task of the year. Winter is the most destructive season for asphalt — freeze-thaw cycles, snow plow damage, and salt infiltration all peak between December and March. Walk your entire driveway systematically:
- Cracks — mark any crack wider than 1/8 inch with chalk; these need filling before the next rain
- Alligator cracking — interconnected crack networks indicate base failure; note the location and size
- Heaving or frost upheaval — sections that lifted due to sub-surface ice; check whether they settled back flat
- Potholes — any hole or depression deeper than 1/2 inch needs patching before it expands
- Edge crumbling — edges lack lateral support and are the first to deteriorate; check both sides
- Surface color — uniformly gray surface means the binder has oxidized and sealcoating is due
- Water ponding — any area where water pools after rain indicates a grade issue or depression
- Drainage channels — clear any debris blocking catch basins or swales along the driveway
Crack Filling Guide
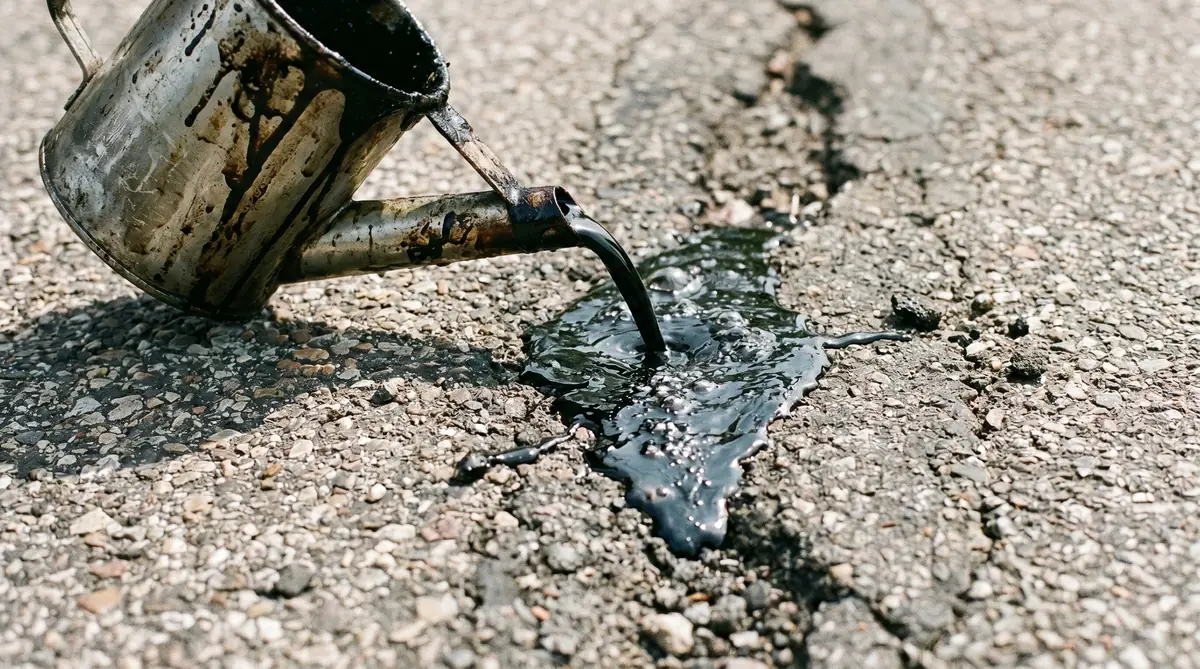
Crack filling is the highest-ROI maintenance task. A $12 bottle of crack filler seals a crack that, left open, will become a $200 pothole within two winters. The key is timing: fill cracks when they're still narrow and before water penetrates the base.
| Crack Type | Width | Treatment | DIY Product | Urgency |
|---|---|---|---|---|
| Hairline / surface cracks | < 1/8 inch | Sealcoat will cover; monitor | Sealcoat at next cycle | Low |
| Medium cracks | 1/8 – 1/2 inch | Liquid pour crack filler | Latex-ite, Quikrete, Gardner | High — fill this season |
| Wide cracks | 1/2 – 1 inch | Backer rod + liquid filler | Foam backer rod + pour filler | High — fill immediately |
| Edge cracks | Any | Filler + edge restraint | Pour filler + steel edging | High — spread rapidly |
| Alligator cracking | Network | Cold patch or hot mix; structural repair | Not DIY-fixable with filler | Call a contractor |
Crack Filling Step-by-Step
Clean the crack
Remove all vegetation, dirt, and debris using a wire brush, screwdriver, or compressed air. Crack filler does not bond to dirty surfaces — this step determines how long the repair lasts.
Let it dry completely
Never fill a wet crack. If it rained recently, wait at least 24 hours. Use a heat gun or propane torch to dry stubborn moisture from deep cracks before filling.
Install backer rod if needed
For cracks deeper than 1/2 inch, press foam backer rod into the crack to within 1/4 inch of the surface. This prevents filler from sinking and wasting material.
Apply crack filler
Pour or squeeze filler into the crack, slightly overfilling (proud of the surface by 1/8 inch). Work in sections of 3–4 feet at a time. For pour-pot filler, tilt and move steadily along the crack.
Tool flush and feather edges
Use a putty knife or margin trowel to push filler down into the crack and level it flush with the surface. Feather the edges so there's no bump that can catch snowplow blades.
Allow full cure before traffic
Most latex crack fillers are dry to the touch in 1–4 hours but need 24–48 hours before vehicle traffic. Check the product label — some rubberized fillers need 6+ hours minimum.
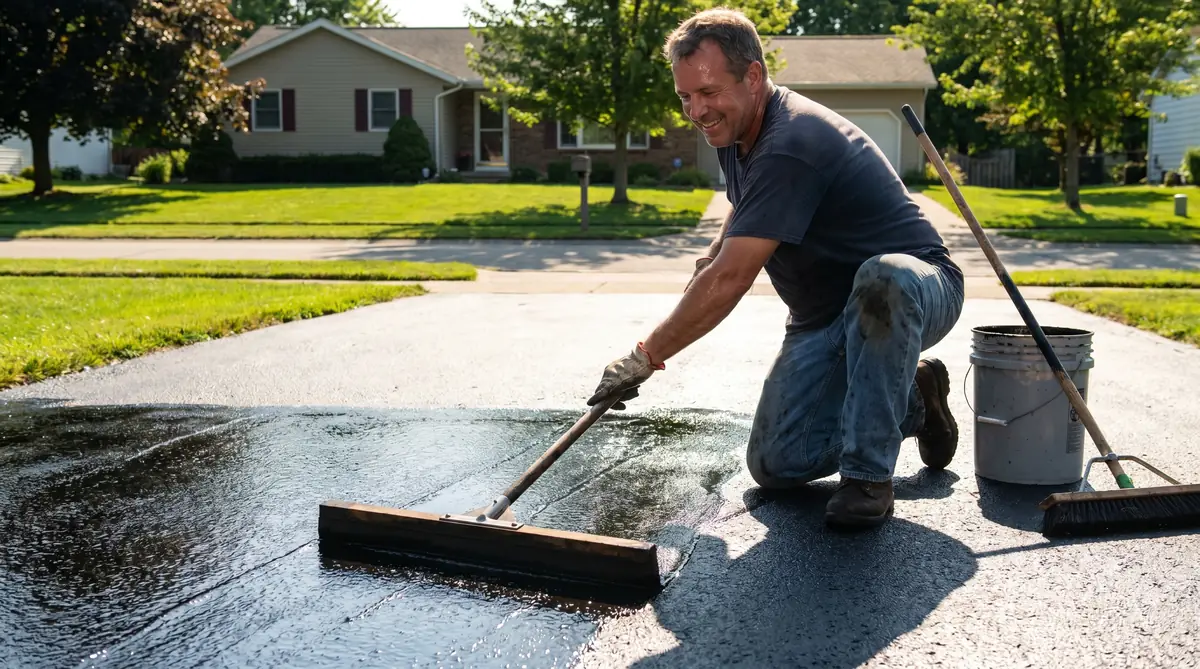
Sealcoating — Timing, Cost & Application
Sealcoating protects the bitumen binder from UV oxidation and water infiltration. It's the single most impactful cosmetic and protective treatment for an asphalt driveway. For full guidance, see our complete sealcoating cost guide.
| DIY | Professional | |
|---|---|---|
| Cost (600 sq ft driveway) | $80–$200 | $150–$400 |
| Materials | 5-gallon pail ($40–$80) × 2 | Bulk emulsion, spray equipment |
| Application tool | Squeegee or brush ($15–$30) | Spray system or squeegee |
| Coats | 2 coats recommended | 2 coats standard |
| Dry time before traffic | 24–48 hours | 24–48 hours |
| Longevity | 2–4 years | 3–5 years |
Cleaning Your Asphalt Driveway
Pressure Washing Rules
Pressure washing is effective for removing dirt, algae, and surface stains — but it can damage asphalt if used incorrectly. Follow these limits:
- Max PSI: 1,500–2,000. Higher pressure erodes aggregate from the surface, especially on older or unsealed asphalt.
- Nozzle angle: 25–40 degrees, never a zero-degree pinpoint stream directly on asphalt.
- Distance: minimum 12 inches from the surface at all times.
- Do not power wash within 30 days of fresh sealcoating — it strips the new coat.
Oil Stain Removal
| Stain Age | Method | Product | Effectiveness |
|---|---|---|---|
| Fresh (< 24 hrs) | Absorb with cat litter, sweep, degrease, scrub, rinse | Simple Green, Oil Eater, Purple Power | Excellent — near-complete removal |
| Recent (1 day – 2 weeks) | Apply degreaser, dwell 15–30 min, scrub, repeat 2× | Zep Purple, Krud Kutter, TSP | Good — significant fading |
| Set (2 weeks – 6 months) | Petroleum degreaser, heat gun, scrub, repeat 3× | WD-40 + degreaser, or poultice | Fair — stain lightens but may not fully clear |
| Old (> 6 months) | Treat, accept residual, cover with sealcoat | Any degreaser | Cosmetic only — cover with sealer |
Winter Salt Damage
Rock salt (sodium chloride) is the most common driveway de-icer but it's also the most damaging to asphalt. Salt accelerates the freeze-thaw cycle by lowering the freezing point while drawing moisture into micro-cracks. Over multiple winters, this causes surface scaling and accelerated deterioration.
Better alternatives: Calcium chloride (works to −25°F, gentler on asphalt), magnesium chloride, or plain sand for traction. If you use rock salt, rinse the driveway in spring to remove residue before it works into unsealed cracks.
Pothole Repair
Potholes start as cracks that let water infiltrate the base layer. The base softens, the surface above loses support, and traffic loads punch it through. Catch potholes early — a 6-inch pothole is a $20 repair; a 24-inch pothole is a $300+ professional job.
| Pothole Size | Best Repair Method | DIY Cost | Expected Life |
|---|---|---|---|
| Under 6 inches diameter, under 2 inches deep | Cold patch, hand-tamp or plate compact | $15–$25 (1 bag) | 1–3 years |
| 6–18 inches, 2–4 inches deep | Cold patch in 2 lifts, plate compactor | $30–$75 (2–4 bags) | 2–5 years |
| Over 18 inches or structural damage | Professional hot mix patch | $150–$400 pro | 10–15 years |
| Widespread (alligator cracking + potholes) | Full-depth reclamation or overlay | $2,000–$6,000 pro | 15–25 years |
See our detailed guide on asphalt repair products for brand comparisons and coverage data across every cold patch and crack filler product category.
Edge Maintenance
Driveway edges are the most vulnerable section of any asphalt surface. Unlike the main field of pavement, edges have no lateral support — vehicles that drive half-on, half-off repeatedly apply load to unsupported asphalt, causing crumbling and spreading that works inward over time.
- Install steel or plastic landscape edging along both sides and stake every 18 inches
- Keep grass and soil from building up against the edge — water channels along this seam
- Fill edge cracks with pour filler immediately — edge cracks spread faster than field cracks
- Avoid driving with one set of tires on the edge — train all drivers to stay centered
- If edges have crumbled, a cold patch border repair can rebuild the profile before deterioration spreads inward
Drainage Maintenance
Standing water is asphalt's worst enemy. Even a properly paved driveway will fail prematurely if drainage is compromised. Check drainage annually and after every major rain event.
| Drainage Problem | Sign | Solution |
|---|---|---|
| Surface ponding | Water pools on driveway after rain | Check grade — may need resurfacing with correct crown or slope |
| Edge erosion | Soil washing onto driveway edge | Install edging, re-grade adjacent soil away from driveway |
| Blocked catch basin | Water backs up in low point | Clear debris from grate; flush basin with hose |
| Base saturation | Soft spots that flex underfoot after rain | Professional base repair or French drain installation |
| Runoff from roof or yard | Water flows across driveway from one side | Install swale or channel drain to intercept before it reaches pavement |
10-Year Maintenance Cost Analysis
The math on maintenance vs neglect is stark. Here's what a maintained vs unmaintained 600 sq ft driveway costs over 10 years:
| Task | Frequency | DIY Cost Each | Pro Cost Each | 10-Yr DIY Total |
|---|---|---|---|---|
| Crack filling | 2× / year | $20 | $150 | $400 |
| Sealcoating | Every 4 years | $150 | $300 | $375 |
| Cleaning / degreasing | 1× / year | $20 | $100 | $200 |
| Pothole repair | Every 3 years | $40 | $200 | $130 |
| Edge maintenance | Every 5 years | $30 | $150 | $60 |
| Total maintained (DIY) | ~$1,165 | |||
| Total maintained (pro) | ~$4,800 | |||
| Unmaintained — early replacement | Year 12–15 | Full replacement | $3,600–$8,400 | |
When to Call a Professional
DIY maintenance handles the vast majority of asphalt driveway care — but some conditions require professional assessment and repair:
- Alligator cracking covering more than 20% of the surface — indicates base layer failure; no surface treatment will fix this
- Sunken sections where water consistently ponds — sub-grade settlement or drainage failure requiring base repair
- Potholes larger than 18 inches in any dimension — DIY cold patch won't hold under normal vehicle loads
- Frost heave that created permanent raised sections — may indicate drainage or base compaction issues
- Driveway over 20 years old with widespread surface fatigue — resurfacing overlay is more cost-effective than patching individual failures
- Soft spots that flex under a parked vehicle — base saturation from drainage failure; requires excavation
Frequently Asked Questions
How do you maintain an asphalt driveway?
Four core tasks: annual inspection (spring and fall), crack filling as soon as cracks appear, sealcoating every 3–5 years, and prompt pothole repair. Clean oil stains immediately and avoid rock salt in winter. DIY annual cost: $50–$300.
How often should you seal an asphalt driveway?
Every 3–5 years. Sealing too frequently (annually) builds up excessive layers that crack and peel. Signs it's time: surface has faded gray, small surface cracks are forming, and water no longer beads on the surface. Never seal asphalt less than 90 days old.
How much does asphalt driveway maintenance cost per year?
DIY: $50–$300/year averaged over the maintenance cycle. Professional: $200–$800/year averaged. Over 10 years, a maintained driveway costs $1,200–$4,800 in upkeep — vs $3,600–$8,400 for premature replacement of a neglected one.
What is the best way to fill cracks in an asphalt driveway?
For cracks under 1/2 inch: liquid pour crack filler (Latex-ite, Quikrete) applied to a dry, clean crack. For cracks 1/2–1 inch: backer rod first, then filler. For alligator cracking or cracks over 1 inch: cold patch or professional hot mix — crack filler alone won't hold.
How do you remove oil stains from an asphalt driveway?
Fresh oil: absorb with cat litter, then apply degreaser (Simple Green, Oil Eater), scrub, rinse. Set stains: apply petroleum degreaser, dwell 15–30 min, scrub, repeat. Very old stains may not fully clear — degrease as much as possible, then cover with sealcoat.
When should you not sealcoat an asphalt driveway?
Don't sealcoat when: asphalt is less than 90 days old, temperature is below 50°F or above 90°F, rain is forecast within 24 hours, humidity is above 80%, existing sealcoat is less than 3 years old, or there is active structural damage (alligator cracking, potholes).
How long does an asphalt driveway last with proper maintenance?
25–30 years. Without maintenance: 10–15 years. Key factors are proper base installation, prompt crack filling, sealcoating on schedule, and good drainage. A resurfacing overlay at year 15–20 can extend life another 10–15 years.
What are the signs that an asphalt driveway needs professional repair?
Alligator cracking over 20% of the surface, sunken sections with water pooling, potholes over 18 inches, frost heave creating permanent raised sections, driveway over 20 years old with widespread fatigue, or soft spots flexing under parked vehicles.