Asphalt Driveway Installation — Complete Process, Cost & What to Expect (2026)
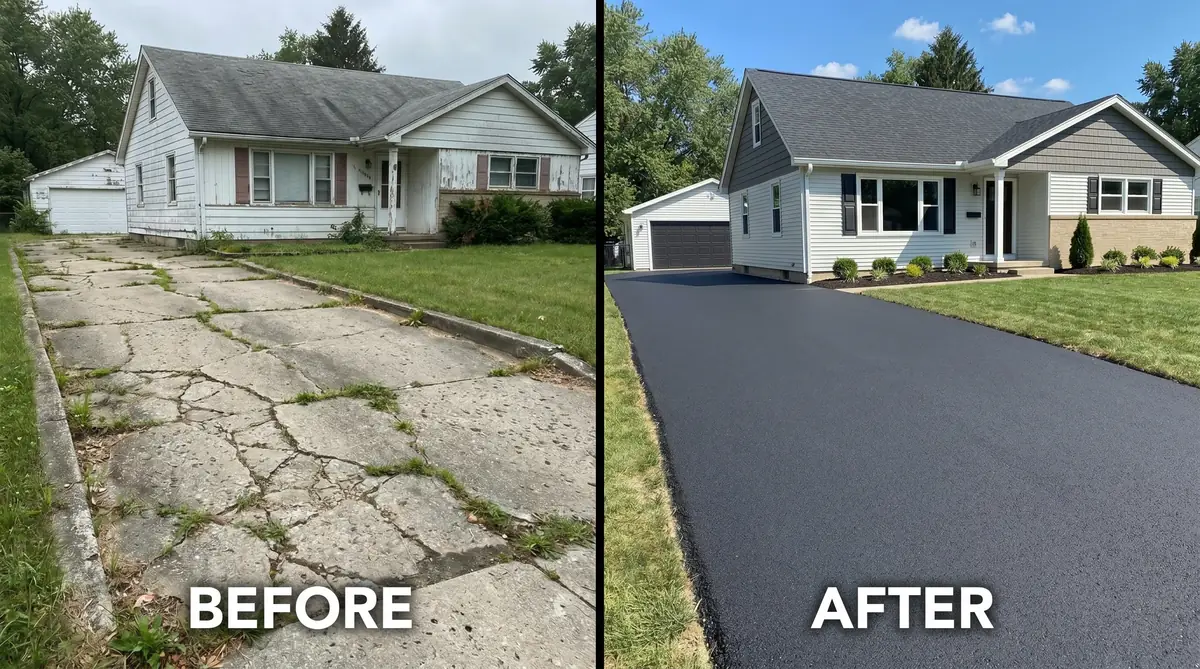
A new asphalt driveway installation transforms your property's entrance and adds real value to your home. But the process — from site prep to the final roller pass — involves more steps than most homeowners expect. Understanding each phase before work begins helps you verify the job is being done right, avoid costly mistakes, and know exactly what questions to ask when getting quotes.
This guide walks through the complete installation process step by step, breaks down the 2026 cost, explains what affects the timeline, and gives you the contractor questions that separate professional crews from cut-rate operators. Use our Asphalt Project Calculator to estimate your specific cost before calling anyone.
In this guide
The Asphalt Driveway Installation Process — Step by Step
A professionally installed asphalt driveway follows a specific sequence. Each step builds on the last — rushing or skipping any phase leads to premature failure. Here is what a proper installation looks like from start to finish:
-
Site assessment and layout
The crew marks the driveway boundary, checks for underground utilities (call 811 before any digging), evaluates soil conditions, and establishes drainage slope. The driveway should slope away from the house at a minimum 1–2% grade to prevent water pooling near the foundation. -
Demolition and removal of existing material
Old asphalt, concrete, gravel, or vegetation is removed and hauled away. Existing asphalt is typically broken up with a jackhammer or skid steer and loaded into a dump truck. This step adds $1–$3/sq ft to the total cost but is essential — paving over unstable old material causes the new surface to mirror existing cracks within 1–3 years. -
Subgrade preparation and grading
The soil subbase is graded to the correct slope, compacted with a vibratory roller, and checked for soft spots. Any weak areas (often found over clay soil or old tree roots) are excavated deeper and filled with compacted aggregate. This step determines whether your driveway lasts 5 years or 25 years — it's the most important and the least visible. -
Gravel base installation
A 4–6 inch layer of crushed stone or Class 5 gravel is spread over the prepared subgrade. This base layer distributes vehicle load across the soil, provides drainage, and prevents frost heave in cold climates. The gravel is compacted in lifts to at least 95% proctor density. Never skip this layer — asphalt over bare soil will crack and sink within a season. -
Edge forming
Steel forms or temporary wooden boards are set along the driveway edges to contain the asphalt during paving. The edges are the most vulnerable part of any asphalt driveway — unsupported edges crumble under vehicle tires. Some contractors install permanent steel or aluminum edging; others rely on compacted backfill after paving. -
Tack coat application (if overlay)
If paving over an existing asphalt or concrete surface, a tack coat (liquid asphalt emulsion) is sprayed onto the old surface first. The tack coat bonds the new asphalt layer to the existing pavement. Without it, the new layer can delaminate and slide under braking forces. -
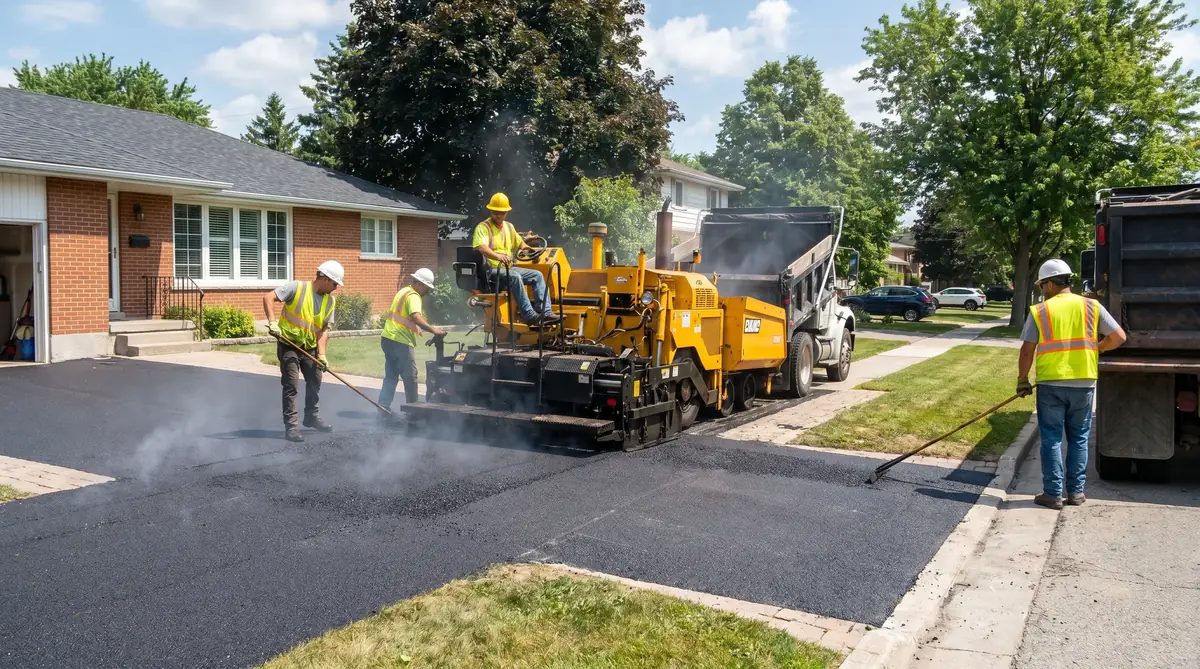
Hot mix asphalt delivery and placement
The asphalt paver machine spreads hot mix asphalt (HMA) at 275–325°F across the prepared base. The paver screed pre-compacts the material and sets the thickness. A good paving crew works continuously — stopping the paver mid-run creates a cold joint that is a future crack point. -
Compaction
Steel drum rollers make multiple passes over the fresh asphalt while it's still hot enough to compact. Breakdown rolling happens immediately after paving, intermediate rolling achieves target density (92–96% of theoretical maximum), and finish rolling closes the surface texture. Compaction is what locks the aggregate together and creates durability. -
Edge cleanup and backfill
Forms are removed and the edges are cleaned. Soil or crushed stone is backfilled against the asphalt edges and compacted to provide lateral support. A well-supported edge resists the chipping and crumbling that makes driveways look old within a few years. -
Final inspection
The crew checks surface smoothness, drainage slope, edge quality, and compaction. Any low spots or rough patches are addressed before the crew leaves. Walk the finished surface yourself and confirm water drains correctly — check during the next rain if possible.

Understanding the Layers of an Asphalt Driveway
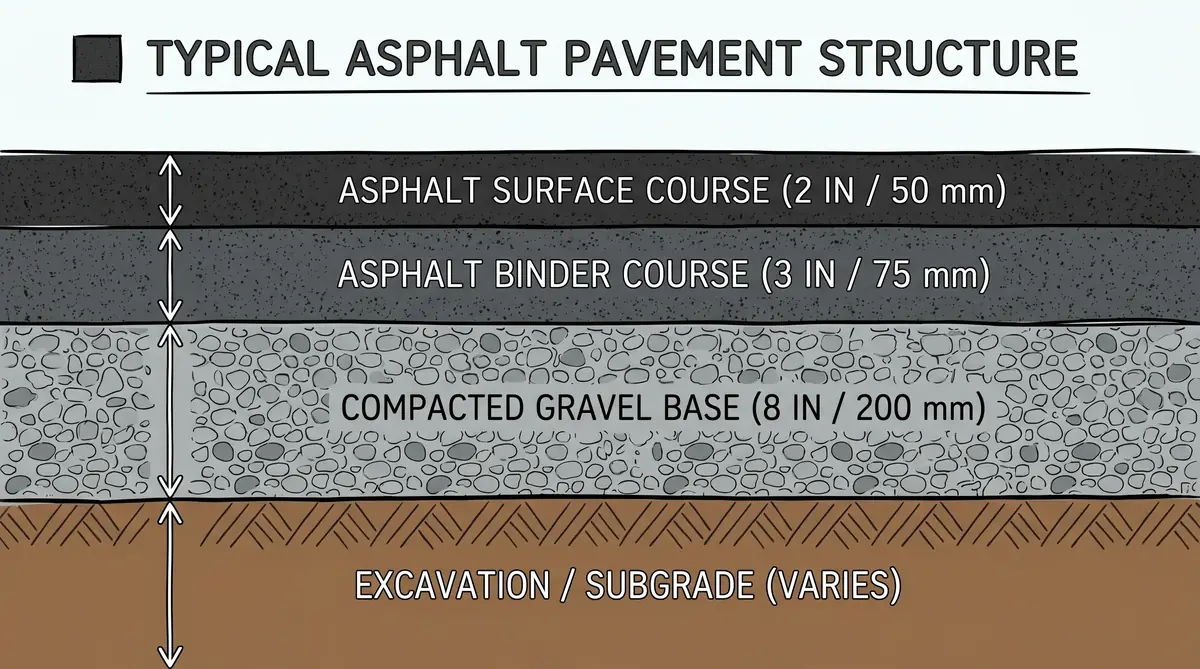
A properly built asphalt driveway is a layered system, not just asphalt on dirt. Each layer has a specific structural role:
| Layer | Thickness | Purpose |
|---|---|---|
| Subgrade (native soil) | 12+ inches | Ultimate load-bearing foundation. Must be stable and well-drained. |
| Gravel base (crushed stone) | 4–6 inches compacted | Load distribution, drainage, frost protection. |
| Binder course (coarse HMA) | 2–3 inches (heavy traffic) | Structural layer for roads and commercial projects. |
| Surface course (fine HMA) | 2–3 inches compacted | Wearing surface — what you see and drive on. |
For a standard residential driveway, only the gravel base and surface course are required — total depth of 6–9 inches from subgrade to finished surface. Commercial parking lots and roads add a binder course for additional structural capacity.
Red flag: Any contractor who quotes a new driveway without mentioning base preparation or excavation depth is skipping the most critical steps. Ask specifically: "How deep will you excavate? How thick will the base be? What will the finished asphalt thickness be?" Get the answers in writing.
Asphalt Driveway Installation Cost Breakdown (2026)
The total cost of a new asphalt driveway depends on your location, project size, site conditions, and whether you're replacing existing pavement. Here is a realistic breakdown for a standard 600 sq ft residential driveway:
| Cost Component | Estimate | Notes |
|---|---|---|
| Excavation & grading | $300–$900 | Deeper excavation on soft soil = higher cost |
| Old driveway removal | $600–$1,800 | Only if replacing existing asphalt or concrete |
| Gravel base (4–6 inches) | $200–$500 | 12–15 tons of crushed stone at $15–$35/ton |
| Asphalt materials (2–3 inches) | $600–$1,000 | 11–13 tons at $80–$120/ton plant price |
| Labor & equipment | $700–$1,500 | Paving crew, paver machine, roller |
| Total — new driveway | $1,800–$3,900 | No removal; bare ground start |
| Total — replacement | $2,800–$6,000 | Includes old surface removal |
Cost per square foot ranges $3–$7 for new installs and $4–$9 for replacements. Larger driveways get lower per-sq-ft pricing. Use our Asphalt Project Calculator to run your exact numbers, or see the Asphalt Driveway Calculator for material-only quantities.
Factors That Increase Cost
- Soft or unstable soil — requires deeper excavation and more base material
- Slopes and curves — slower paving and additional hand work
- Narrow access — smaller equipment needed, higher labor cost
- Tree root removal — roots must be removed or they push through asphalt within 2–3 years
- Drainage features — catch basins, French drains, or channel drains add $500–$2,000
- Cold climate preparation — extra base depth and thicker asphalt layer
Timeline — How Long Does Installation Take?
| Phase | Duration | Notes |
|---|---|---|
| Excavation & base prep | Half day – 1 day | Longer for soft soil or large projects |
| Asphalt paving | 4–8 hours | Most 600–800 sq ft driveways in one session |
| Walk on driveway | After 24 hours | Surface firm but still warm |
| Drive passenger cars | After 2–3 days | Avoid sharp turns and standing vehicles |
| Heavy vehicles (trucks, RVs) | After 2 weeks | Surface still curing under load |
| Full cure | 6–12 months | Surface hardens fully through first summer |
| First sealcoat | 6–12 months after paving | Wait for full cure before sealing |
Don't sealcoat too early
Many contractors offer to sealcoat immediately after paving. Refuse it. New asphalt needs 6–12 months to off-gas its volatile oils and fully cure. Sealing too early traps those oils in, softens the surface, and reduces long-term durability. Wait a full year before your first sealcoat application.
DIY vs Hiring a Contractor
Hot mix asphalt installation is not a realistic DIY project for most homeowners. Here is why:
- Equipment required: An asphalt paver machine ($100,000+), steel drum rollers, and dump trucks. Rental is not widely available for hot mix equipment.
- Temperature window: HMA must be laid at 275–325°F and compacted before it cools below 185°F. You have minutes, not hours, to work.
- Plant access: Hot mix asphalt is produced at an asphalt plant and must reach the job site within 30–90 minutes. Plants typically require minimum order quantities.
What you CAN do yourself to reduce cost:
- Clear the area and remove vegetation before the crew arrives
- Mark underground utilities (call 811 — it's free)
- Install your own gravel base with a rented plate compactor
- Backfill and compact the edges after paving
- Apply your own sealcoat after the 6–12 month cure period
If budget is the primary concern and appearance is flexible, consider asphalt millings — a DIY-friendly recycled asphalt option at 50–75% less cost than new asphalt.
Best Time of Year to Install an Asphalt Driveway
| Season | Suitability | Notes |
|---|---|---|
| Late spring (May–June) | Excellent | Warm temps, contractors available, ground not frozen |
| Summer (July–August) | Good | Peak demand — book early, prices may be higher |
| Early fall (Sept–Oct) | Best value | Contractors slow down, prices drop, good paving temps |
| Late fall (Nov) | Marginal | OK if daytime temps stay above 50°F |
| Winter / frozen ground | Not recommended | Cold asphalt won't compact properly; base may be frozen |
Best timing strategy
Get your quotes in spring, schedule for September or October. You'll get the best availability, slightly lower prices as the season winds down, and cooler temperatures that make asphalt easier to work with. Contractors are less rushed and more likely to take care with prep work.
10 Questions to Ask Your Paving Contractor
These questions separate quality crews from ones who will cut corners on your job:
- How deep will you excavate, and how thick will the base be? Correct answer: 4–6 inches of gravel base minimum for residential.
- What asphalt mix are you using, and what will the finished thickness be? Correct: 2–3 inches of compacted hot mix asphalt for driveways.
- Do you use a paver machine or hand-lay the asphalt? Machine-laid is more uniform and better compacted.
- How many roller passes will you make? A minimum of 3–4 passes is needed for proper compaction.
- Do you handle edge support, and how? Edges need lateral support — either permanent edging or compacted backfill immediately after paving.
- Is the estimate line-itemized? You should see excavation, base, asphalt, and labor broken out separately.
- What's your warranty? A reputable contractor offers at least a 1-year workmanship warranty.
- Are you licensed, bonded, and insured? Verify before signing anything.
- Can I see recent local references? Ask for driveways installed in the past 2 years you can drive by.
- Do you handle permits if required? Some municipalities require permits for new impervious surfaces.
After Installation — Curing and First-Year Care
The first year is the most critical period for a new asphalt driveway. Proper care during this window directly determines how long your surface lasts.
First 72 Hours
- Stay off the driveway completely for the first 24 hours
- Passenger cars only after 48–72 hours — no trucks, RVs, or delivery vehicles
- Avoid sharp turns — they shear the surface when it's still soft
- Do not park in the same spot every day — concentrated weight creates ruts
First Month
- Keep vehicle jacks, bike kickstands, and lawn furniture off the surface — point loads sink into fresh asphalt
- Avoid gasoline, motor oil, and power steering fluid spills — petroleum solvents dissolve asphalt binder
- Expect the surface to feel slightly soft on very hot days — this is normal and resolves as the asphalt cures
Year 1
- Fill any cracks wider than ¼ inch before winter — water in cracks freezes, expands, and widens them dramatically. See our asphalt crack filler guide.
- Do not sealcoat until 6–12 months after installation. New asphalt needs to off-gas oils before sealing.
- At 6–12 months: apply your first asphalt sealer to lock in the surface and start the protection cycle
- After that, sealcoat every 2–3 years to maintain the surface and extend driveway life by years
Frequently Asked Questions
How long does asphalt driveway installation take?
Most residential driveways are installed in one day, sometimes two if site preparation is extensive. The actual asphalt paving takes 4–8 hours for a standard 600–800 sq ft driveway. You can walk on it after 24 hours and drive on it after 2–3 days. Full cure takes 6–12 months.
How much does a new asphalt driveway cost in 2026?
A new 600 sq ft asphalt driveway costs $1,800–$3,900 installed starting from bare ground. Replacing an existing driveway (including removal) costs $2,800–$6,000. Per square foot: $3–$7 for new installs, $4–$9 for replacements. Use our project calculator for your exact dimensions.
How thick should a residential asphalt driveway be?
2–3 inches of compacted hot mix asphalt over a 4–6 inch compacted gravel base is the residential standard. Total system depth: 6–9 inches. For RVs, trucks, or heavy vehicle traffic, use 3–4 inches of asphalt over 6–8 inches of base. Cold climates: add 1 inch to both layers.
How long does an asphalt driveway last?
A properly installed asphalt driveway lasts 20–30 years with regular maintenance. The key factors are base quality, asphalt thickness, drainage, and sealcoating every 2–3 years. See our full asphalt driveway lifespan guide for what affects longevity.
When can I drive on a newly installed asphalt driveway?
Passenger vehicles: 2–3 days after installation. Heavy vehicles and trucks: wait at least 2 weeks. Avoid sharp turns, standing vehicles in one spot, and pointed supports (kickstands, jacks) for the first month. The surface is fully cured and at maximum hardness after 6–12 months.
Do I need a permit to install an asphalt driveway?
Most residential driveways don't require a permit, but this varies by municipality. Some areas require permits for new impervious surfaces due to stormwater regulations. HOA communities may require design approval. Check with your local building department and HOA before scheduling work.