How to Remove Asphalt from a Car — 5 Safe Methods for Car Paint (2026)
Fastest Safe Method
Spray a dedicated automotive tar remover (Turtle Wax Bug & Tar Remover, Meguiar's Heavy Duty Tar Remover, or 3M Adhesive Remover) directly on the asphalt spots. Let it soak for 1–2 minutes, then gently wipe with a clean microfiber cloth using light, circular pressure. Repeat if needed. Finish with a car wash and fresh wax coat.
No dedicated product on hand? WD-40 works — spray, wait 2 minutes, wipe. It's paint-safe and removes fresh asphalt effectively. Follow with a wash to remove the oil residue.
Why Asphalt Sticks to Car Paint
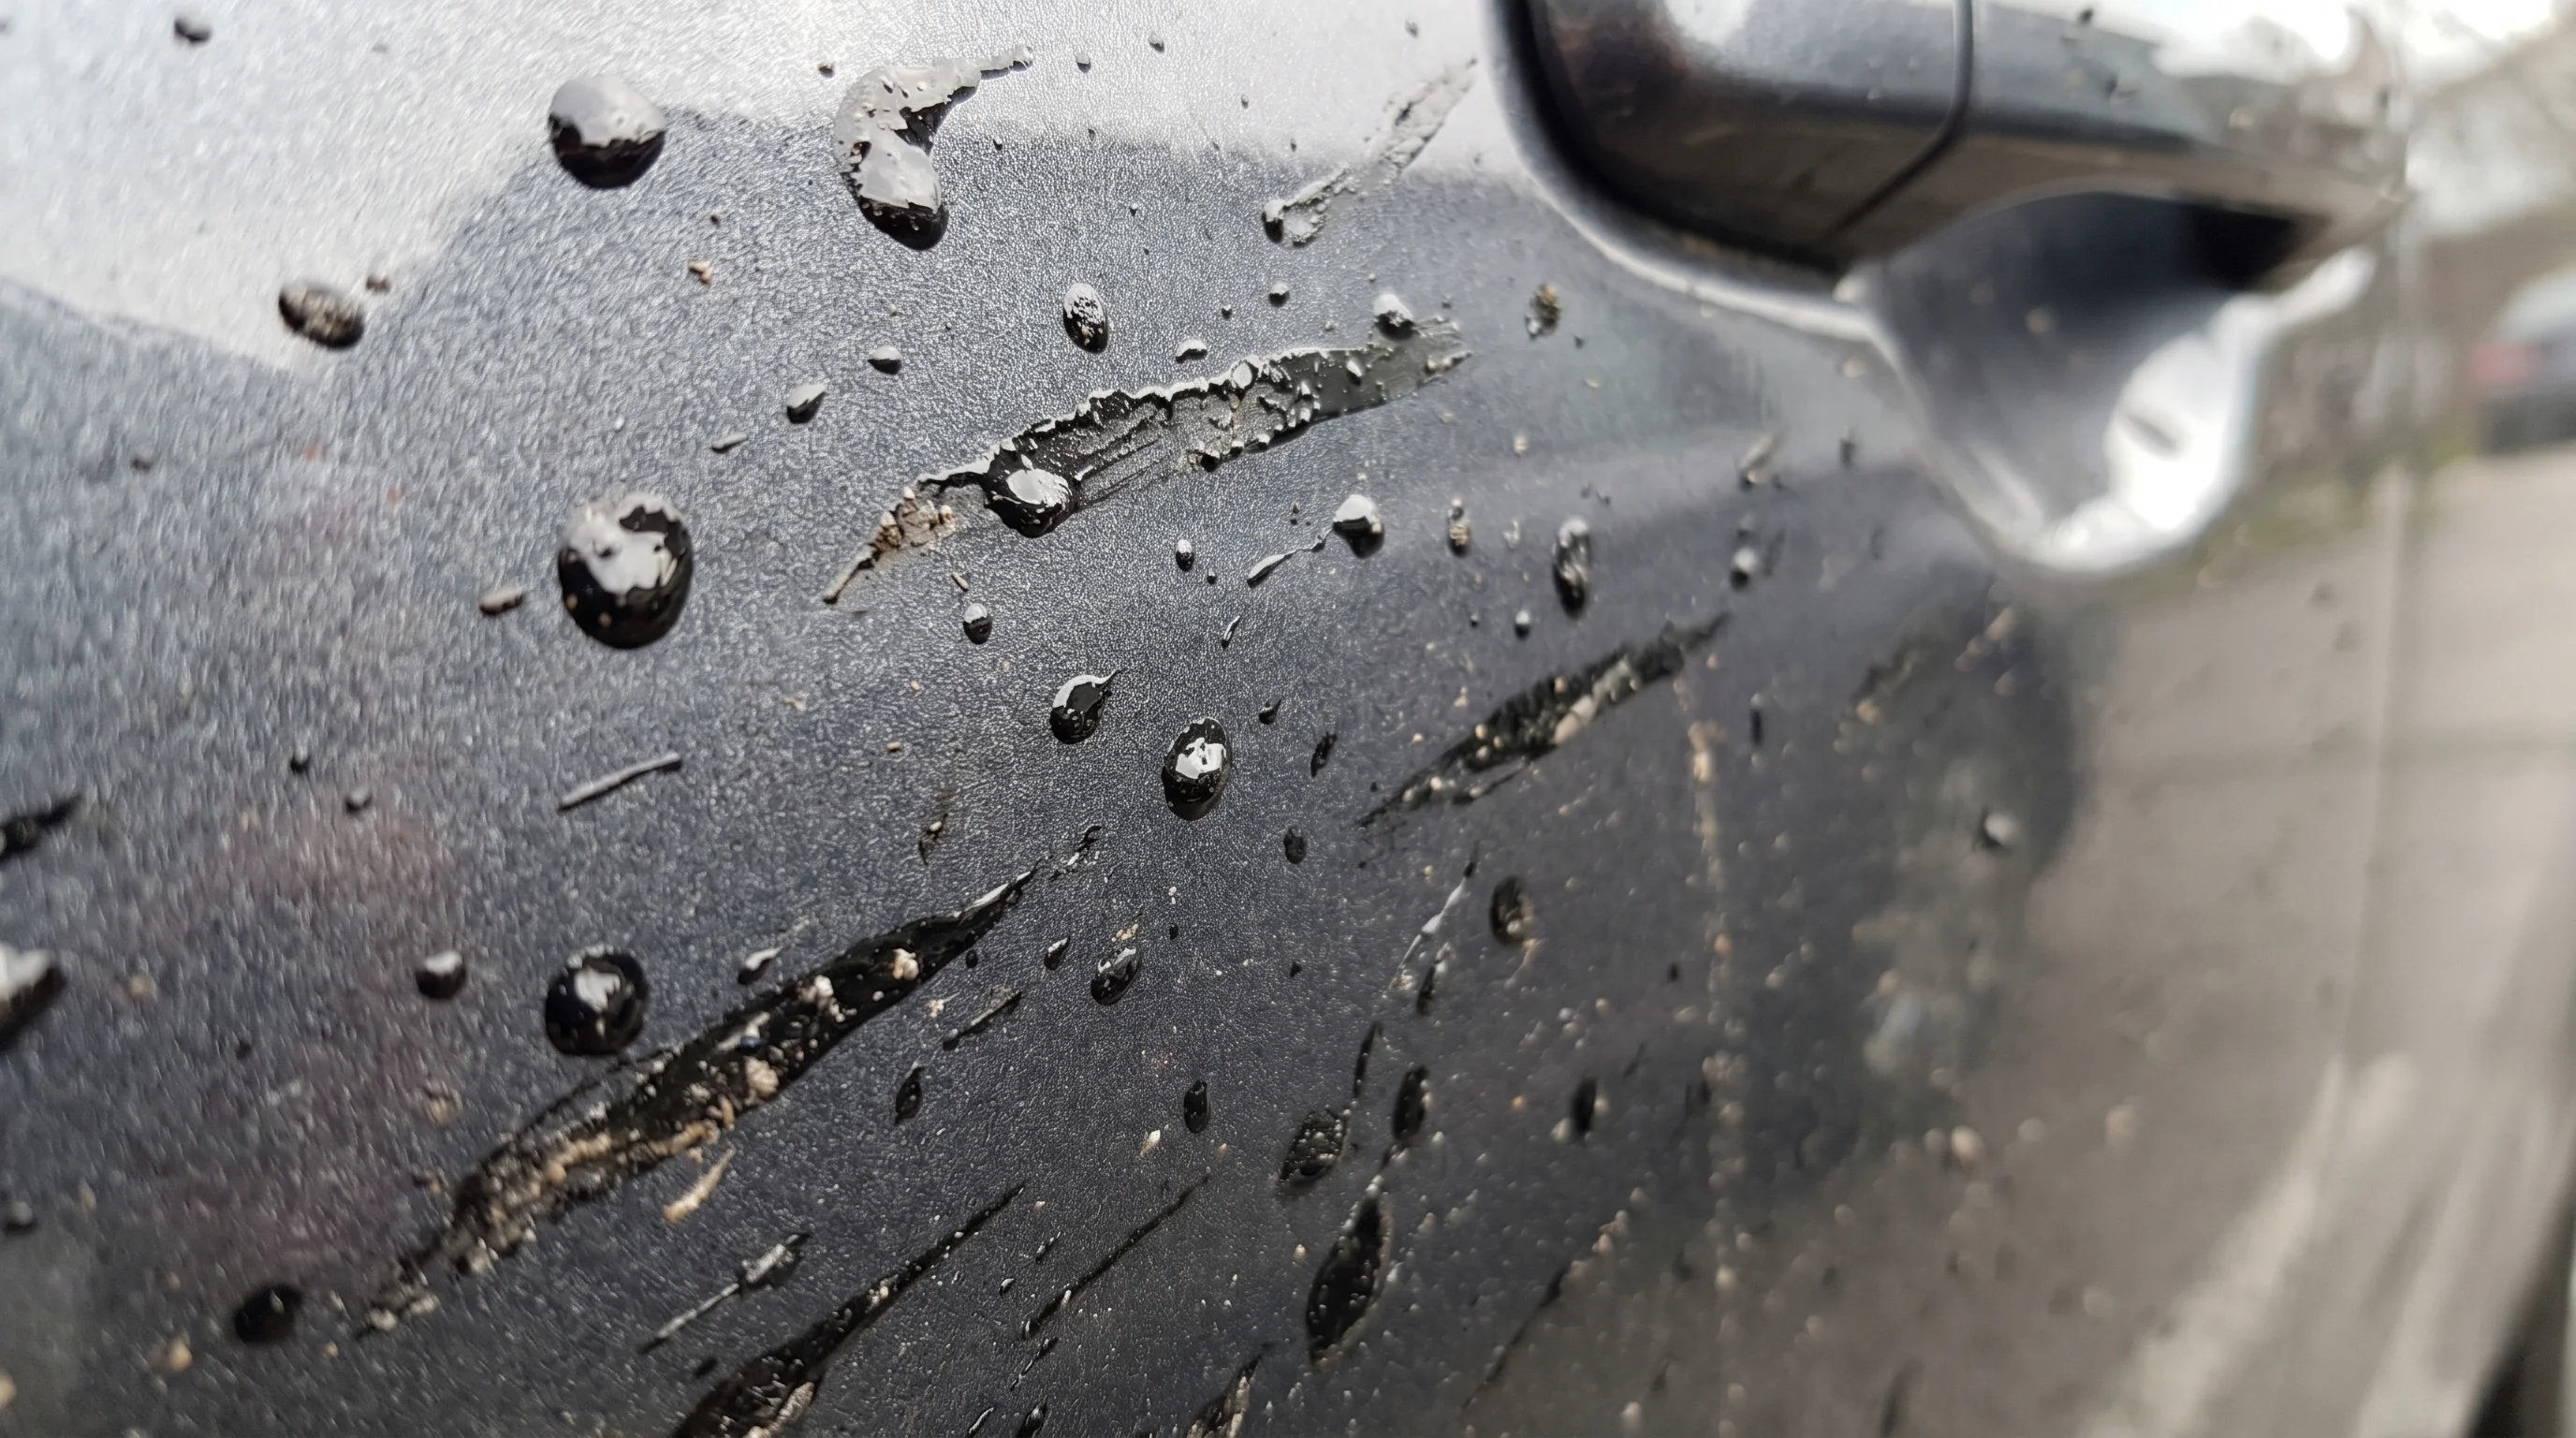
Road tar and asphalt splatter on vehicles comes from two main sources: fresh hot-mix asphalt on newly paved roads, and liquid bitumen (road oil) sprayed as a tack coat or chip seal binder on road surfaces. Both contain the same basic ingredient — asphalt cement, a petroleum-derived binder — which is naturally tacky and bonds strongly to any surface it contacts.
When your car passes over or near freshly paved asphalt, the heat of the surface keeps the material semi-liquid. Small droplets eject off tires, rolling surfaces, and paving equipment and land on the lower panels, wheel wells, and undercarriage of your vehicle. As those droplets cool and harden on your paint, the asphalt binder grips the clearcoat — the same way it grips aggregate in a road surface.
Fresh asphalt is much easier to remove than cured asphalt. Within the first 24–48 hours, the binder is still relatively pliable and can be dissolved with petroleum-based solvents like WD-40. After several days of heat cycling and UV exposure, the binder hardens significantly — the same process that makes a road durable also makes baked-on tar much harder to remove without extended soaking.
The key distinction between types of contamination:
- Fresh road tar splatter — small dots or streaks from driving on a newly paved road; easiest to remove
- Chip seal tar — liquid bitumen applied before stone chips; tends to be thicker and more widespread
- Asphalt millings dust — fine black powder from recycled asphalt driveways; easier to wash off but stains if left
- Old baked-on tar — any of the above that has been on the car for a week or more in sun exposure; requires longer soak and possible clay bar treatment
5 Asphalt Removal Methods — Compared
| Method | Paint Safety | Effectiveness | Cost | Time | Best For |
|---|---|---|---|---|---|
| Dedicated tar remover | ✅ Safe | ⭐⭐⭐⭐⭐ | $8–$18 | 5–15 min | All tar types, especially fresh |
| WD-40 | ✅ Safe | ⭐⭐⭐⭐ | $5–$10 | 5–10 min | Fresh to moderately cured tar |
| Peanut butter / cooking oil | ✅ Safe | ⭐⭐⭐ | $0 (pantry) | 10–20 min | Light fresh splatter, home remedy |
| Rubbing alcohol (IPA) | ⚠️ Use carefully | ⭐⭐⭐ | $3–$8 | 5–10 min | Small spots, diluted 50/50 with water |
| Clay bar + lubricant | ✅ Safe | ⭐⭐⭐⭐⭐ | $15–$30 | 20–45 min | Embedded residue after initial removal |
Method 1: Dedicated Automotive Tar Remover (Best Overall)

Dedicated Tar & Asphalt Remover
Dedicated automotive tar removers are specifically formulated to dissolve petroleum-based contaminants — including road tar, asphalt, tree sap, and adhesive — without attacking the clearcoat or paint beneath. They contain petroleum distillates or citrus-based solvents blended to penetrate tar bonds while being safe on modern automotive finishes.
-
1
Wash the car first
Start with a standard car wash to remove loose dirt and grit. Washing first prevents dragging abrasive particles across the paint when you wipe the tar spots — which would scratch the clearcoat. Let the car dry or work panel by panel while still damp.
-
2
Spray the tar remover directly on the affected area
Hold the bottle 4–6 inches from the surface and spray generously to saturate each tar spot. For panels with many spots, work in sections of roughly 2–3 square feet at a time so the product doesn't dry before you wipe.
-
3
Allow 1–2 minutes of dwell time
Do not wipe immediately. Let the solvent penetrate and soften the tar bond. For fresh tar, 60 seconds is usually enough. For older, more cured deposits, allow 2–3 minutes. The tar should visibly soften and lose its hard, glossy appearance.
-
4
Wipe gently with a clean microfiber cloth
Use a soft, clean microfiber cloth — not a paper towel, which can scratch. Apply light pressure and use a circular or straight wiping motion. The tar should lift easily. Do not scrub hard; if the tar resists, apply more product and wait another minute rather than increasing pressure.
-
5
Repeat for stubborn spots
For thick deposits or heavily cured tar, one application may not fully remove the stain. Reapply, allow full dwell time, and wipe again. Three applications handle most situations. Use a fresh section of the microfiber cloth each time to avoid redepositing tar.
-
6
Wash the panel with car shampoo and rewax
Tar remover strips wax from the treated area. Wash the panel with car shampoo to remove all solvent residue, then apply a coat of carnauba wax or spray detailer to restore paint protection. Failing to rewax leaves the clearcoat exposed to UV and environmental contamination.
Method 2: WD-40 (Best Household Alternative)
WD-40 Multi-Use Product
WD-40 is a petroleum-based water-displacing spray that most households already have on hand. Its light oil formula penetrates and lubricates the bond between road tar and the paint surface, allowing the tar to be wiped away without scratching. It is not as aggressive as a dedicated tar remover and may require more applications on cured deposits, but it is completely safe on clearcoat and paint.
-
1
Wash the car to remove surface dirt
A basic rinse or full wash removes abrasive grit that could scratch the paint during tar removal. Work on a cool surface out of direct sunlight if possible — WD-40 evaporates faster in heat, reducing dwell time.
-
2
Spray WD-40 directly onto the tar spots
Apply a generous coat over each tar deposit. WD-40's low viscosity allows it to seep under the edges of the tar and begin loosening the bond from below. For thick deposits, spray from different angles to ensure full coverage.
-
3
Wait 2–3 minutes
WD-40 works more slowly than dedicated tar removers. Allow at least 2 minutes — up to 5 minutes for older deposits. The tar should begin to look slightly glossy or wet as the oil penetrates.
-
4
Wipe with a microfiber cloth using light circular motion
The tar should come away cleanly on the cloth. For heavier deposits, fold the cloth to expose a clean surface frequently to avoid redepositing tar back onto the paint.
-
5
Wash thoroughly with car shampoo and rewax
WD-40 leaves a noticeable oily film. This must be fully removed with car shampoo and warm water — do not skip this step. Rewax the treated area to restore paint protection, as WD-40 strips existing wax.
Method 3: Peanut Butter or Cooking Oil (Home Remedy)
Peanut Butter / Vegetable Oil
This sounds unusual, but the oils in peanut butter (and cooking oils like olive oil, vegetable oil, or coconut oil) work on the same principle as WD-40 — they penetrate the tar bond and lubricate the interface between the tar and the clearcoat. It is completely paint-safe and works surprisingly well on light, fresh road tar splatter. For thick deposits or cured tar, it is too mild to be effective.
-
1
Apply peanut butter or oil directly to the tar spot
Use a small dollop of smooth peanut butter (not chunky — the texture can scratch) or a few drops of cooking oil. Spread it over and around the tar deposit with a finger or soft cloth.
-
2
Allow 3–5 minutes to penetrate
Leave the peanut butter or oil in contact with the tar. It works slowly — give it adequate time, especially if the tar has been on the car for more than a day.
-
3
Wipe gently with a soft microfiber cloth
The tar should lift with light pressure. If it does not, apply more and wait longer. Do not scrub — if it is not coming off easily after two applications, switch to a dedicated tar remover or WD-40.
-
4
Wash thoroughly with car shampoo
Peanut butter and cooking oil leave significant residue. Wash the entire panel with warm water and car shampoo, scrubbing to remove all oil traces. Rewax to restore paint protection.
Method 4: Isopropyl Alcohol — Targeted Use Only
Isopropyl Alcohol (IPA)
Isopropyl alcohol (IPA) at 70% or below is commonly used in auto detailing for panel wipe-down before applying wax, ceramic coatings, or paint protection film. At that dilution, it is generally safe on clearcoat. At higher concentrations (91–99%) or with prolonged contact, it can strip wax and potentially dull the clearcoat on older or already-compromised paint. Use IPA as a last resort for very small tar spots that haven't responded to other methods — not as your first approach.
- Dilute to 50/50 with water before using on paint
- Apply to a microfiber cloth first — never pour directly on the panel
- Limit contact time to under 30 seconds per application
- Do not use on matte or satin paint finishes — IPA can alter the sheen
- Rewax the area immediately after treatment
Method 5: Clay Bar Treatment — For Embedded Residue
Clay Bar + Lubricant
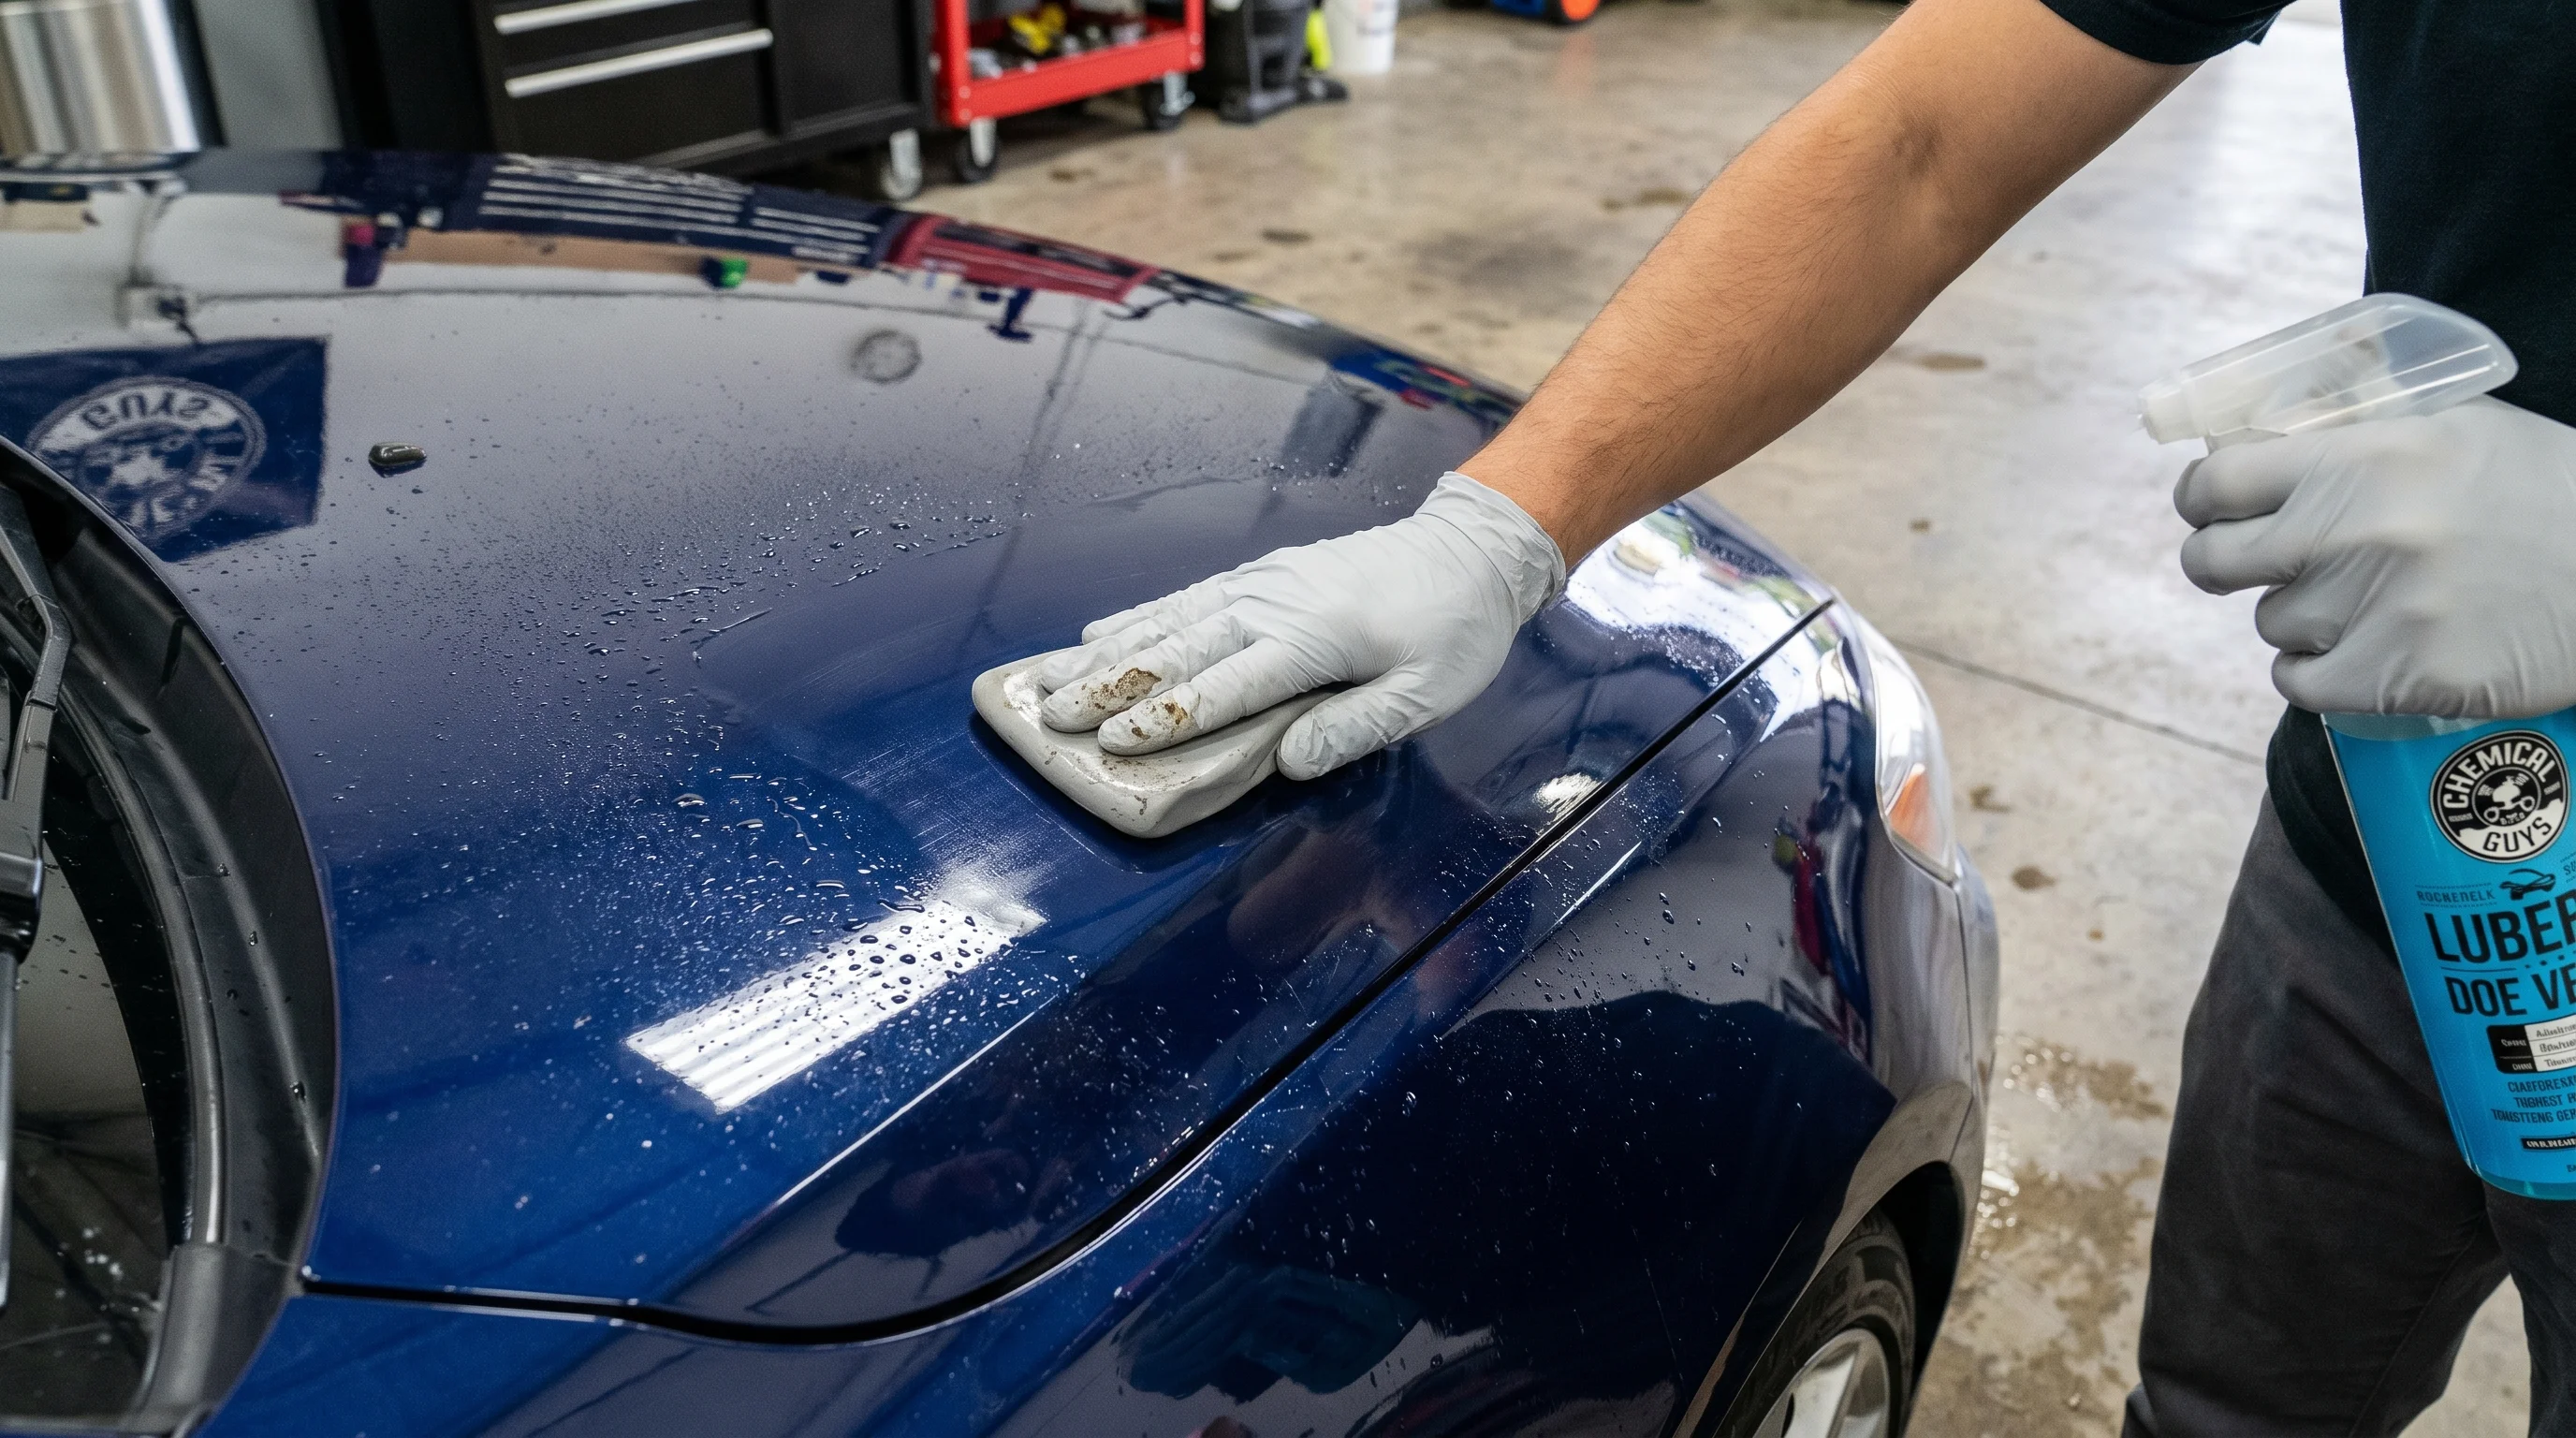
A detailing clay bar is a synthetic resin compound that, when used with a clay lubricant spray, glides across paint and physically pulls contamination out of the clearcoat surface. It is not abrasive in the traditional sense — it works by mechanical bonding rather than cutting. Clay bars are the standard detailing industry tool for removing embedded contamination that has already been softened but not fully removed by chemical methods.
Use the clay bar after an initial round of tar remover or WD-40 has removed the bulk of the deposit. The clay picks up the remaining embedded residue and leaves the surface smooth and contamination-free. Claying leaves the paint feeling like glass — smooth enough that running your hand over it produces no dragging or texture.
-
1
Wash the car thoroughly
Clay only works effectively on a clean surface. A full wash removes loose contamination so the clay can focus on embedded particles and residue.
-
2
Apply tar remover first (if significant deposits remain)
Clay is not designed to remove large tar deposits — it excels at the embedded residue that remains after chemical removal. Handle bulk removal first with a dedicated tar remover or WD-40, then clay as the finishing step.
-
3
Flatten a piece of clay to a pancake shape
Break off a section roughly the size of a golf ball. Knead and flatten it in your palm until it's a smooth, flat disc about 3 inches across. This maximizes the working surface area.
-
4
Spray clay lubricant generously on a 2×2 ft section
Never use clay on a dry surface — it will scratch. Use a dedicated clay lubricant spray, quick detailer, or diluted car shampoo (1:10 ratio). The surface should be visibly wet.
-
5
Glide the clay across the surface in straight overlapping strokes
Use light pressure — let the clay do the work. Move in one direction (front-to-back or top-to-bottom), not in circles. You will feel and hear the clay pulling at contamination initially; as the surface clears, it becomes smoother and quieter.
-
6
Fold the clay to expose a clean surface regularly
As the clay picks up tar and contamination, fold it to expose a clean section. A clay bar that is visibly dark with contamination needs to be folded or replaced — contaminated clay redeposits particles and can scratch.
-
7
Wipe the panel with a clean microfiber and rewax
After claying, wipe off any lubricant residue with a clean microfiber. The paint will feel completely smooth. Apply a coat of wax or sealant — claying removes all existing wax protection from the treated area.
8 Recommended Products for Asphalt & Tar Removal
Meguiar's Heavy Duty Tar Remover — Best Overall
Purpose-built tar and asphalt remover from one of the most respected names in auto detailing. Citrus-based formula dissolves road tar, asphalt, tree sap, and adhesive residue without attacking clearcoat. Works on both fresh and cured deposits. ~$12–$16 for 15 oz spray.
Turtle Wax Bug & Tar Remover — Best Value
Widely available at major retailers and auto parts stores. Petroleum-based formula that effectively removes road tar, asphalt, bugs, tree sap, and bird droppings. Slightly stronger than citrus-based products — very effective on stubborn deposits. ~$8–$12 for 16 oz.
3M Adhesive Remover — Best for Heavy Deposits
Originally designed for removing adhesive and sticker residue, 3M Adhesive Remover is extremely effective on heavy asphalt and tar deposits. Petroleum-based solvent blend. Use with good ventilation — strong odor. Wipe quickly and rewax after use. ~$10–$18 for 12 oz aerosol.
Chemical Guys Bug & Tar Wash — Best for Full-Car Treatment
A car wash shampoo specifically formulated with tar-cutting agents. Use when tar contamination is widespread across multiple panels — add to a bucket wash instead of standard shampoo. Gentler than spray solvents; may not remove heavy deposits but excellent for full-car decontamination washes. ~$15–$20 for 16 oz.
Mothers CMX Ceramic Spray Coating — Best Post-Removal Protection
Not a tar remover, but the best follow-up product after tar removal. Applying a ceramic spray coating after cleaning creates a hydrophobic layer that makes future tar contamination much easier to remove — tar beads up and releases rather than bonding deeply to the clearcoat. ~$18–$25 for 8 oz.
WD-40 Multi-Use — Best Household Option
The classic household spray that most people already own. Works well on fresh to moderately cured road tar. Not as aggressive as dedicated tar removers but completely paint-safe and highly effective for light contamination. ~$5–$10 for 8 oz spray.
Griot's Garage Tar & Sap Remover — Best for Sap + Tar Combo
Specifically formulated to handle both tar and tree sap — common on vehicles parked under trees near road work. Citrus and petroleum blend. Leaves no oily residue, unlike some tar removers. Slightly pricier but highly rated by detailers. ~$15–$20 for 22 oz.
Meguiar's Smooth Surface Clay Kit — Best for Post-Removal Finishing
Includes a clay bar and clay lubricant — everything needed to decontaminate the paint surface after bulk tar removal. The clay pulls embedded residue that chemical removers leave behind, restoring a perfectly smooth surface. ~$20–$28 for kit.
What NOT to Use on Car Paint
- Gasoline or diesel fuel — highly flammable, strips wax and paint over time, harmful to breathe
- Acetone or nail polish remover — aggressively dissolves clearcoat on contact; causes permanent dull spots
- Paint thinner or lacquer thinner — same risk as acetone; will strip and cloud clearcoat
- Metal scrapers, razors, or putty knives — cause deep scratches requiring paint correction or respray
- Steel wool or abrasive scrubbing pads — scratch clearcoat and leave swirl marks
- Bleach or concentrated household cleaners — chemically attack paint and rubber trim
- Pressure washer at close range — high-pressure water can chip or peel paint, especially on older vehicles
- Dry wiping without lubricant — dragging a cloth across tar without solvent first scratches the clearcoat
After Removal — Restoring Paint Protection
Every tar and asphalt remover — including WD-40 — strips wax from the treated area. Tar removers are solvents that dissolve petroleum-based substances, and car wax is a petroleum-based substance. The treated panel is left with bare, unprotected clearcoat after tar removal. This is not a problem in the short term, but UV exposure, acid rain, and environmental contamination will attack unprotected clearcoat faster than waxed paint.
After tar removal, follow this sequence to restore full paint protection:
- Full car wash — remove all solvent and tar residue from the panel with car shampoo
- Clay bar treatment — optional but recommended; removes any remaining embedded residue and restores paint smoothness
- Polish if needed — if the tar was present for more than a week, mild paint polishing may be needed to remove any staining or dullness left in the clearcoat
- Wax or sealant — apply a coat of carnauba wax, synthetic sealant, or ceramic spray coating to the treated panel to restore UV protection and slick surface
How to Prevent Asphalt from Sticking to Your Car
Prevention is significantly easier than removal — especially for older or baked-on tar. Several practical measures reduce the risk of asphalt contamination:
- Avoid freshly paved roads — look for orange construction cones, "Fresh Oil" signs, or liquid-looking road surfaces and detour around them when possible
- Keep a fresh wax coat on your car at all times — wax creates a sacrificial layer that tar bonds to less aggressively than bare clearcoat, and it makes tar removal significantly easier
- Apply a ceramic coating or paint protection film (PPF) on lower panels — especially the front bumper, lower doors, and wheel wells, which are most exposed to road spray
- If you must drive on a freshly paved road, wash the car within 24 hours before the tar cures and hardens
- Slow down on freshly paved surfaces — lower vehicle speeds generate less tire spray and reduce the distance tar droplets travel
- Park away from road work zones and asphalt paving equipment — even stationary near a paving crew puts your car in the spray zone
When to See a Professional Detailer or Body Shop
DIY tar removal handles the vast majority of road tar and asphalt contamination effectively. However, there are situations where professional help is the right call:
| Situation | Who to See | Why |
|---|---|---|
| Tar contamination across multiple full panels | Auto detailer | Professional clay bar + solvent treatment is faster and more thorough at scale |
| Tar baked on for more than 2 weeks | Auto detailer | Cured tar may require professional-grade solvents and equipment to remove without paint damage |
| Paint appears dull, hazy, or discolored under/around tar spots | Auto detailer with paint correction | Tar may have etched the clearcoat — requires polishing to restore clarity |
| Visible scratches from previous removal attempts | Auto detailer (paint correction) | Compounding and polishing restores clarity; deep scratches may need wet sanding |
| Paint chipped, cracked, or peeling near tar spots | Body shop | Structural paint damage — needs professional respray assessment |
| Tar contamination on matte or satin finish paint | Specialist detailer | Matte finishes require specialized products — standard removers can alter the sheen permanently |
If you notice any of the following after removing asphalt from your car, stop and see a detailer or body shop before attempting further DIY treatment: a dull or hazy area where the tar was, a color difference between the treated spot and surrounding paint, fine swirl marks or scratches visible in direct sunlight, a rough or pitted texture after removing the tar, or any area where the paint appears to have softened, lifted, or bubbled. These are signs of clearcoat or paint damage that require professional paint correction or respray — further DIY treatment will make them worse.
Frequently Asked Questions
How do you remove asphalt from a car?
The fastest safe method is a dedicated automotive tar remover (Meguiar's, Turtle Wax, or 3M). Spray on, wait 1–2 minutes, wipe with a microfiber cloth, and wash the panel afterward. WD-40 works well as a household alternative. For embedded residue after chemical removal, follow up with a clay bar and lubricant. Always rewax the treated area when done.
Does WD-40 remove asphalt from car paint?
Yes — WD-40 is paint-safe and effectively removes fresh to moderately cured road tar. Spray on, wait 2–3 minutes, wipe with a microfiber cloth. It leaves an oily residue that must be washed off with car shampoo. Follow up with wax to restore paint protection. For heavily cured tar, a dedicated tar remover works faster.
Will asphalt damage car paint?
Asphalt left on paint for extended periods can etch the clearcoat, especially in hot weather. Fresh tar is primarily a cosmetic issue; tar baked on for weeks in summer heat can cause clearcoat discoloration and staining. Remove asphalt from your car within 24–48 hours of contact for the easiest, safest removal.
What should you NOT use to remove asphalt from a car?
Never use gasoline, acetone, nail polish remover, paint thinner, lacquer thinner, metal scrapers, steel wool, or abrasive pads. These will damage or strip the clearcoat. Even dry wiping without a lubricant first can scratch paint by dragging tar across the surface.
How do you remove dried asphalt from a car?
Apply a dedicated tar remover and allow 3–5 minutes of dwell time rather than the standard 60–90 seconds. Reapply and repeat up to 3 times for heavily baked-on deposits. Follow with a clay bar treatment to lift embedded residue. Do not try to scrape dried tar with a fingernail or tool.
Can I use peanut butter to remove tar from my car?
Yes — it's paint-safe and works on light, fresh tar splatter. The oils penetrate and loosen the tar bond. Apply, wait 3–5 minutes, wipe with a microfiber cloth. Follow with a thorough car wash to remove all peanut butter residue, then rewax. Not effective on thick or cured deposits — switch to a commercial tar remover for those.
How do I prevent asphalt from getting on my car?
Avoid freshly paved roads, keep a fresh wax coat on your paint at all times, consider paint protection film on lower panels, and wash the car within 24 hours if you've driven on a new road surface. Wax and ceramic coatings make future tar removal significantly easier by preventing deep bonding.
When should I take my car to a detailer for asphalt removal?
See a detailer if contamination covers multiple panels, the tar has been on the car for more than two weeks, the paint looks dull or discolored under the tar spots, or you've already tried home methods without full success. See a body shop if you notice paint peeling, chipping, or structural damage around the tar spots.