Concrete Screws — Types, Best Brands, How to Install & Load Ratings (2026)
Quick Answer
For most concrete fastening jobs — attaching wood plates, metal brackets, furring strips, or electrical boxes to concrete — a 3/16" or 1/4" Tapcon concrete screw at 1" to 1-3/4" embedment handles the load. Drill with a carbide-tipped masonry bit that is one size smaller than the screw diameter, blow out the hole, and drive with a regular drill or impact driver (not hammer mode). For structural connections like ledger boards, use 3/8" Simpson Titen HD with ICC-ESR load values.
Concrete screws changed fastening forever when ITW Buildex introduced Tapcon in the 1970s. Before concrete screws, attaching anything to concrete meant setting expansion anchors (slow, requires separate hardware), epoxy anchors (expensive, requires cure time), or powder-actuated fasteners (loud, requires a special gun, no removal). Concrete screws simplified the process to two steps: drill a hole, drive the screw. The screw taps its own threads directly into the concrete — no separate anchor, no expansion force, no adhesive.
The mechanics are elegant but specific: the hi-lo thread geometry — alternating high and low threads — cuts a helical groove into the concrete wall while the cutting flutes near the tip clear debris ahead of the thread. The result is a direct mechanical interlock between screw and concrete that is surprisingly strong for such a fast installation. But that interlock depends entirely on correct hole size, correct depth, correct embedment, and correct base material strength. Get any one of those wrong and the screw either won't drive or will pull out at a fraction of its rated load.
This guide covers every concrete screw format, all the major brands, the exact numbers for drill bit size and embedment depth, real load rating data, applications from furring strips to ledger boards, and the mistakes that cause failures.
5 Concrete Screw Types Compared
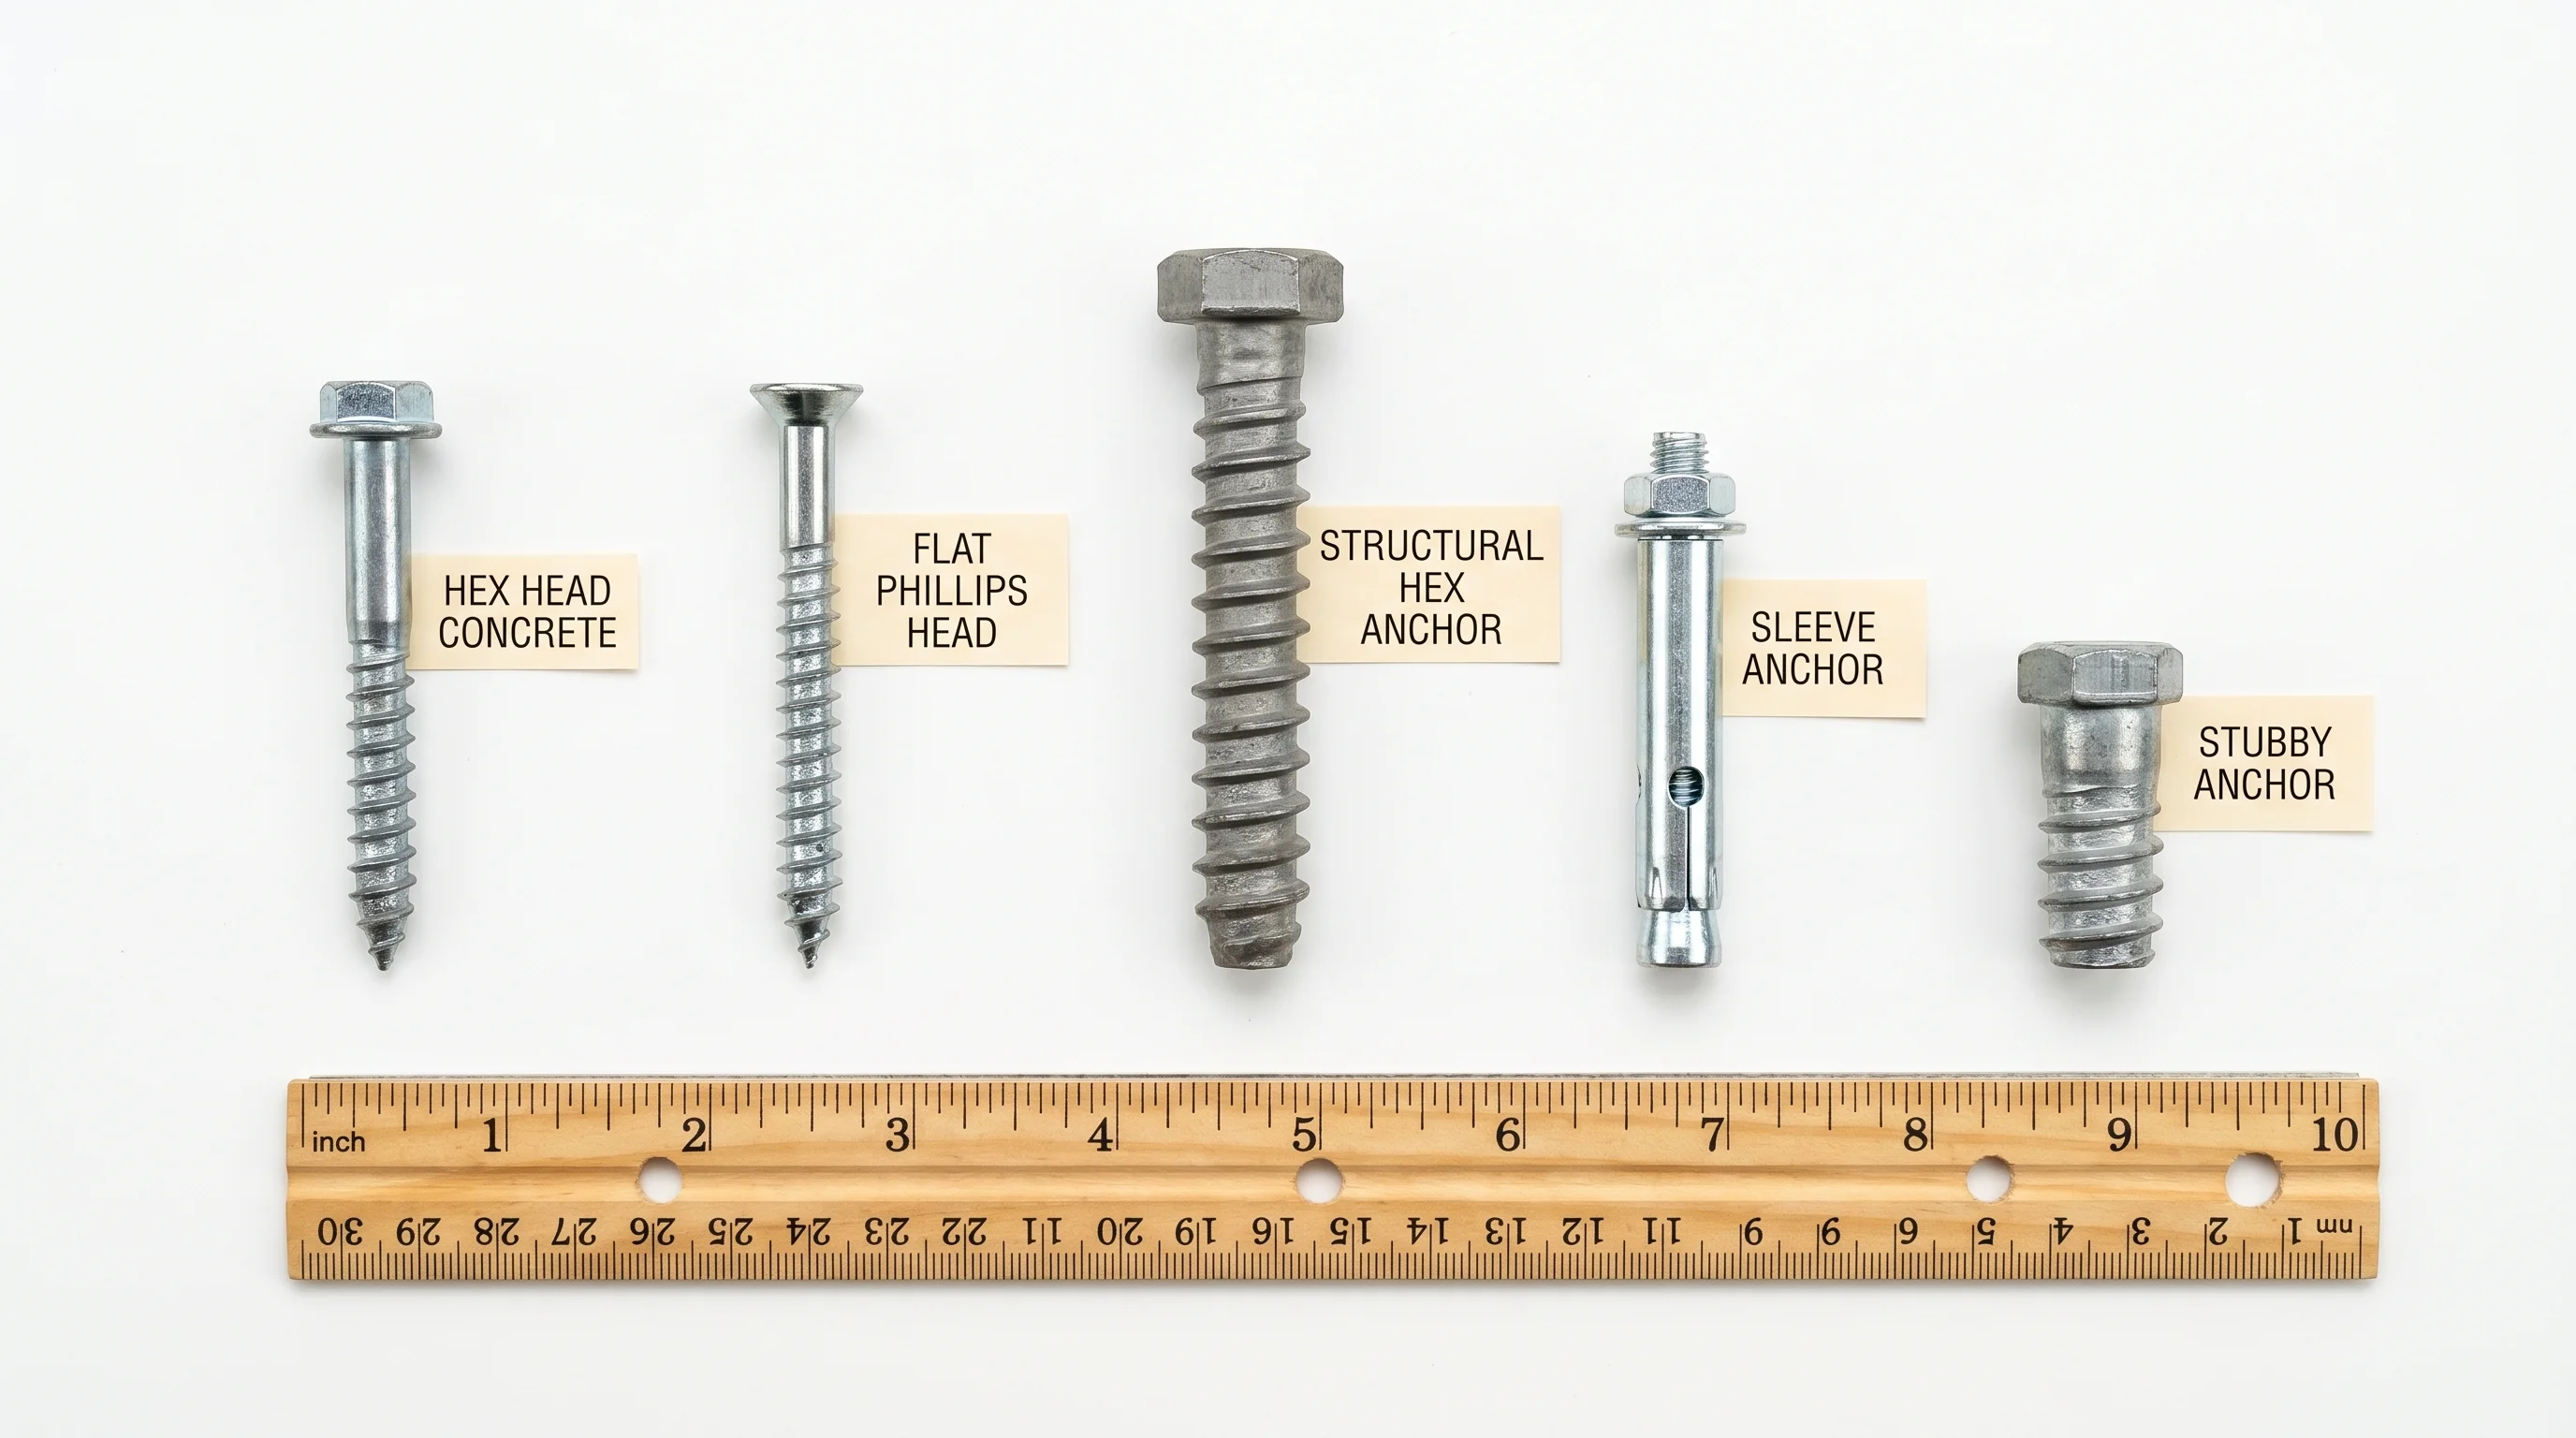
| Type | Common Diameters | Head Style | Best Applications | Max Embedment |
|---|---|---|---|---|
| Standard Hex Washer Head | 3/16", 1/4" | Hex washer (nut driver or socket) | General purpose — wood, metal, brackets to concrete | 1-3/4" |
| Flat/Phillips Countersunk Head | 3/16", 1/4" | Flat countersunk (Phillips or square) | Flush-mount applications — thresholds, ledger boards, trim | 1-3/4" |
| Large-Diameter Hex Head | 3/8", 1/2" | Hex head (wrench-driven) | Heavy structural loads — sill plates, equipment bases | 3-1/2" |
| Structural Concrete Screw (Titen HD) | 1/4", 3/8", 1/2" | Hex head, engineered thread | ICC-ESR structural connections — ledger boards, holdowns | 4-1/2" |
| Short/Stub Anchor Screw | 3/16", 1/4" | Hex washer or flat | Thin material attachment — electrical boxes, cable anchors | 1" |
How Concrete Screws Work — Thread Geometry

The hi-lo thread is what distinguishes a concrete screw from a wood screw or machine screw. Standard wood screws have a single uniform thread helix. Concrete screws have two thread helices of alternating height: the high thread cuts into the concrete and creates the primary mechanical interlock, while the low thread follows in the groove cut by the high thread and provides additional bearing surface. This alternating pattern reduces the driving torque required while maximizing the thread-to-concrete contact area.
Near the tip, 3–5 cutting flutes are milled into the shank. These flutes act like a drill bit — they break up the concrete ahead of the thread and channel the powdered concrete dust up and out of the hole, preventing compaction at the tip that would stop the screw from advancing. Without cutting flutes, the screw would compress the dust into a plug that resists penetration.
The thread angle on concrete screws is typically 60°, similar to standard machine screws, but the thread pitch is finer than wood screws. The fine pitch means more thread engagements per inch of embedment — more individual contact points between the screw and the concrete wall, which distributes load and increases pullout resistance compared to a coarse-thread wood screw of equivalent diameter.
The coating matters too. Standard Tapcon's blue climaseal coating is a baked-on resin that provides corrosion resistance and a low-friction surface that reduces driving torque. Hot-dip galvanized (HDG) variants add a thicker zinc layer for outdoor exposure. Stainless steel screws (Type 304 or 316) are used in coastal environments, swimming pool surrounds, and anywhere contact with ACQ or CA pressure-treated lumber is unavoidable — these treated woods contain copper compounds that corrode standard zinc coatings within months.
Brand Deep-Dives
Tapcon (ITW Buildex) — The Original
Tapcon is the brand that created the concrete screw category. ITW Buildex holds the original patents and has been manufacturing Tapcon since 1976. The blue color is a trademark — if you see a blue concrete screw, it's almost certainly a Tapcon. The brand dominates North American distribution: Home Depot and Lowe's carry Tapcon almost exclusively in the concrete screw aisle, and virtually every ICC-ESR evaluation and building code reference for concrete screws uses Tapcon load data as the benchmark.
Tapcon's ICC-ESR-1671 evaluation covers 3/16" and 1/4" diameters in concrete, grout-filled CMU, and hollow CMU. The published values are conservative by design — Tapcon tests at 5x the published allowable load as a safety factor. For residential and light commercial work, Tapcon is the default choice. The only meaningful limitation is the 1-3/4" maximum embedment, which limits capacity compared to longer structural screws.
Tapcon is available in hex washer head (most common — use a nut driver or 3/8" socket), Phillips flat head (countersunk — use for flush applications), and hex head (structural large-diameter versions). Length range: 3/4" to 3-3/4" for 3/16", 3/4" to 4" for 1/4". Screw length equals embedment depth plus material thickness being fastened — select length so embedment is between 1" and 1-3/4".
Hilti Kwik-Con II
Hilti's Kwik-Con II is the professional contractor alternative to Tapcon, with an ICC-ESR evaluation (ESR-1271) and higher listed load values in some configurations. Hilti makes its own carbide-tipped TE-CD drill bits specifically designed to drill the exact hole diameter for Kwik-Con II, and the combination is tested and listed together — using a different bit voids the published load values on a strict reading of the ESR report.
The Kwik-Con II uses a similar hi-lo thread geometry to Tapcon but with a slightly different thread angle optimized for Hilti's specific hole profile. Available in 3/16" and 1/4" diameters. Hilti's commercial distribution channel means Kwik-Con II is often found on professional job sites and commercial projects where the engineer specifies an ESR-listed fastener by name. Pricing is typically 20–40% higher than Tapcon per screw, but Hilti's tool rental and support network makes the system attractive for high-volume commercial work.
Simpson Strong-Tie Titen HD — Structural Applications
The Simpson Titen HD (Heavy Duty) is the structural concrete screw — available in 1/4", 3/8", and 1/2" diameters with embedment up to 4-1/2". It is ICC-ESR listed (ESR-2713) and appears in Simpson's wood construction connectors catalog as the fastener of choice for holdowns, post bases, ledger connections, and other structural hardware attached to concrete.
The Titen HD's thread geometry is more robust than standard Tapcon — the segments are wider and the cutting flutes are more aggressive, allowing deeper embedment into higher-strength concrete. The 3/8" Titen HD at 3-1/4" embedment in 3,000 PSI concrete achieves 1,505 lbs allowable shear and 1,075 lbs allowable tension — load values that far exceed standard 1/4" Tapcon and approach sleeve anchor performance. Available in zinc-plated, hot-dip galvanized, and stainless steel finishes for compatibility with treated lumber and outdoor exposure.
8 Best Concrete Screw Products (2026)
Tapcon 3/16" Hex Head — Best General Purpose
The standard for light-to-medium concrete fastening. 3/16" diameter handles electrical boxes, conduit straps, furring strips, cable trays, and general brackets. Available in lengths from 1-1/4" to 3-3/4". Comes with a 5/32" carbide drill bit in most retail packs. ICC-ESR-1671 listed. ~$8–$14 per 25-pack (1-3/4" length), ~$18–$28 per 75-pack.
Tapcon 1/4" Hex Head — Best Medium Duty
Step up from 3/16" for higher-load applications — wood plates, heavier brackets, equipment anchoring. 1/4" diameter at 1-3/4" embedment achieves ~500–620 lbs shear in 3,000 PSI concrete. Available up to 4" length for thicker materials. Requires 3/16" carbide drill bit (sold separately or in combo packs). ~$12–$18 per 25-pack (2-1/4" length).
Tapcon 3/16" Flat Head Phillips — Best Flush Mount
Same Tapcon performance in a flat countersunk Phillips head for applications where the screw head must sit flush — door thresholds, stair nosings, ledger trim, surface-mounted electrical boxes. Phillips #3 drive or square drive option. Same ESR listing and load values as hex head in equivalent diameter. ~$9–$15 per 25-pack.
Hilti Kwik-Con II 1/4" — Best Professional Grade
Higher published load values than Tapcon in some configurations. ICC-ESR-1271 listed. Requires Hilti TE-CD carbide bits for listed performance. Preferred on commercial projects where inspectors require ESR documentation and engineers specify by name. Available in carbon steel and stainless steel. ~$18–$28 per 25-pack.
Simpson Titen HD 3/8" — Best Structural
The structural concrete screw for ledger boards, holdowns, post bases, and heavy equipment anchoring. 3/8" diameter, up to 4-1/2" embedment, ICC-ESR-2713. At 3-1/4" embedment in 3,000 PSI: 1,505 lbs allowable shear, 1,075 lbs allowable tension. Available in zinc, HDG, and stainless. Requires 5/16" carbide bit. ~$3.50–$5.50 per screw.
DEWALT DFM14300 Concrete Screws — Best Value Contractor Pack
1/4" x 1-3/4" hex head concrete screws in a 100-pack contractor box — the best value per-screw for high-volume work. DEWALT's concrete screw uses compatible thread geometry; works with standard 3/16" carbide bits. Not ICC-ESR listed (use Tapcon or Hilti for code-required applications). Excellent for non-structural framing, electrical rough-in, and utility anchoring. ~$25–$35/100-pack.
Simpson Titen HD 1/4" Stainless — Best Outdoor/ACQ
Type 316 stainless steel Titen HD for outdoor applications, coastal environments, and direct contact with ACQ or CA pressure-treated lumber. Standard zinc coatings corrode rapidly against treated lumber — stainless is mandatory. ICC-ESR-2713 listed with stainless values. 1/4" diameter for moderate structural loads in treated-lumber deck ledger connections. ~$1.80–$2.50 per screw.
LedgerLOK Structural Wood-to-Concrete Screw — Best Ledger Connection
FastenMaster LedgerLOK is a 5/16" structural screw specifically designed for attaching ledger boards to concrete and masonry. ICC-ESR-2649 listed with published values for deck ledger connections. 3-1/2" long with deep embedment capability. Torx T40 drive for high-torque installation without cam-out. No pilot hole through the ledger required — drills its own path through wood, then requires a 1/4" concrete pilot hole. ~$2.50–$4.00 per screw.
Drill Bit Selection Table
Using the wrong bit size is the single most common concrete screw installation error. Too large a bit and the screw spins without gripping. Too small and the screw snaps. Always use a carbide-tipped masonry bit — standard HSS drill bits cannot drill concrete and will burn out immediately.
| Screw Diameter | Required Bit Diameter | Bit Type | Min. Hole Depth | Notes |
|---|---|---|---|---|
| 3/16" (4.8 mm) | 5/32" (3.97 mm) | Carbide-tipped SDS or standard | Embedment + 1/2" | Most common residential size |
| 1/4" (6.35 mm) | 3/16" (4.76 mm) | Carbide-tipped SDS or standard | Embedment + 1/2" | Standard medium-duty size |
| 5/16" (7.94 mm) | 1/4" (6.35 mm) | Carbide-tipped SDS | Embedment + 1/2" | LedgerLOK and Titen HD 5/16" |
| 3/8" (9.53 mm) | 5/16" (7.94 mm) | Carbide-tipped SDS | Embedment + 1/2" | Titen HD 3/8" structural |
| 1/2" (12.7 mm) | 3/8" (9.53 mm) | Carbide-tipped SDS | Embedment + 1/2" | Heavy structural only |
Embedment Depth by Screw Diameter and Base Material
| Screw Diameter | Min. Embedment | Max. Effective Embedment | Concrete | Grouted CMU | Hollow CMU (face shell) | Brick |
|---|---|---|---|---|---|---|
| 3/16" | 1" (25 mm) | 1-3/4" (44 mm) | Full range OK | Full range OK | Min 1" into face shell | Min 1" into solid brick |
| 1/4" | 1" (25 mm) | 1-3/4" (44 mm) | Full range OK | Full range OK | Min 1" into face shell | Min 1" into solid brick |
| 3/8" (Titen HD) | 2-1/4" (57 mm) | 4-1/2" (114 mm) | Full range OK | Full range OK | Grouted cores recommended | Min 2-1/4" solid brick only |
| 1/2" (Titen HD) | 2-1/2" (64 mm) | 4-1/2" (114 mm) | Full range OK | Full range OK | Grouted cores required | Not recommended |
- Drive the screw in fully. If it turns with almost no resistance in the last 3–4 turns, the hole is stripped or the base material is too soft — pull it out and move to a new location at least 2" away.
- A properly installed concrete screw requires increasing torque as it approaches full embedment — you should feel the screw "tightening up" as the threads engage deeper.
- If the screw head snaps off during installation, you likely used too small a drill bit or the concrete is exceptionally hard — switch to a larger bit (one size up from spec) and try a new location.
- If you hit rebar while drilling, do not try to drill through it — relocate the hole at least 3" away. Drilling through rebar destroys the bit and weakens the structural element.
- For hollow CMU, you'll feel the bit break through the face shell into the hollow core — stop drilling before the bit travels more than 1/4" into the void, or use a depth stop set to face shell thickness + 1".
Load Ratings — Tension and Shear by Diameter
These values are allowable loads (ultimate load ÷ safety factor of 4) from ICC-ESR reports for concrete screws in normal-weight concrete (NW concrete) at the PSI noted. Always consult the specific ESR report for your exact application — load values vary by embedment depth, concrete strength, edge distance, and spacing.
| Screw | Diameter | Embedment | Concrete PSI | Allowable Tension | Allowable Shear |
|---|---|---|---|---|---|
| Tapcon | 3/16" | 1-1/4" | 2,500 | 230 lbs | 290 lbs |
| Tapcon | 3/16" | 1-3/4" | 3,000 | 270 lbs | 340 lbs |
| Tapcon | 1/4" | 1-1/4" | 2,500 | 370 lbs | 480 lbs |
| Tapcon | 1/4" | 1-3/4" | 3,000 | 500 lbs | 620 lbs |
| Titen HD | 1/4" | 2-1/4" | 3,000 | 660 lbs | 895 lbs |
| Titen HD | 3/8" | 2-1/2" | 3,000 | 905 lbs | 1,265 lbs |
| Titen HD | 3/8" | 3-1/4" | 3,000 | 1,075 lbs | 1,505 lbs |
| Titen HD | 1/2" | 3-1/4" | 3,000 | 1,450 lbs | 2,100 lbs |
Applications Guide
Wood to Concrete (Sill Plates and Bottom Plates)
Attaching a pressure-treated sill plate or bottom plate to a concrete slab is one of the most common concrete screw applications in residential framing. Code requires treated lumber in contact with concrete. Typical specification: 1/4" Tapcon at 24" on-center, minimum 1-3/4" embedment, 2" from plate edges, 3" from slab edges. For seismic zones and high-wind areas, a structural engineer may specify Titen HD 3/8" at closer spacing. Drill through the plate into the slab, blow out the hole, and drive the screw — the standard Tapcon approach is fast and code-compliant for most residential applications.
Metal to Concrete (Brackets, Angle Iron, HVAC Equipment)
Mounting angle iron brackets, steel equipment bases, electrical panels, and HVAC units to concrete uses the same screw but with different considerations. Metal has no compressibility — the hole through the metal must be larger than the screw shank to allow the screw to pass through freely (clearance hole). Only the concrete provides thread engagement. Predrilling the metal with a metal bit before positioning is faster and more accurate than trying to drill through both materials simultaneously. Stainless steel screws are required for exterior metal-to-concrete connections to prevent galvanic corrosion between dissimilar metals.
Ledger Boards (Structural Deck Connection)
Ledger board connections to concrete foundations are structural — they transfer deck loads into the foundation and must be engineered. Building codes require fastener schedules based on joist span, tributary area, and deck height. Simpson Titen HD 3/8" or 1/2" at specified spacing, or LedgerLOK 5/16" per their ESR-listed fastener schedule, are the code-compliant options. The fastener schedule published in ICC-ESR reports lists required spacing per linear foot of ledger based on joist span. Never use standard 1/4" Tapcon for ledger-to-concrete connections — the load values are insufficient for most deck configurations. Use treated-lumber-compatible screws (HDG or stainless) for all ledger applications.
Furring Strips and Wall Framing
Attaching 1x3 or 2x4 furring strips to a concrete or CMU wall for a stud wall or paneling substrate is a light-load application where 3/16" Tapcon performs well. Space screws 16"–24" on center vertically within each strip, with 12" spacing near ends. For CMU walls, locate screws to land in the face shell material — avoid drilling into the hollow core. A depth stop set to face-shell thickness plus 1" prevents drilling through into the void.
Electrical and Plumbing Rough-In
Conduit straps, J-hooks, pipe clamps, and electrical box mounting to concrete use 3/16" Tapcon almost universally. Short screws (3/4" to 1-1/4" length) are typically adequate for these low-load applications. The speed advantage of concrete screws over expansion anchors is most apparent here — an electrician running conduit might install 50–100 concrete screws in a day, and the ability to snap in a screw with an impact driver instead of setting expansion anchors saves significant time.
Concrete Screws vs Other Concrete Fasteners
| Fastener Type | Installation Speed | Removable? | Load Capacity | Best For | Limitations |
|---|---|---|---|---|---|
| Concrete Screw (Tapcon) | Fast (drill + drive) | Yes (once) | Moderate — 230–620 lbs | General fastening, light-to-medium loads | Limited embedment; not for very high loads |
| Structural Concrete Screw (Titen HD) | Fast-moderate | Limited | High — up to 2,100 lbs | Structural connections, ledger boards | Higher cost; requires larger bit |
| Sleeve Anchor | Moderate (drill, insert, tighten) | No (expansion damages hole) | High — 800–3,000+ lbs | Heavy equipment, overhead anchoring | Not removable; larger hole required |
| Wedge Anchor | Moderate | No | Very high — 1,500–6,000+ lbs | Structural, overhead, heavy machinery | Not removable; minimum edge distance critical |
| Powder-Actuated (Hilti, Ramset) | Very fast (one shot) | No | Moderate — depends on pin | High-volume framing, track installation | Requires gun and loads; loud; no removal |
| Epoxy Anchor (chemical) | Slow (drill, clean, inject, cure) | No | Highest — 3,000–20,000+ lbs | Rebar dowels, post-installed rebar, critical structural | Cure time 4–24 hrs; hole cleaning critical |
| Drop-In Anchor | Moderate (drill, set with tool) | No | Moderate — 400–1,500 lbs | Overhead threaded-rod connections, HVAC hangers | Requires setting tool; flush to surface only |
Edge Distance and Spacing Requirements
| Screw Diameter | Min. Edge Distance | Min. Screw Spacing (c-c) | Min. Distance from Other Anchors | At Min. Distance, Load Reduction |
|---|---|---|---|---|
| 3/16" | 1-3/4" (use 2-1/2" practical) | 1-3/4" | 3" | Consult ESR table |
| 1/4" | 1-3/4" (use 2-1/2" practical) | 1-3/4" | 3" | Consult ESR table |
| 3/8" (Titen HD) | 3" | 3" | 6" | Consult ESR-2713 |
| 1/2" (Titen HD) | 3" | 4" | 8" | Consult ESR-2713 |
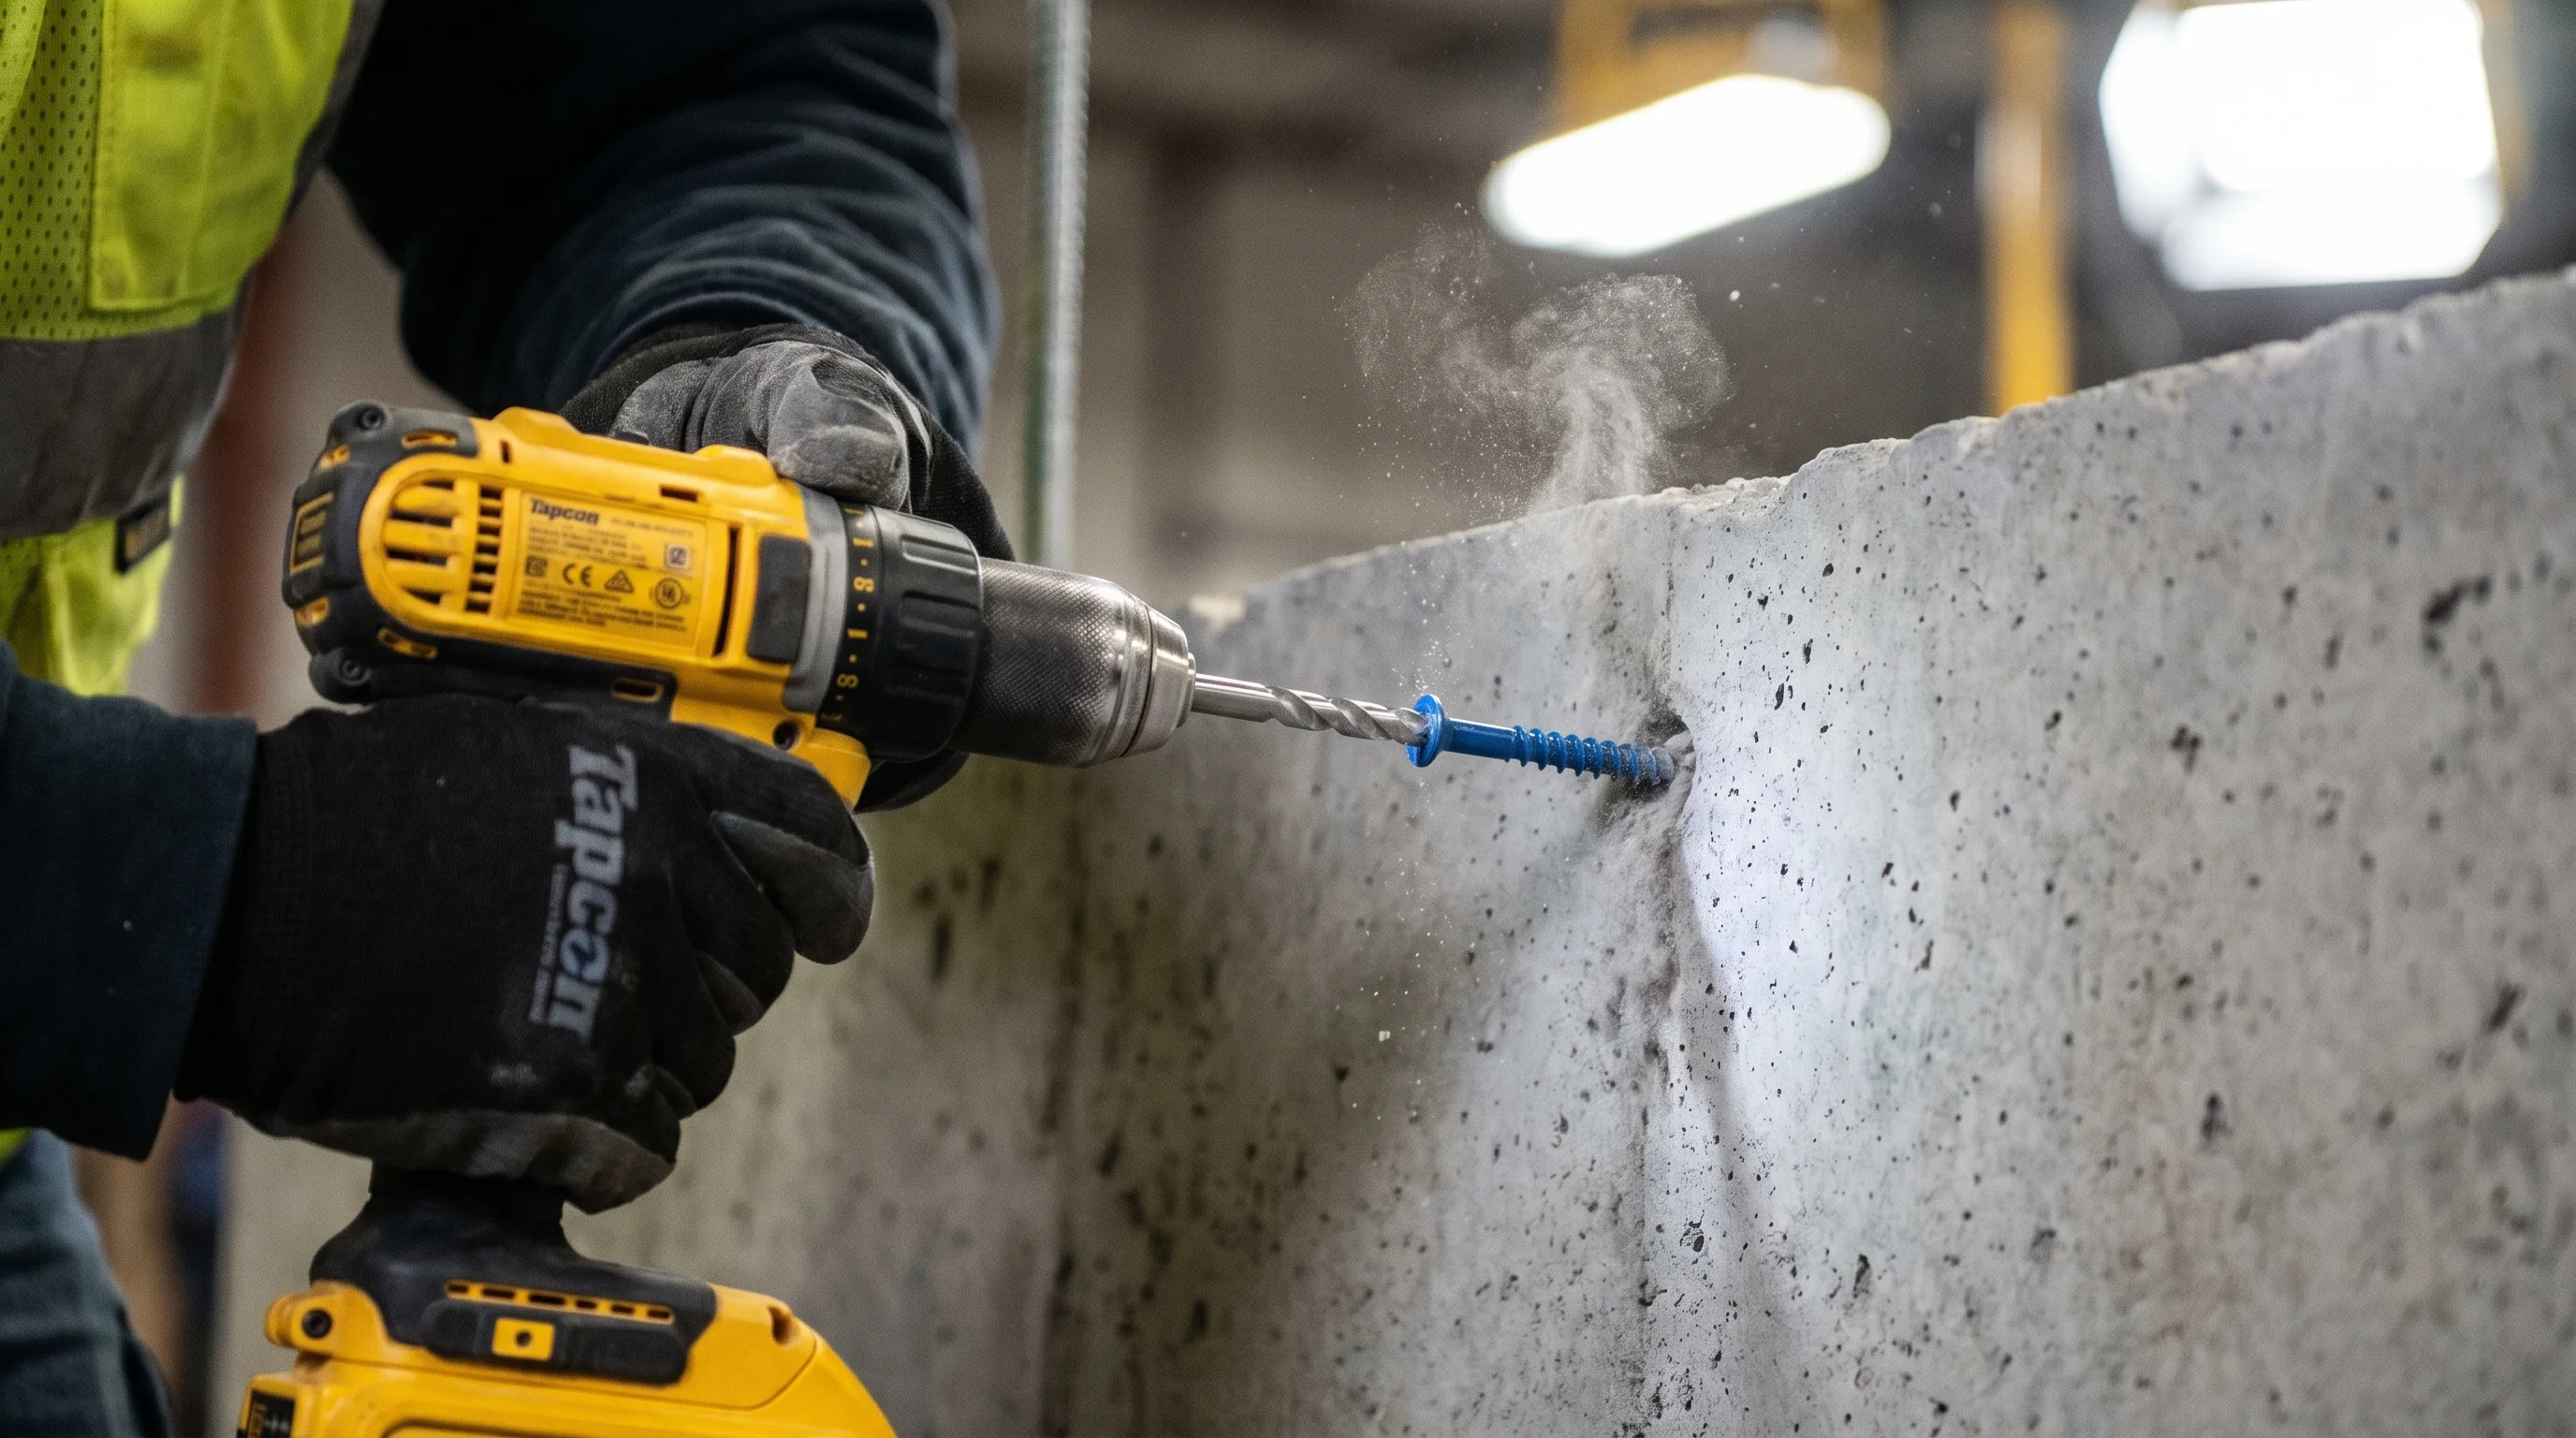
8-Step Installation Process
-
1
Select Screw Length
Screw length = material thickness being fastened + required embedment depth. For a 3/4" furring strip requiring 1-1/4" embedment: 3/4" + 1-1/4" = 2" screw. Add 1/4" to 1/2" buffer if the material thickness is variable (rough lumber, uneven concrete surface). Round up to the next available length — it's better to have 1/16" of thread protruding under the head than to be short of embedment.
-
2
Mark and Pre-Drill the Fixture
For metal fixtures: pre-drill clearance holes through the metal with a metal drill bit slightly larger than the screw shank diameter (not the thread OD). For wood: no pre-drilling needed — the concrete screw's shank passes through wood without threading it. Position the fixture exactly where it will be installed, clamp or hold it in place, then use it as a drilling template for the concrete holes.
-
3
Drill the Concrete Pilot Hole
Use a hammer drill (rotary hammer for larger diameters) with the correct carbide-tipped bit. Set a depth stop to the required embedment + 1/2" extra for dust clearance at the bottom. Drill perpendicular to the surface — angled holes reduce holding capacity and cause the screw to bind. Apply steady forward pressure without forcing — let the hammer action do the work. For CMU, stop drilling when you feel the bit break through the face shell into the void.
-
4
Clean the Hole
Blow out the hole with compressed air (2–3 puffs from a blow bulb or compressed air gun). Remove the material being fastened from the hole area first — concrete dust blown onto the fixture face reduces clamping. Cleaning is mandatory: fine concrete dust at the bottom of the hole acts as a compressible layer that prevents full embedment and reduces holding capacity. For horizontally drilled holes, a bottle brush or pipe cleaner removes dust the blow-out misses.
-
5
Position the Fixture and Align the Screw
Place the fixture over the hole(s). Start the concrete screw by hand through the fixture hole and into the concrete pilot hole — confirm it starts straight before applying power. If installing multiple screws, start all screws by hand before driving any of them — this ensures the fixture alignment is correct before you commit to any single screw position.
-
6
Drive the Screw — Drill Mode Only
Use a drill or impact driver set to drill mode — never use a hammer drill with hammering engaged to drive the screw. The percussion would vibrate the threads and destroy the cut grooves in the concrete. Drive at moderate speed (500–800 RPM for 3/16"–1/4") with steady forward pressure. Resistance should increase as the screw approaches full embedment — this is the hi-lo threads engaging the concrete.
-
7
Stop at Correct Torque — Do Not Overdrive
Stop driving when the screw head contacts the fixture and resistance increases sharply. Overdriving strips the concrete threads — the screw will continue to turn freely with no resistance, which means it has lost grip and must be removed. If you feel the resistance suddenly drop while the screw is still short of full embedment (the head hasn't contacted the fixture), the threads have stripped — remove and relocate. Set the clutch on your drill to an appropriate torque setting to prevent overdriving.
-
8
Verify Installation and Test
Visually confirm the screw head is snug against the fixture with no gap. For critical applications, a torque wrench verification at the manufacturer's specified installation torque confirms proper engagement (Tapcon 1/4": 35–45 ft-lbs installation torque). For structural connections, document the installation per the ESR report requirements — some inspectors require photos of the hole depth before installation. Apply a light tug test to the fixture — any movement indicates inadequate engagement.
8 Common Concrete Screw Mistakes
- Using the wrong drill bit size. The most common failure cause. A bit that is even 1/32" too large produces a hole the screw spins in freely. Use exactly the specified bit — 5/32" for 3/16" screws, 3/16" for 1/4" screws, 5/16" for 3/8" screws.
- Not drilling deep enough. The hole must be embedment depth plus at least 1/2" for dust clearance. Drilling only to the exact embedment depth leaves a dust plug at the bottom that prevents the screw from reaching full engagement. The screw will strip before reaching full depth.
- Skipping the blow-out step. Concrete dust in the hole significantly reduces holding capacity. This step takes 5 seconds and is skipped on 90% of DIY installations. Never skip it.
- Driving in hammer mode. Engaging the hammer function on a rotary hammer while driving the screw destroys the concrete threads. Always disengage hammer mode before switching from drilling to driving.
- Overdriving and stripping. The moment you feel resistance disappear while the screw still has travel remaining, you've stripped the hole. Stop immediately — continuing to drive makes the hole worse. Extract the screw, move at least 2" away, and start over.
- Placing screws too close to the edge. Less than 1-3/4" from a concrete edge causes spalling and blowout — the concrete simply fractures instead of holding. Maintain at least 2-1/2" practical edge distance for any concrete screw.
- Using standard zinc screws with treated lumber outdoors. ACQ and CA pressure-treated lumber are highly corrosive to zinc coatings. Standard Tapcon screws corrode within 1–3 years in contact with ACQ outdoors. Use hot-dip galvanized or stainless steel for all outdoor treated lumber connections.
- Attempting to reinstall in the same hole. Once removed, a concrete screw hole is compromised. The threads have already been cut — reinstallation strips them further. Always move to a fresh location or fill and re-drill.
Quick Reference — Best Screw by Application
Light loads, fast install, 3/4"–1-1/4" length.
1-3/4" embedment, 24" spacing, treated lumber contact.
Thresholds, stair nosings, surface trim.
ICC-ESR structural values, 1,505 lbs shear.
316 SS, treated lumber compatible, deck use.
Best value per screw for non-structural work.
Frequently Asked Questions
What size drill bit do I use for a concrete screw?
One size smaller than the screw's major (outer) thread diameter: 5/32" for 3/16" screws, 3/16" for 1/4" screws, 5/16" for 3/8" screws, 3/8" for 1/2" screws. Always use a carbide-tipped masonry bit — standard HSS bits cannot drill concrete. The undersized hole is intentional: the screw's hi-lo thread cuts into the concrete wall of the hole to create mechanical interlock.
How deep should a concrete screw be embedded?
Minimum 1" for 3/16" and 1/4" screws; maximum effective embedment is 1-3/4". Drill the hole at least 1/2" deeper than the required embedment to provide clearance for concrete dust at the bottom. For structural 3/8" Titen HD: minimum 2-1/4", maximum 4-1/2". More embedment within the effective range = more holding capacity.
Can concrete screws be removed and reused?
They can be removed but not reused in the same hole — the hi-lo thread cuts the concrete grooves on first installation and strips them on removal, significantly reducing capacity. For structural connections, never reuse concrete screws. For non-structural applications requiring repositioning, fill the old hole with non-shrink grout and drill a new hole at least 2" away.
What is the difference between a concrete screw and a Tapcon?
Tapcon is a brand name — the original and dominant concrete screw by ITW Buildex. "Concrete screw" is the generic term for any threaded fastener that taps directly into a pre-drilled hole in concrete without a separate anchor or expansion insert. Tapcon-brand screws have a blue coating, proprietary thread geometry, and ICC-ESR-1671 evaluation for code-compliant use.
How much weight can a concrete screw hold?
Allowable loads (ultimate ÷ 4 safety factor): 3/16" Tapcon at 1-3/4" embedment in 3,000 PSI concrete — ~270 lbs tension, ~340 lbs shear. 1/4" Tapcon — ~500 lbs tension, ~620 lbs shear. 3/8" Titen HD at 3-1/4" embedment — ~1,075 lbs tension, ~1,505 lbs shear. Always check the specific ICC-ESR report for your exact application.
Can I use a regular drill to install concrete screws?
You need a hammer drill to drill the pilot hole — a regular drill cannot drill through concrete. For driving the screw after the pilot hole is drilled, a regular drill or impact driver works well. Never drive the screw with the hammer drill in hammer mode — always disengage hammering when driving to avoid vibrating the threads loose.
What is the minimum edge distance for concrete screws?
For 3/16" and 1/4": minimum 1-3/4" per ESR reports, but use 2-1/2" as a practical working minimum. For 3/8" Titen HD: minimum 3". Driving too close to an edge causes concrete spalling and dramatically reduced holding capacity.
Are concrete screws waterproof — can I use them outdoors?
Standard Tapcon's blue climaseal coating handles occasional moisture but is not rated for full outdoor exposure or treated lumber contact. For outdoor use, use hot-dip galvanized or stainless steel screws. For direct contact with ACQ or CA pressure-treated lumber, stainless steel (Type 304 or 316) is mandatory — treated lumber corrodes zinc coatings within months.