
How to Make Concrete Planters: DIY Concrete Pots, Large Planters and White Concrete
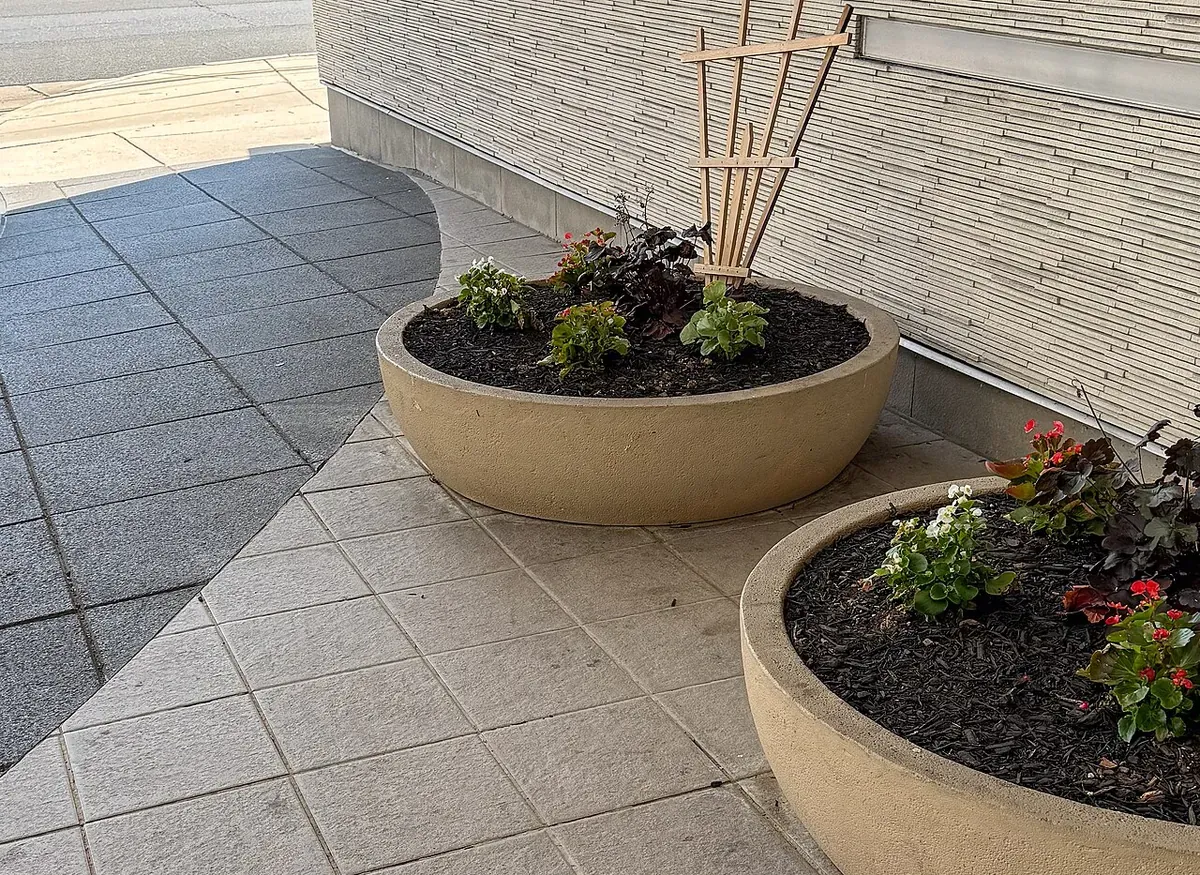
Photo: Tony Webster, Big Concrete Planters, Wikimedia Commons, CC BY 2.0.
Quick Answer
To make concrete planters, use two containers, one smaller than the other, as an outer and inner mold. Coat both with release oil or cooking spray, and put a cork, dowel or PVC plug in the bottom of the outer mold for a drain hole. Mix sand mix (topping mix) for small DIY concrete pots or standard concrete mix for large planters to a thick oatmeal consistency, fill the bottom about 1 inch deep, set the inner mold and weigh it down, then fill the walls. Tap the sides to release bubbles. Demold after 24 to 48 hours, keep the planter damp for several days to cure, then soak or rinse it to lower the alkalinity before planting. For white concrete, use white portland cement with white or silica sand.
Concrete planters look modern, last for decades outdoors and cost very little to make. With a bag of mix and a few plastic containers, you can make small DIY concrete pots for succulents on a windowsill, or large planters for a patio. The process is the same at every size: build a mold, pour, wait, demold and cure. The details, like the mix, wall thickness and reinforcement, change with the size.
This guide explains how to make concrete planters step by step, how to choose the mix and mold, how to make white concrete, how to make lightweight hypertufa pots, and how to finish, seal and plant them safely.
What You Need
- Concrete mix: sand mix or topping mix for small pots; standard concrete mix for large planters; or white cement and white sand for white concrete. See how much a bag of concrete costs.
- Two molds: plastic buckets, food containers, pots, cardboard boxes or plywood boxes, one about 1 to 2 inches smaller on each side than the other.
- Release agent: cooking spray, vegetable oil or form release oil.
- Drain hole plug: wine cork, wooden dowel, short PVC pipe or a plastic bottle cap, taped or glued in place.
- Weights: sand, gravel or rocks to hold the inner mold down.
- Mixing tub, trowel or paint stick, measuring cup, water.
- Gloves, safety glasses and a dust mask.
- Optional: concrete fibers, wire mesh, color pigment, sandpaper, sealer.
Step 1: Choose the Mix
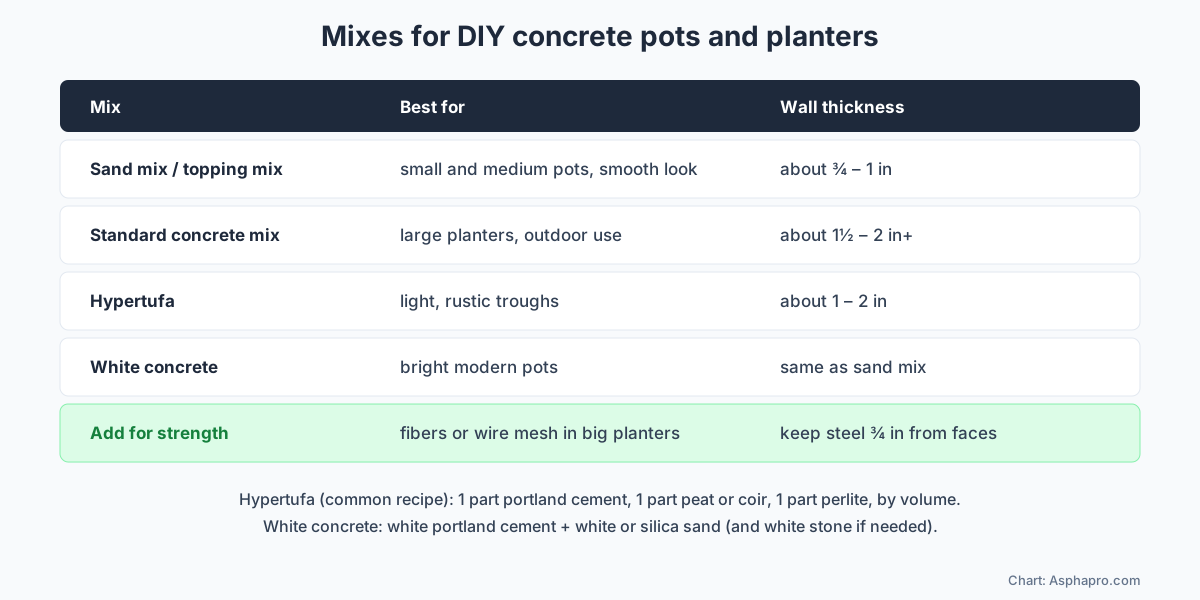
- Sand mix (topping mix or sand/topping mix): portland cement and sand, no gravel. It flows into thin walls and gives a smooth finish. Best for small and medium DIY concrete pots.
- Standard concrete mix: cement, sand and gravel. Stronger in thick walls and cheaper for large planters, but gravel can leave rough spots in thin walls.
- High-strength or crack-resistant mixes: some bagged mixes include fibers, which help thin walls resist cracking.
- Mortar mix: works for very small pots, but it is designed for bonding bricks and is usually weaker than sand mix.
- Countertop mixes: very smooth, strong and flowable; more expensive but great for fine detail. See concrete countertops.
Step 2: Make the Mold
The simplest mold is two nested containers. The gap between them becomes the wall of the planter; the depth of concrete under the inner container becomes the bottom.
- Wall thickness: about ¾ to 1 inch for small pots, 1½ to 2 inches or more for large outdoor planters.
- Bottom thickness: about the same as the walls, at least 1 inch.
- Shapes: round buckets make cylinders; square food containers or boxes make cubes. Tapered containers (wider at the top) release more easily.
- Custom molds: for large rectangular planters, build an outer box from melamine or plywood screwed together so it can be taken apart, and an inner box from rigid foam board, which is easy to remove or cut out.
- Release: coat the inside of the outer mold and the outside of the inner mold with oil or spray.
- Drain hole: glue or tape a cork or dowel to the center of the outer mold's bottom. It must be as tall as the bottom thickness.
Step 3: Mix the Concrete
- Put on gloves, glasses and a dust mask; cement dust is irritating and wet concrete is caustic to skin.
- Add dry mix to a tub, then add water slowly while stirring.
- Mix to a thick oatmeal or peanut butter consistency. It should hold its shape but flow when tapped. Too much water makes weak, cracked planters.
- Mix pigment in with the water if you want colored concrete.
- Mix only what you can pour within about 20 to 30 minutes.
Step 4: Pour and Set the Inner Mold
- Fill the bottom of the outer mold to the planned bottom thickness, around the drain plug.
- Press the inner mold into the concrete, centered, and add weights inside it.
- Fill the gap between the molds in layers, poking with a stick or dowel to remove air pockets.
- Tap the outside of the mold all around with a rubber mallet, or hold an orbital sander against it, to bring air bubbles to the surface. This gives smoother walls.
- Level the top rim and smooth it with a trowel or gloved finger.
Step 5: Wait, Then Demold
Let the planter set in the shade, covered with a plastic bag to keep moisture in. After about 24 to 48 hours, remove the inner mold first by twisting and pulling, then the outer mold, then the drain plug. If a mold is stuck, flex it, cut it off or wait another day. Handle the planter gently; it is still weak.
Step 6: Cure
Concrete gains strength as it cures, which needs moisture. Mist the planter and keep it wrapped in plastic for at least 3 to 7 days. Strength keeps rising for weeks; concrete typically reaches its design strength at about 28 days. See how long concrete takes to cure.
Step 7: Leach Before Planting
Fresh concrete is highly alkaline. Lime leaching from a new planter can raise soil pH and harm some plants, especially acid-lovers. Before planting, soak the planter in water for several days, changing the water daily, or leave it outdoors through a few rains. Some makers rinse with a mild vinegar solution and then plain water. Most cacti and succulents tolerate slightly alkaline soil well.
Making Large Concrete Planters
Big outdoor concrete planters need more planning than small pots because they are heavy and carry soil weight, frost and moving stresses.
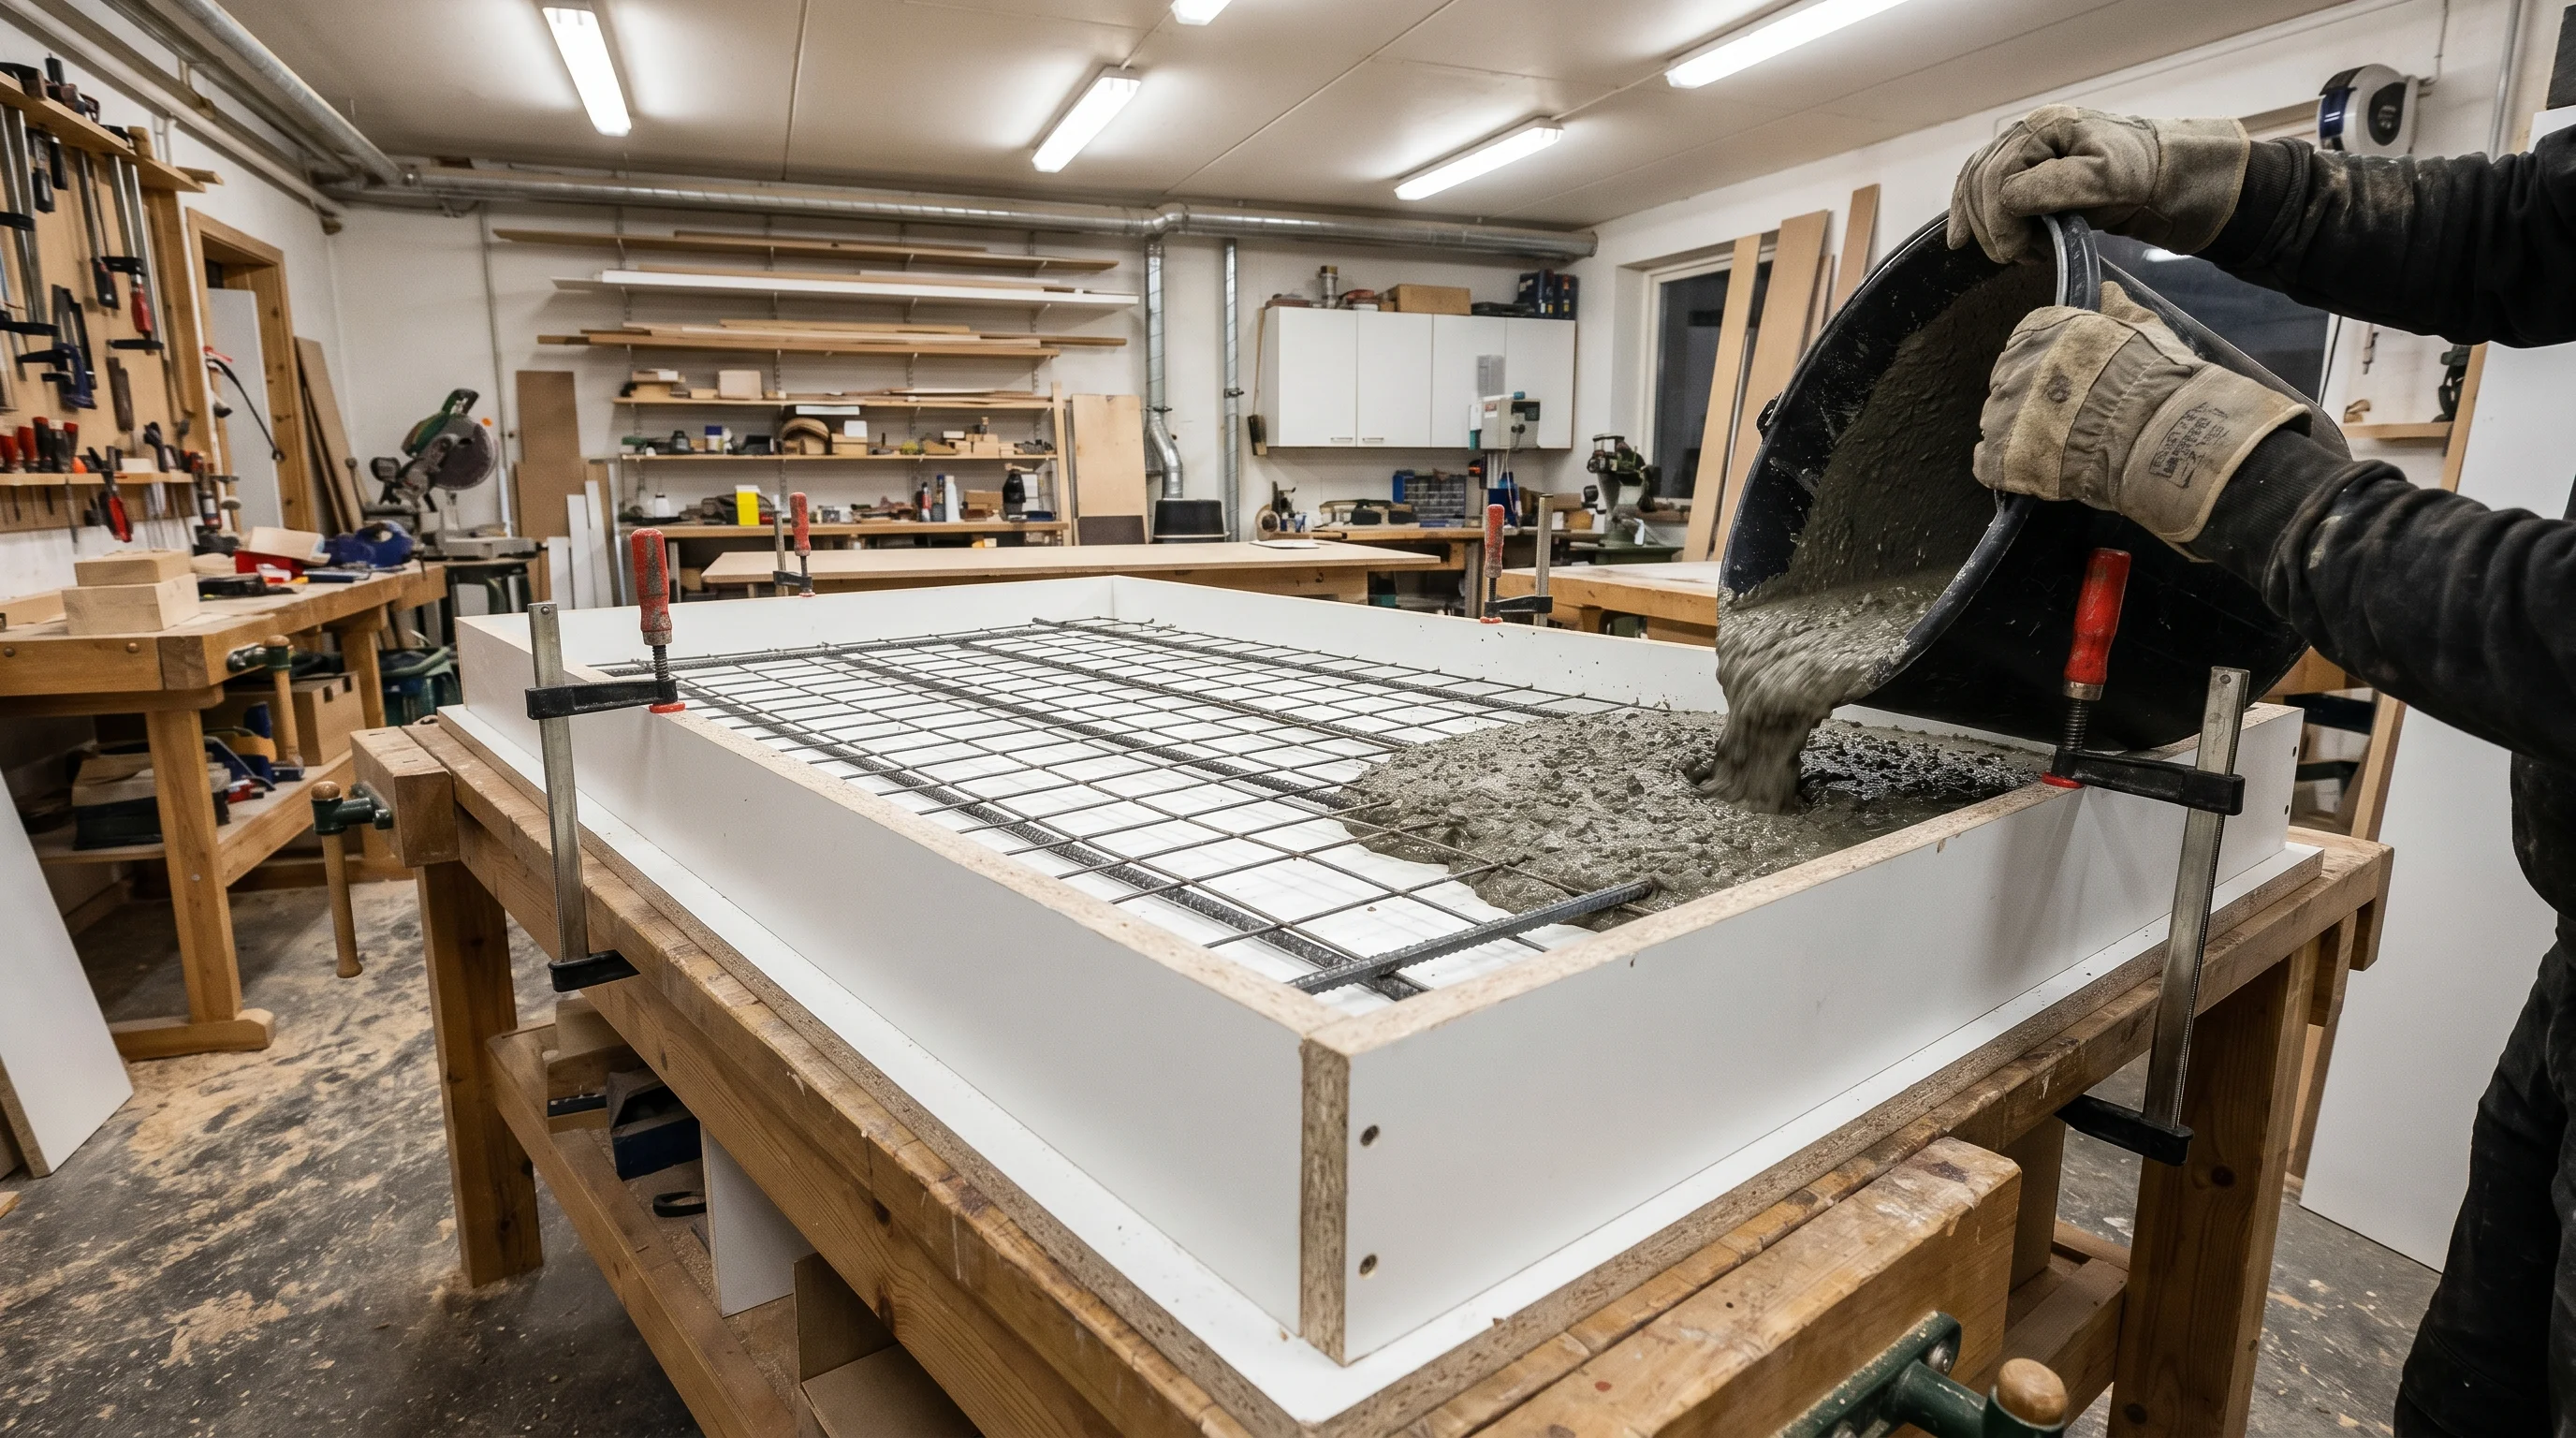
- Mold: build an outer box from ¾-inch melamine or plywood, screwed (not nailed) at the corners so it can be taken apart. Make the inner mold from rigid foam board taped together, which can be cut out after the pour. Caulk inside corners with silicone for rounded edges.
- Reinforcement: add synthetic fibers to the mix, and set galvanized wire mesh or a light rebar cage in the walls and floor. Keep steel at least ¾ inch from all faces so it does not rust through.
- Mix: standard concrete mix, or a sand mix with fibers for a smoother face.
- Drainage: cast two or more drain holes with PVC pipe pieces.
- Pour location: pour close to where the planter will live. A 24-inch cube planter with 2-inch walls can weigh a few hundred pounds.
- Feet: cast small feet or set the planter on pavers so it drains and does not stain the patio.
To estimate weight, work out the volume of concrete (outer volume minus inner volume) and multiply by roughly 140 to 150 pounds per cubic foot. See how much a yard of concrete weighs.
Small DIY Concrete Pots for Succulents
Small DIY concrete pots are a great first project. Use plastic food containers, yogurt cups or small buckets as molds, with a smaller container or cup inside. Sand mix or a fine countertop mix gives smooth, sharp edges. Walls about ¾ inch thick are enough. Make several at once from one small bag. Because succulents like fast drainage, cast a hole or drill one later with a masonry bit while the concrete is a few days old.
A Worked Example: Four Small Pots From One Bag
- Molds: four 32-ounce deli containers for the outside, four 16-ounce cups for the inside, all sprayed with cooking oil. A wine cork hot-glued in each outer container.
- Mix: about a third of a 50-pound bag of sand mix with water to a thick oatmeal consistency.
- Pour: about 1 inch in each bottom, press in the cups, fill cups with gravel as weights, fill the walls and tap the sides for a minute each.
- Cover: each pot in a plastic grocery bag, in the shade.
- Demold: after 36 hours, twist out the cups and peel off the containers.
- Cure: mist and rewrap daily for 5 days.
- Finish: sand the rims with 120-grit sandpaper, soak the pots in a bucket of water for 3 days, changing it daily, then let them dry and plant.
Mold Ideas for DIY Concrete Pots
Almost anything with a smooth, flexible or removable surface can shape DIY concrete pots. Good options:
- Plastic buckets and paint pails: classic cylinder concrete planters.
- Food storage containers: square and rectangular concrete pots for herbs and succulents.
- Plastic plant pots: nest a smaller pot inside a bigger one for tapered concrete planters that release easily.
- Milk and juice cartons: peel-away molds for tall, slim concrete pots.
- Cardboard boxes: lined with packing tape, they make one-time molds for larger concrete planters.
- Silicone molds: sold for concrete crafts, flexible and reusable, ideal for small white concrete pots with crisp detail.
- Balls and bowls: a rubber ball cut in half or a mixing bowl makes rounded concrete pots.
- Plywood and melamine boxes: the go-to for large, square outdoor concrete planters.
Avoid molds with undercuts, like a container that is narrower at the top, unless the mold is flexible or can be cut off. Tapered sides are your friend when you learn how to make concrete planters.
Indoor vs Outdoor Concrete Planters
Indoor concrete planters need smooth finishes, drainage trays or no holes with a plastic liner, and felt pads to protect floors and furniture. Sealing the outside keeps watering stains off. Outdoor concrete planters need drainage holes, thicker walls in cold climates, and a mix that holds up to sun, rain and frost. Large outdoor concrete pots also need a level, firm spot, because they are heavy once filled with wet soil.
Planting Your New Concrete Planters
- Leach the planter first so lime does not affect soil pH.
- Cover the drain hole with mesh or a shard of broken pot so soil does not wash out.
- Use a potting mix suited to the plants; cacti mix for succulents, general potting mix for herbs and flowers.
- Water thoroughly and check that water drains freely.
- Set outdoor concrete planters on feet or pavers so the base does not sit in water.
Concrete breathes a little, so soil in concrete pots dries a bit faster than in glazed ceramic but slower than in terracotta. Adjust watering for the first few weeks.
White Concrete Tips for Clean, Bright Pots
White concrete shows every flaw, so a few extra steps help. Use fresh white cement, because old bags can clump and discolor. Measure water carefully between batches, since more water makes white concrete look grayer and weaker. Use clean plastic or silicone molds; wood can stain white concrete. Cover the white concrete pots right after pouring and keep them evenly damp while curing to avoid dark blotches. Lightly sand the finished white concrete with fine sandpaper, then seal it to keep it bright and stain-free.
Finishing Touches
- Sanding: smooth rims and edges with sandpaper or a diamond sanding pad. Wear a dust mask.
- Filling bubbles: rub a cement slurry or a little sand mix into pinholes, then sand.
- Painting: masonry paint, acrylic craft paint or dipped color bands look striking on white or gray pots.
- Staining: concrete stains add color that soaks in rather than sitting on top; see concrete staining.
- Sealing: a breathable concrete sealer on the outside slows staining and moss. Leave the inside unsealed or use a plant-safe sealer. See concrete sealer.
- Felt pads: add felt or cork pads under indoor pots to protect furniture.
Coloring Concrete
Powdered or liquid iron oxide pigments made for concrete color the mix throughout. Add them to the mixing water for even color, and measure carefully so batches match. Pigment makers list dosage as a percentage of cement weight; too much weakens the concrete. Black, charcoal, terracotta and sand tones are popular for planters. Pigment in a gray cement mix gives muted colors; white cement gives brighter, cleaner colors.
Decorative Ideas
- Leaf prints: press leaves into wet concrete on the outside face of a mold-free planter, or line the mold with leaves.
- Textured molds: use textured containers, rubber mats or bubble wrap inside the outer mold.
- Exposed aggregate: brush the surface lightly after demolding to expose sand and small stones.
- Two-tone pots: pour a colored layer, let it firm, then pour a second color.
- Geometric shapes: build faceted molds from foam board or plastic sheet.
- Embedded details: glass pieces, tiles or stones pressed into the outer face.
Concrete Planters vs Other Materials
| Material | Weight | Durability outdoors | Notes |
|---|---|---|---|
| Concrete planters | Heavy | Excellent; can crack in hard freezes if water is trapped | Cheap to make, wind-proof, modern look |
| Hypertufa | Light to medium | Good | Rustic, porous, plant-friendly |
| Terracotta | Medium | Fair; can crack in frost | Breathes well; dries fast |
| Glazed ceramic | Medium | Good if frost-rated | Decorative, holds moisture |
| Plastic / resin | Light | Fair; fades in sun | Cheap, easy to move |
| Fiberglass | Light | Good | Expensive, often made to look like concrete |
Concrete planters win on cost, wind resistance and lifespan. Their weight is a downside on balconies and roof decks; check load limits before placing large concrete planters on a balcony, or choose hypertufa or lightweight mixes.
Tools That Make It Easier
- A drill with a paddle mixer for bigger batches of concrete planter mix.
- An orbital sander (no sandpaper) pressed against the mold to vibrate out bubbles.
- A small margin trowel for rims.
- A spray bottle for misting during curing.
- Diamond hand pads for smoothing edges of DIY concrete pots.
- A masonry drill bit for adding drain holes later.
Troubleshooting
Cracks
Usually from too much water in the mix, walls that are too thin, drying too fast, or demolding too early. Use less water, add fibers, keep the planter wrapped and wait longer before demolding.
Lots of air bubbles
The mix was too stiff or not vibrated. Tap the mold longer or use an orbital sander against the sides. A small amount of dish soap in the water is a common hobby trick to reduce bubbles, but it can slightly weaken the mix.
Mold stuck
Not enough release, or the mold has straight sides or undercuts. Flex it, cut it off, or use tapered molds next time.
Crumbly edges
Too dry, too weak a mix, or demolded too early. Cure longer and handle gently.
White powder on the surface
Efflorescence, salts drawn to the surface as the concrete dries. Brush it off dry; it usually fades. See our notes on efflorescence.
Winter and Frost Care
Concrete planters left outside in freezing climates can crack if soil and water inside freeze and expand. Thick walls, good drainage, slightly tapered sides and a sealer on the outside help. In cold regions, empty small pots or move them under cover for winter, and set large planters on feet so water drains away. Hypertufa is more frost-tolerant than its weight suggests but still benefits from good drainage.
Cost of DIY Concrete Planters
A single bag of sand mix makes several small pots, so each one costs very little. Large planters use more concrete plus mold materials like melamine and foam board, which can be reused. White cement and pigments cost more than regular gray mix. Compared with store-bought concrete planters, DIY versions are usually far cheaper, especially for large sizes. See how many bags of concrete are in a yard for bag yields.
Making Concrete Planters in Batches
Once you have made one planter, making several at a time saves mix, cleanup and time. Set up a simple assembly line: prepare all molds with release and drain plugs first, mix one batch, fill every mold, then vibrate and cover them all. Use the same water amount for each batch so color and strength stay consistent, especially with pigments or white concrete. Number the molds and keep notes on the mix and water used, so you can repeat a result you like.
Reusable plastic and silicone molds hold up for many pours if you clean them right after demolding while any residue is still soft. Melamine boxes for large concrete planters can be unscrewed, cleaned, waxed or oiled and stored flat. Foam inner molds are usually one-use, so keep offcuts to make the next set.
Moving and Placing Heavy Planters
Even a medium concrete planter is surprisingly heavy, and it becomes much heavier once filled with damp soil. Place large planters in their final spot before filling them. Use a hand truck, a furniture dolly or a pair of pipes as rollers to move them, and lift with your legs or get a helper. On wood decks and balconies, spread the weight with pavers or a board under the planter, and check the structure can carry it. To lighten the load in tall planters, fill the bottom third with upturned plastic pots or a lightweight filler under landscape fabric, then add soil on top.
Safety
- Wear gloves; wet concrete is alkaline and can burn skin with long contact.
- Wear eye protection when mixing and a dust mask when pouring dry mix and sanding.
- Wash skin promptly if concrete gets on it.
- Do not wash leftover concrete down drains; let it harden and throw it away.
- Lift large planters with help or a dolly.
How to Make White Concrete
Ordinary gray portland cement makes gray concrete. To make white concrete:
- Use white portland cement, sold at masonry suppliers and some home centers.
- Use white or very light sand, such as white silica sand or marble sand.
- For larger pieces, add a white or light aggregate, such as white marble chips.
- A small amount of titanium dioxide pigment makes it brighter white.
- Keep tools and containers clean; gray cement residue tints white mixes.
- Cure under plastic without touching it; uneven drying can cause blotchy color.
A common starting ratio for small white pots is about 1 part white cement to 2 to 3 parts white sand by volume, mixed with water to a thick paste. Some bagged white mortar and white countertop mixes are also available.
Hypertufa Planters
Hypertufa is a lightweight, porous mix that looks like old stone. A common recipe is equal parts by volume of portland cement, peat moss (or coir) and perlite or vermiculite. It is weaker than concrete but light, breathable for plant roots and good for rustic troughs and alpine plant pots. Cure it slowly and leach it like concrete.
Whether you are making one statement piece or a dozen DIY concrete pots as gifts, the same basics apply: a well-oiled mold, a stiff mix, patient curing and a good soak before planting. Get those right and your concrete planters will last for many years.
Frequently Asked Questions
What is the best concrete for planters?
Sand mix or topping mix for small pots; standard concrete mix with fibers or mesh for large planters.
How thick should concrete planter walls be?
About ¾ to 1 inch for small pots and 1½ to 2 inches or more for large outdoor planters.
How long before I can remove the mold?
Usually 24 to 48 hours. Keep curing the planter for several more days.
Do concrete planters need drainage holes?
Yes, for most outdoor plants. Cast a hole with a cork or dowel, or drill one later with a masonry bit.
How do you make white concrete?
Use white portland cement and white sand, plus white aggregate for big pieces. Titanium dioxide makes it brighter.
Is concrete safe for plants?
Yes, after leaching. Soak or rinse new planters to reduce alkalinity before planting.
Can I use quick-setting concrete for planters?
It works for thick, large planters, but it sets fast and is grainier. Sand mix is easier for smooth small pots.
How do I make concrete planters lighter?
Use hypertufa, add perlite to the mix, make thinner walls with fibers, or use a foam core inside large planters.
Should I seal concrete planters?
Sealing the outside helps resist stains and moss. Leave the inside unsealed or use a plant-safe sealer.
Why did my concrete pot crack?
Usually too much water, thin walls, fast drying or early demolding. Use a stiffer mix, fibers and slow curing.
Sources
- Portland Cement Association, curing and concrete basics. cement.org
- Bagged concrete and sand mix manufacturer instructions.
- Image credits: planter photo by Tony Webster, Wikimedia Commons (CC BY 2.0); other images and chart by Asphapro.com.
Wear gloves and eye protection when working with cement. Checked November 2026.
Related Guides
- How to make concrete stepping stones — molds, mix and setting a path