
How to Use Self Leveling Concrete: Prep, Pour and Dry Times
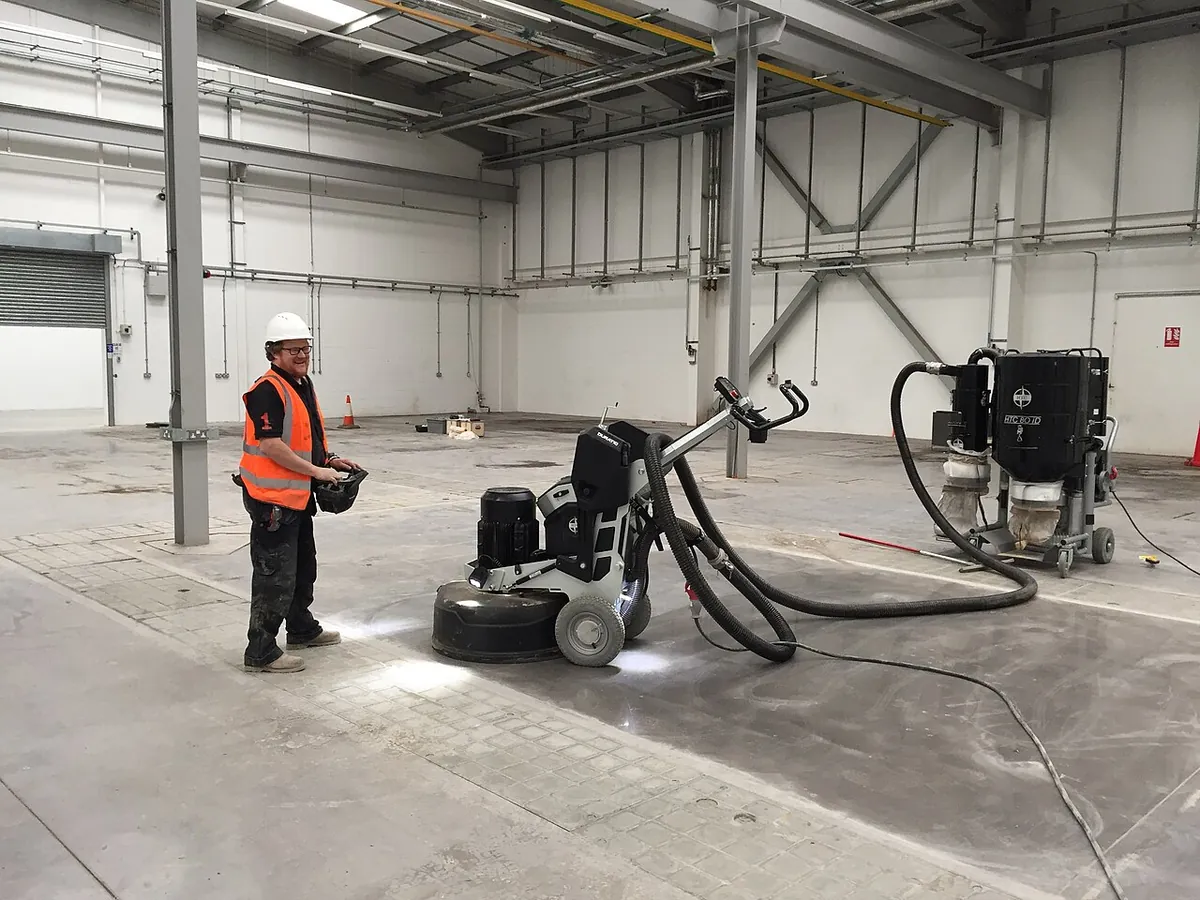
Photo: Kyriakos04072004, Wikimedia Commons, CC BY-SA 4.0
Quick Answer
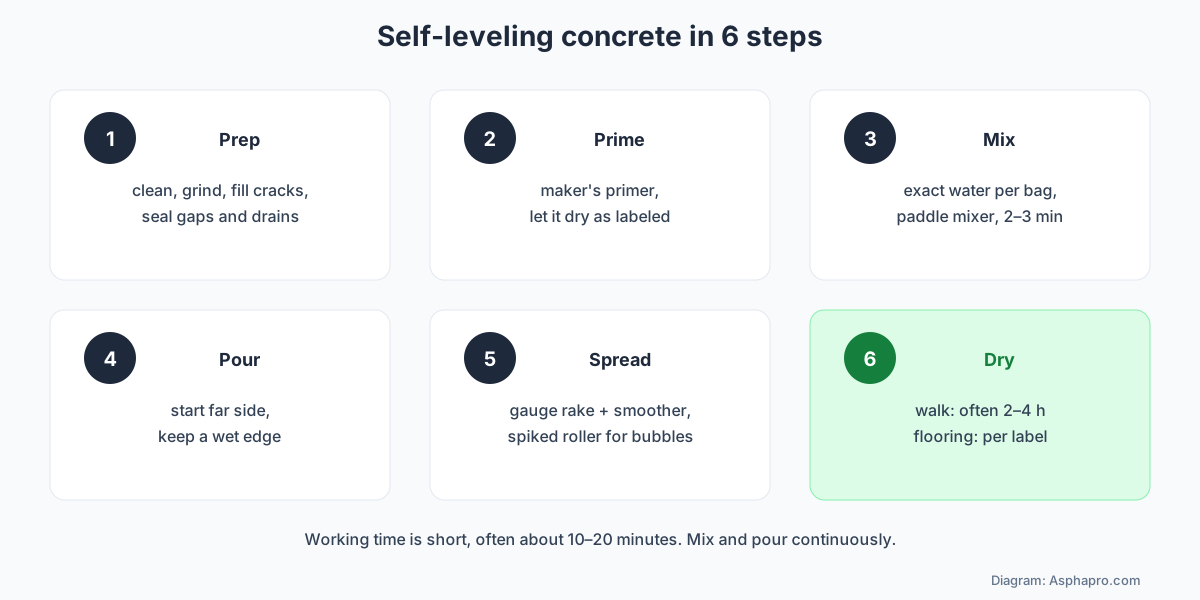
To use self leveling concrete, clean the floor of dust, paint, adhesive and oil, fill cracks and seal gaps so the liquid cannot leak away, and apply the manufacturer's primer. Mix each bag with the exact amount of water on the label using a drill and paddle, then pour right away, starting at the far wall and keeping a wet edge. Spread it with a gauge rake or smoother and roll it with a spiked roller to release air. Most products have a short working time, often about 10 to 20 minutes. How long does self leveling concrete take to dry? Many are walkable in about 2 to 4 hours, ready for tile in several hours to a day, and ready for moisture-sensitive flooring like vinyl, laminate or wood after about a day or more, depending on thickness and conditions. Always follow the product label.
Self-leveling concrete, more accurately called self-leveling underlayment or compound, is a cement-based mix that flows like a thick liquid and settles into a flat, smooth surface. It is used to level uneven concrete floors, fill dips, cover old tile or adhesive residue, and create a flat base for new flooring like tile, vinyl plank, laminate or carpet. When applied correctly, it saves hours of grinding and patching. When applied poorly, it can crack, delaminate, or set before it levels.
This guide explains how to use self leveling concrete step by step, how to apply self leveling concrete over different subfloors, how much you need, how long self leveling concrete takes to dry, and common mistakes to avoid.
What Self-Leveling Concrete Is (and Is Not)
Self-leveling compounds are blends of portland cement and other cements, fine sand, polymers and flow agents. They are designed to be poured thin, often from a featheredge up to about an inch per pour, with some products going thicker when extended with aggregate. They flow under their own weight and level out with light help from a gauge rake or smoother.
- Underlayments: designed to be covered by flooring. They are not meant to be the finished wear surface.
- Self-leveling toppings or wear surfaces: some products are designed to be left exposed, polished or sealed. Check the label.
- Not a structural fix: self-leveler fixes a surface, not a moving, cracked or sinking slab. Fix structural problems first. See concrete leveling cost.
- Mostly interior: most products are for interior use; exterior resurfacing uses different products. See concrete overlay cost.
What You Need
- Self-leveling compound (enough bags plus extra).
- The manufacturer's primer.
- Two clean buckets (one for measuring water) and a heavy-duty drill with a mixing paddle.
- Measuring container marked for the exact water per bag.
- Gauge rake set to the target depth, or a smoother/trowel.
- Spiked roller and spiked shoes.
- Foam backer rod, caulk or expansion foam strip for perimeter and gaps.
- Laser or long level and a marker to map low spots.
- Dust mask or respirator, gloves and eye protection.
Step 1: Check the Subfloor
Self-leveler can only be as good as what it sits on. Check that the concrete is sound, not crumbling or moving, and that any cracks are stable. Measure moisture if flooring will go on top; flooring makers often require moisture tests. Map high and low spots with a laser or long straightedge and mark them so you know where the material needs to go and how much you need.
Step 2: Prepare the Surface
- Clean: remove dust, dirt, oil, grease, paint, curing compounds, sealers and loose material. Self-leveler will not bond to contamination.
- Grind or shot-blast if needed to remove coatings or adhesives and open the surface. Use dust collection; concrete dust contains silica. See how to cut concrete for dust safety.
- Fill cracks and holes: large cracks and holes should be patched; the liquid will drain into them otherwise.
- Seal the perimeter and gaps: caulk gaps at walls, around pipes and at drains, and add an expansion strip along the walls if the product calls for it. Use dams or foam to contain the pour at doorways.
- Vacuum thoroughly: a clean, dust-free surface is essential for bond.
Step 3: Prime
Most self-leveling compounds require a primer, which improves bond, seals the surface so it does not suck water out of the mix (which causes pinholes and weak spots), and reduces bubbles. Apply the manufacturer's primer at the recommended dilution with a roller or brush, avoid puddles, and let it dry as the label directs, often 1 to 3 hours. Over porous concrete, two coats may be needed. Do not skip primer.
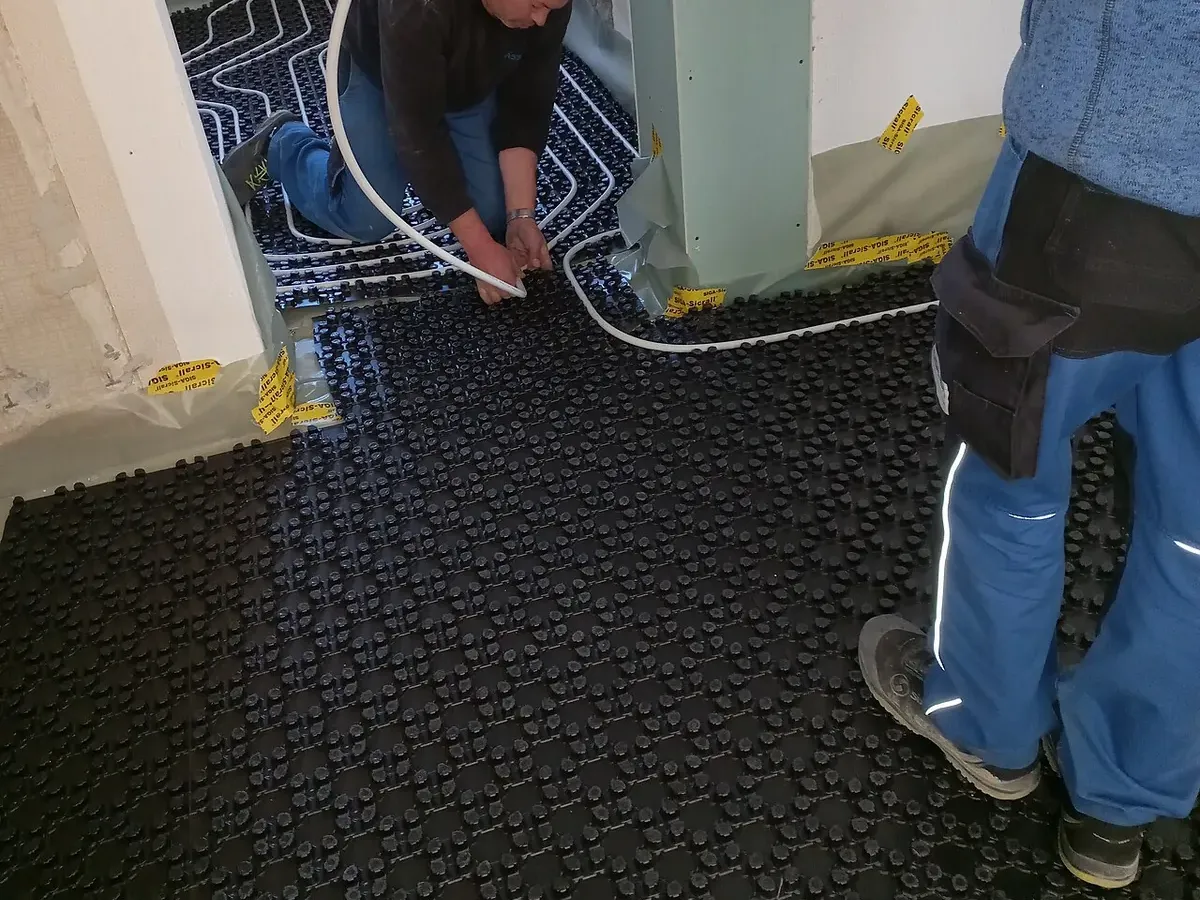
Photo: Asurnipal, Wikimedia Commons, CC BY-SA 4.0.
Step 4: Mix
- Measure the exact amount of clean water on the bag into a bucket. Too much water weakens the compound and causes cracking and dusting; too little stops it from flowing.
- Add the powder to the water while mixing with a drill and paddle at the recommended speed.
- Mix for the time on the label, usually about 2 to 3 minutes, until smooth and lump-free.
- Do not let it sit; pour right away.
For bigger rooms, have one person mixing while another pours, and use two buckets so mixing never stops. Large commercial jobs use pumps.
Step 5: Pour and Spread
- Start at the far side of the room, away from the exit, and pour in a ribbon or band.
- Pour the next batch right next to the previous one while it is still wet, keeping a continuous wet edge.
- Use a gauge rake set to the target thickness, or a smoother, to push the material into place and help it level.
- Run a spiked roller over it to release trapped air and blend batches, wearing spiked shoes to walk on it.
- Work quickly; most products have a working time of about 10 to 20 minutes and can lose flow sooner in warm or dry conditions.
How Long Does Self Leveling Concrete Take to Dry?
- Walkable: often about 2 to 4 hours.
- Tile: often after several hours to about a day, per the label.
- Vinyl, laminate, wood and other moisture-sensitive flooring: often after about 24 hours or more, longer for thick pours or cool, humid conditions; some products and flooring makers require moisture testing first.
- Full strength: continues to develop over days.
Keep the room at the temperature range on the label, avoid direct sun, drafts and heaters blowing on the surface during the first hours, and do not force-dry it.
How Much Self-Leveling Concrete Do You Need?
Coverage depends on thickness. A common rule of thumb is that a 50-pound bag of self-leveling underlayment covers roughly 50 square feet at ⅛ inch thick, about 25 square feet at ¼ inch, and much less at greater depths, but products vary, so always check the bag. To estimate:
- Measure the room's area in square feet.
- Map the floor with a laser or straightedge to find the average depth needed. Low spots need more; high spots may need none.
- Use the bag's coverage table for that average depth.
- Add 10 to 15% extra for waste, uneven areas and material that flows into gaps.
Running out halfway through a pour is one of the worst problems with self-leveler, because the first batches begin to set while you go back to the store. Buy extra and return unopened bags if the store allows. For larger volumes of concrete, see how to calculate yards of concrete.
How to Apply Self Leveling Concrete Over Different Subfloors
Concrete slabs
The most common and easiest base. Clean, grind if needed, repair cracks, prime and pour. Basement floors may need moisture checks first; see mold on concrete for moisture tips.
Old tile or terrazzo
Many self-levelers can go over well-bonded ceramic tile after it is cleaned and scuffed and primed with a bonding primer. Loose tiles must be removed.
Adhesive residue
Old flooring adhesive often must be scraped down to a thin, well-bonded residue, and some products allow pouring over it with the right primer. Old black cutback adhesive may contain asbestos; test it before scraping or grinding. See how to remove adhesive from concrete.
Wood subfloors
Some self-leveling products are rated for plywood subfloors if the floor is stiff enough, the seams are sealed, a metal lath is fastened down, and the right primer is used. Pours over wood are usually thicker. Follow the manufacturer's wood subfloor instructions exactly; flexing floors crack thin cement layers.
Radiant heating
Self-leveling compounds are often poured over electric heating mats or hydronic tubing to embed them and create a flat surface for tile, as in the photo above. Follow both the heating system and self-leveler instructions for minimum cover thickness, and do not turn on the heat until the compound has cured as specified.
Common Mistakes
- Skipping primer: leads to pinholes, bubbles, poor bond and weak spots.
- Adding extra water: makes it flow more easily but weaker, causing cracking, dusting and shrinkage.
- Mixing too little at a time: batches set before the next arrives, leaving ridges and cold joints.
- Not sealing gaps: the liquid drains into cracks, under walls and into drains.
- Pouring too thin or too thick: each product has a minimum and maximum depth.
- Overworking it: after it starts to set, troweling leaves marks.
- Drafts and heat: fans, sunlight or heaters blowing on fresh compound cause cracking and uneven drying.
- Installing flooring too soon: trapped moisture can ruin adhesives and wood flooring.
Fixing Problems
Ridges or lap marks
Sand or grind high spots after the compound has hardened. For future pours, keep a wet edge and mix continuously.
Pinholes and bubbles
Usually from skipping primer or a porous surface. Fill small pinholes with a patching compound before flooring.
Cracks
Hairline cracks are often from too much water, drafts or a moving subfloor. Fill with patching compound if flooring allows. Large cracks over a moving base need the base fixed.
Not level
Self-leveler is self-leveling, not self-planning: if poured thin over a sloped floor, it follows the slope. Use a gauge rake to set the depth, and pour enough to reach your target level, sometimes in two lifts with primer between.
Soft, dusty surface
Usually too much water or freezing during cure. Remove and repour, or apply a hardener if the product maker allows.
Self-Leveling Concrete vs Other Floor Leveling Methods
Self-leveling compound is not the only way to flatten a floor. Choosing the right method depends on how uneven the floor is, how big the area is, and what flooring goes on top.
- Patching compound: for isolated dips and small areas, a trowel-applied patch is quicker and cheaper than pouring a whole room.
- Grinding high spots: when a few ridges or humps stick up, grinding them down may be all that is needed.
- Self-leveling compound: best for large areas with many dips, or for creating a uniformly flat surface for large-format tile and rigid plank flooring.
- Mudjacking or foam leveling: for slabs that have sunk as a whole, lifting the slab is better than pouring thick toppings. See concrete leveling cost.
- New concrete topping or slab: for very uneven or damaged floors, a bonded topping or new slab may be needed. See can you pour concrete over concrete.
Flatness Requirements for Flooring
Flooring manufacturers set flatness tolerances, often expressed as a maximum gap under a straightedge over a set distance. Large-format tile, luxury vinyl plank and engineered wood are especially sensitive, because high and low spots cause lippage, hollow sounds, cracked tiles and separated joints. Check your flooring's installation guide before pouring so you know the target. Self-leveling compound is often the easiest way to meet tight tolerances over large areas, which is why tile setters and flooring installers use it so often.
A Worked Example: Basement Before Vinyl Plank
Say a homeowner is finishing a 400-square-foot basement and plans to install luxury vinyl plank. The concrete slab has dips up to about ¼ inch near the floor drain and an old patched area.
- Moisture check: a plastic sheet test and the flooring maker's recommended moisture test show acceptable levels.
- Prep: they scrape off old paint spots, grind a high ridge, vacuum thoroughly, caulk the wall-floor joint and around pipes, and build a small dam around the floor drain.
- Map: a laser shows the low area covers about 120 square feet, averaging about ⅛ inch deep.
- Prime: they apply two coats of the maker's primer to the porous slab and let it dry.
- Mix and pour: with a helper, they mix three bags in sequence, pouring from the far corner toward the stairs, spreading with a smoother and spike-rolling.
- Dry: they keep the basement at a steady room temperature, walk on it after about three hours, and wait the time the flooring maker requires before installing the vinyl plank.
The result is a flat floor that meets the plank's flatness requirement, with no rocking boards or hollow spots.
Safety
- Wear a dust mask or respirator when pouring dry mix; cement dust contains crystalline silica and irritates lungs.
- Wear gloves and eye protection; wet cement-based compounds are alkaline and can burn skin.
- Use hearing protection and dust collection when grinding.
- Ventilate, especially with some primers.
- Lift bags carefully; they often weigh about 50 pounds.
Cost of Self-Leveling a Floor
DIY costs include the compound, primer, a mixing paddle, gauge rake or smoother, and spiked roller and shoes. For a single room at shallow depth, materials are moderate; deeper pours and large areas add up quickly because coverage drops as thickness rises. Professional installers charge by the square foot and depth, and include prep like grinding. Pros can pump material for large areas, which gives a more consistent result than hand mixing. For broader floor finish options, see polished concrete cost and concrete coating cost.
Tips From Experienced Installers
- Do a dry run: walk through the pour order and where each bucket goes before you open a bag.
- Pre-measure water: fill and label buckets with the exact water for each bag before you start.
- Work as a team: one mixer, one pourer, one spreader for larger rooms.
- Cool water in hot weather: it can extend working time slightly; follow the label's temperature range.
- Turn off HVAC fans blowing on the floor during the first hours.
- Pour toward the exit so you never have to walk back across fresh material.
- Keep extra bags handy so you never run short mid-pour.
Once you understand how to use self leveling concrete, it is one of the most satisfying floor prep jobs: a rough, uneven slab turns into a smooth, flat surface in an afternoon.
Planning Your Pour
Self-leveling compound gives you no time to think once the first bucket is mixed, so the planning happens beforehand. Start by deciding where the pour begins and ends. In most rooms you pour from the wall farthest from the door and work toward the exit, so you never trap yourself or walk back through wet material. In long rooms, divide the floor into lanes about as wide as one bucket spreads, and pour lane by lane while each edge is still wet.
Next, decide how many people you need. A small bathroom can be done by one person mixing and pouring a bag at a time. A kitchen or basement usually needs at least two people: one mixing continuously, one pouring and spreading. For rooms over a few hundred square feet, three people or a pump make the job far easier. The goal is to keep material flowing without gaps, because a batch that sits on the floor for more than its working time before the next one arrives will leave a visible seam or ridge.
Stage everything before you mix: bags lined up in order, buckets of pre-measured water, the drill and paddle tested, the gauge rake set to depth, spiked shoes on, and the doorway dammed. Make sure the room temperature and the floor temperature are within the range on the bag, usually above about 50°F, and that the HVAC is not blowing on the floor.
How Long Does Self Leveling Concrete Take to Dry in Different Conditions?
The label gives dry times at standard conditions, usually around 70°F and moderate humidity. Real conditions change them:
- Cool rooms: basements and unheated spaces slow setting and drying; walkable times can stretch from a few hours to most of a day.
- High humidity: slows moisture loss, delaying when moisture-sensitive flooring can go down.
- Thick pours: a 1-inch pour holds far more water than a ⅛-inch pour and takes much longer before flooring.
- Warm, dry rooms: speed setting and shorten working time, so plan to work faster.
When the next step is a moisture-sensitive floor like wood or some vinyl products, follow the flooring maker's moisture test and limits rather than a calendar date. That is the most reliable answer to how long does self leveling concrete take to dry before flooring.
Quick Reference
- How to use self leveling concrete: clean, repair, seal gaps, prime, mix exact water, pour far-to-near with a wet edge, spread, spike-roll.
- How to apply self leveling concrete over tile or wood: only with products rated for it, proper prep, bonding primer, and lath on wood.
- How long does self leveling concrete take to dry: often walkable in 2 to 4 hours, tile-ready in several hours to a day, other flooring after about a day or more, longer for thick pours and cool rooms.
- Coverage: roughly 50 square feet per 50-pound bag at ⅛ inch, less as thickness increases; check the bag.
Choosing a Self-Leveling Product
Self-leveling products are not all the same, and the bag that works in one room may be wrong for another. Read the data sheet for these points before you buy:
- Depth range: the minimum and maximum thickness per pour, and whether it can be extended with pea gravel for deeper fills.
- Subfloor types: concrete only, or also wood, tile, terrazzo or adhesive residue.
- Interior or exterior: most are interior only.
- Wear surface or underlayment: whether it can be left exposed or must be covered.
- Working time and walkable time: short working time means faster drying but less time to spread.
- Flooring compatibility: when tile, vinyl, wood or carpet can go on top, and any moisture testing required.
- Primer: which primer is required and at what dilution.
- Compressive strength: higher-strength products suit heavier traffic or thin wear surfaces.
Stick with one brand's system of primer and compound. Mixing brands can cause bond failures that void warranties. If your flooring comes with an installation guide, check which underlayments it approves; some flooring warranties depend on it.
Should You DIY It?
For small rooms like bathrooms, laundry rooms and entryways, self-leveling a floor is a realistic DIY job if you prepare carefully and work quickly. The most common DIY failures come from skipped prep, skipped primer, wrong water amounts and running out of material. For large, open areas, deep fills, wood subfloors, radiant heating, or floors that must meet tight flatness limits for large tile, a flooring contractor with pumps and experience often gets a better result and can warranty the work.
Frequently Asked Questions
How do you use self leveling concrete?
Clean and prep the floor, seal gaps, prime, mix with exact water, pour from the far side keeping a wet edge, spread and spike-roll, then let it dry.
How long does self leveling concrete take to dry?
Often walkable in 2 to 4 hours, tile-ready in several hours to a day, and ready for moisture-sensitive flooring after about a day or more.
Do I need primer for self-leveling concrete?
Almost always. Primer improves bond and prevents pinholes and weak spots.
How thick can self-leveling concrete be?
Many products go from featheredge to about 1 inch per pour, some thicker with aggregate. Check the label.
Can I use self-leveling concrete over wood?
Some products allow it over properly prepared, stiff wood subfloors with lath and primer. Follow the maker's instructions.
Can self-leveling concrete be the final floor?
Only products designed as wear surfaces. Most are underlayments meant to be covered.
How long before you can tile over self-leveling concrete?
Often several hours to about a day, depending on the product and conditions. Check the label.
Can you pour self-leveling concrete in two layers?
Yes, many products allow multiple lifts. Prime between lifts as the maker directs.
Why did my self-leveling concrete crack?
Common causes are too much water, no primer, drafts, a moving subfloor, or pouring too thin or thick.
Can you use self-leveling concrete outside?
Most are interior products. Use an exterior-rated resurfacer for driveways and patios.
Sources
- Self-leveling underlayment manufacturer data sheets and installation instructions (primer, water ratio, working time, dry times).
- OSHA, respirable crystalline silica (dust from grinding prep). osha.gov
- Image credits: grinder photo by Kyriakos04072004 (CC BY-SA 4.0); radiant heating photo by Asurnipal (CC BY-SA 4.0), both Wikimedia Commons; diagram by Asphapro.com.
Always follow your product's data sheet. Checked November 2026.