
How to Build Concrete Forms: Layout, Stakes, Slope and Base Prep
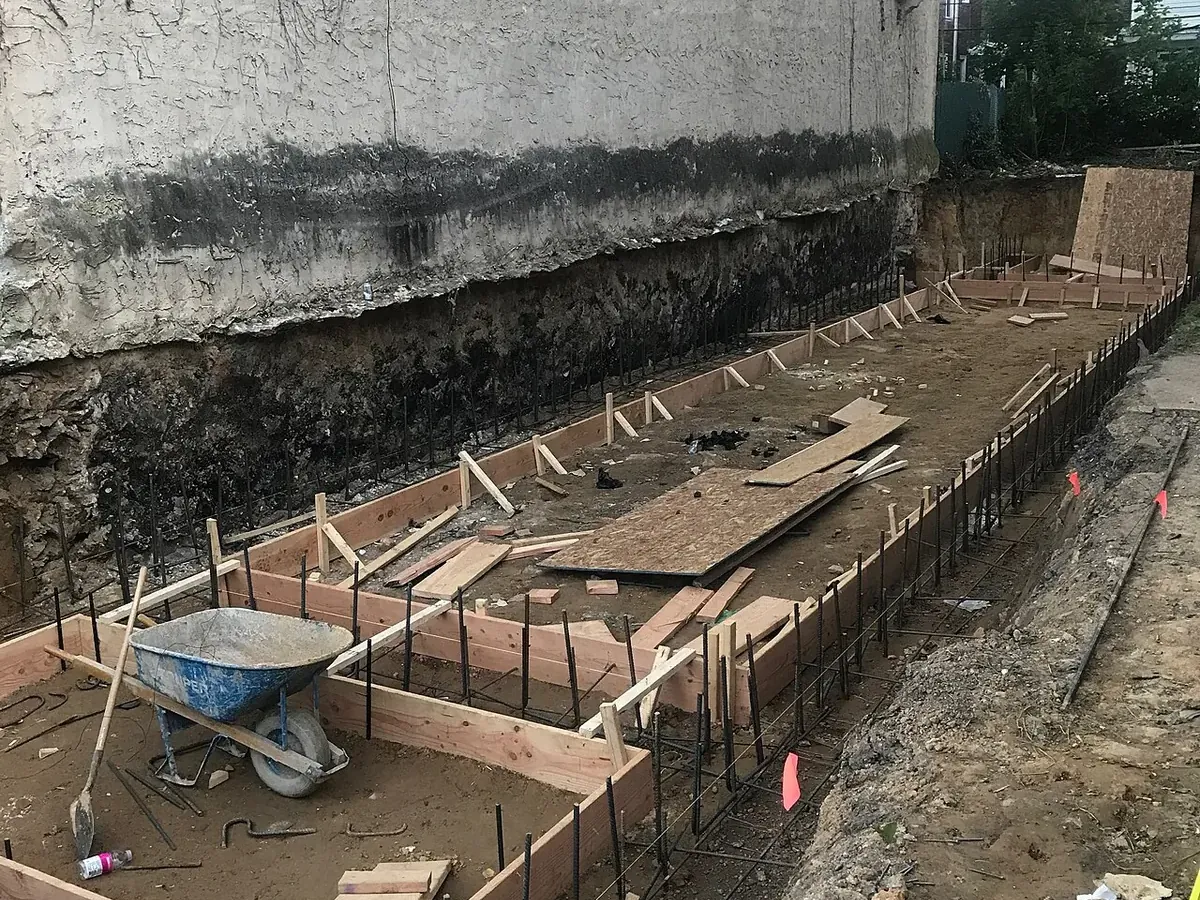
Photo: Beams&Lintels, Wikimedia Commons, CC BY-SA 4.0
Quick Answer
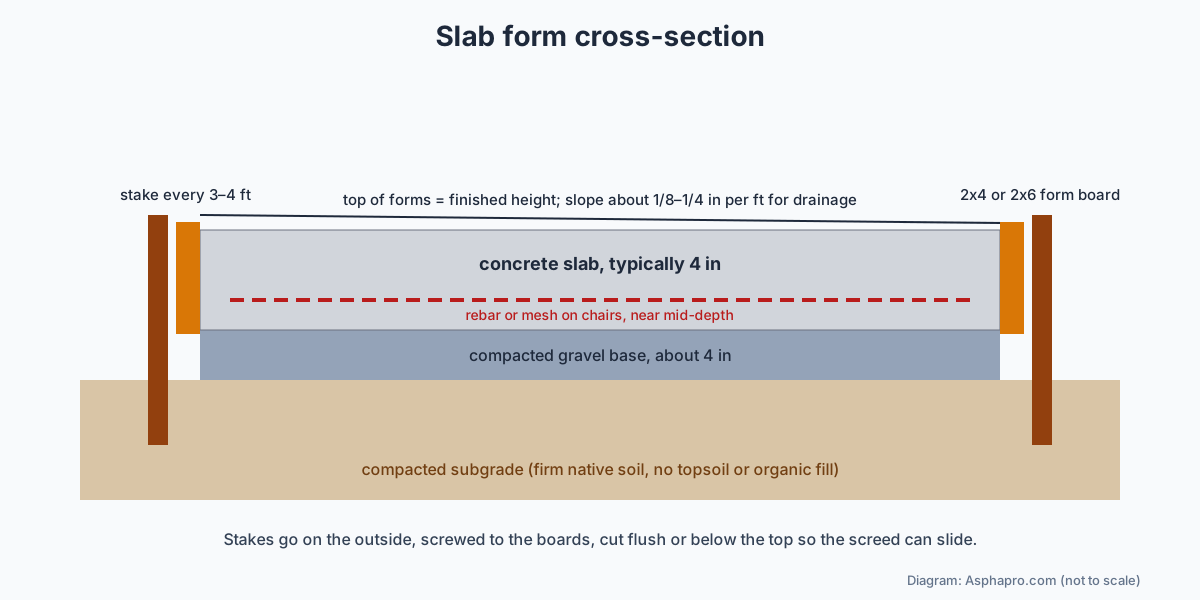
To build concrete forms for a slab, mark the outline with stakes and string, square the corners with the 3-4-5 method, and dig out to allow for about 4 inches of gravel base plus the slab thickness. Set 2x4 boards for a 4-inch slab (actual 3½ inches, so set them slightly into the base) or 2x6 boards for thicker slabs on edge along the string, and drive wood or steel stakes every 3 to 4 feet on the outside, screwing the boards to them. Set the tops to the finished height with a slope of about 1/8 to 1/4 inch per foot away from buildings. Brace corners, coat the inside with form release oil, compact the base and place reinforcement. As for filler before you pour: compacted gravel base is good; topsoil, organic material, loose fill and trash are not.
Forms are the molds that hold wet concrete in shape until it hardens. Good forms make a slab straight, level, the right thickness and properly sloped. Weak or crooked forms lead to bulging edges, uneven surfaces, puddles and blowouts that dump concrete across the yard. Building concrete forms is one of the most important parts of a DIY concrete project, and it is mostly basic carpentry.
This guide explains how to build concrete forms step by step for slabs, patios, sidewalks and driveways, then covers footings, steps, curves and walls. It also answers a common question: is it okay to put filler before you pour concrete?
What You Need
- Form boards: 2x4s for 4-inch slabs, 2x6s for 5- to 6-inch slabs or thickened edges. Straight, untwisted lumber.
- Stakes: 1x4 or 2x4 wood stakes about 18 to 24 inches long, or steel form stakes with nail holes.
- Exterior screws (2½ to 3 inch) or duplex (double-headed) nails.
- String line, line level or laser level, 4-foot level and tape measure.
- Sledgehammer, drill/driver, circular saw.
- Hardboard or bender board, or thin plywood, for curves.
- Form release oil or agent.
- Gravel base, a plate compactor and a shovel.
- Rebar or wire mesh and chairs; expansion joint strips where the slab meets buildings.
Step 1: Plan the Slab
- Size and shape: decide the exact dimensions. Rectangles are easiest.
- Thickness: 4 inches is standard for patios and walkways; driveways are often 4 to 6 inches. See concrete slab thickness and how thick a concrete driveway should be.
- Drainage: plan a slope away from the house, usually about 1/8 to 1/4 inch per foot. A 10-foot patio drops about 1¼ to 2½ inches.
- Permits and utilities: check local rules and call 811 before digging.
- Concrete amount: work out yards so you can order; see how to calculate yards of concrete.
Step 2: Lay Out and Square the Corners
- Drive temporary stakes at the approximate corners.
- Set batter boards (two stakes with a crossbar) a few feet outside each corner, so you can adjust strings without disturbing the work area.
- Run string lines between batter boards to mark the slab edges.
- Square the corners with the 3-4-5 method: measure 3 feet along one string and 4 feet along the other from the corner. The diagonal between those points should be exactly 5 feet. Use 6-8-10 or 9-12-15 for bigger slabs.
- Check the whole layout by measuring both diagonals. They should match.
Step 3: Excavate
Dig out sod, topsoil and organic material inside the layout and about 6 inches beyond it, so there is room for stakes. Dig deep enough for the gravel base (typically about 4 inches) plus the slab thickness, minus any part of the slab above grade. Remove roots and soft spots and replace them with compacted gravel. Compact the soil subgrade with a plate compactor or hand tamper.
Step 4: Set the Form Boards
- Cut boards to length. For long sides, join boards with a scrap splice block screwed across the joint on the outside, backed by a stake.
- Set the boards on edge along the string lines, with the inside face of the board on the line.
- Drive a stake at each corner and at each joint, then every 3 to 4 feet along the sides. Stakes go on the outside of the form.
- Set the board height at the high end first (usually next to the house), with the top at the finished slab height.
- Screw through the stake into the board. Use two screws per stake.
- Set the low end using a level and measuring the planned drop, or a string line with a line level. Check the slope along each side.
- Cut stakes flush with or slightly below the top of the forms so the screed board can slide across.
A 2x4 is actually 3½ inches tall. For a full 4-inch slab, set the form so its bottom sits about ½ inch below the top of the compacted base, or use 2x6 forms and backfill the outside. Fill gaps under the forms with soil or gravel on the outside so concrete does not leak out.
Step 5: Brace and Check
- Add diagonal kicker braces on tall forms and at corners.
- Backfill soil against the outside of the forms to stiffen them.
- Recheck square, dimensions, height and slope.
- Push on the forms. If they move, add stakes. Wet concrete weighs about 150 pounds per cubic foot and pushes hard on forms.
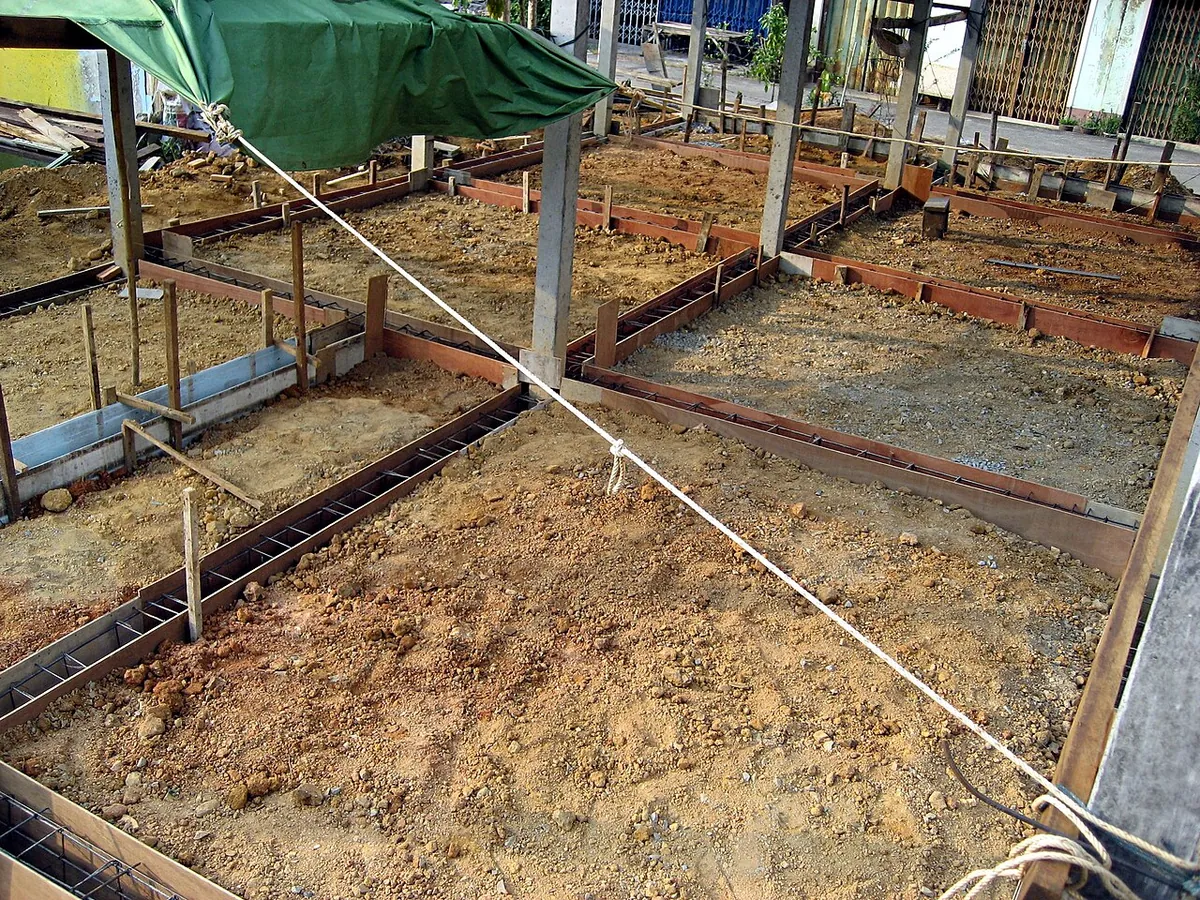
Photo: Khaosaming, Wikimedia Commons, CC BY-SA 3.0
Step 6: Prepare the Base and Reinforcement
- Spread gravel base inside the forms in layers and compact each layer.
- Install expansion joint material where the slab meets the house, steps or other slabs.
- Place rebar or wire mesh on plastic or concrete chairs so it ends up near the middle of the slab, not on the ground.
- Coat the inside faces of the forms with release oil so they strip cleanly.
- Lightly dampen the base before the pour on hot days so it does not suck water from the concrete.
A Worked Example: 10 x 12 Foot Patio Form
Say you are building concrete forms for a 10 by 12 foot patio, 4 inches thick, against the back of a house, sloping away at 1/8 inch per foot.
- Layout: strings set 12 feet along the house and 10 feet out. Corners squared with 6-8-10 measurements; both diagonals measure about 15 feet 7 inches.
- Slope: 10 feet × 1/8 inch = 1¼ inch drop from the house to the outer edge.
- Excavation: sod and topsoil removed; area dug about 7½ inches below the planned top at the house, leaving room for 4 inches of gravel and the slab.
- Boards: two 12-foot 2x4s for the outer side and house side (the house side may use an expansion strip instead of a form), two 10-foot 2x4s for the ends.
- Stakes: 18-inch wood stakes at each corner and every 3 feet, about 18 stakes total.
- Setting height: top of the form at the house set ½ inch below the door threshold; outer form set 1¼ inch lower, checked with a level and a tape.
- Base: 4 inches of crushed stone compacted in two lifts.
- Reinforcement: wire mesh or #3 rebar grid on chairs; expansion strip along the house.
- Concrete: 10 × 12 × 0.333 ÷ 27 ≈ 1.5 cubic yards, plus about 10% extra, so order about 1.65 to 1.75 yards. See concrete price per yard.
Form Materials Compared
| Material | Good for | Pros | Cons |
|---|---|---|---|
| Dimensional lumber (2x4, 2x6) | Slabs, patios, walks, driveways | Cheap, easy to cut and screw | Can warp; limited reuse |
| Plywood with 2x bracing | Steps, walls, footings | Smooth faces, any height | Needs strong bracing |
| Hardboard / bender board | Curves | Bends easily | Needs many stakes |
| Steel forms | Contractor slabs, curbs | Very straight, reusable | Costly to buy |
| Plastic modular forms | Walls, repeated shapes | Lightweight, reusable | Cost up front |
| Cardboard tube forms | Round piers, deck footings | Fast, cheap | One-time use |
| Insulated concrete forms (ICF) | Walls that stay in place | Built-in insulation | Not removed; specialized |
For stay-in-place wall forms, see insulated concrete forms cost.
How to Build Concrete Forms for Footings
Footings spread the load of walls, posts and foundations into the soil. Many footings are poured into a trench dug neatly to size, with no wood forms needed if the soil holds its shape. When the soil is loose or the footing must sit above grade, build forms:
- Continuous footings: set two parallel form boards on edge (often 2x8s or 2x10s) at the footing width, held by stakes and spreader boards across the top every few feet to keep the width.
- Pier footings: use cardboard tube forms set in holes and braced plumb, or square plywood boxes.
- Depth: footings must reach below the local frost line and to firm soil; local codes set the minimum.
- Rebar: place horizontal bars on chairs and any vertical dowels called for in the plans.
See concrete footing cost for sizes and prices.
How to Build Concrete Forms for Steps
Step forms are taller and must hold more pressure than slab forms.
- Plan the rise and run: divide the total height into equal risers, typically about 7 inches each, with treads about 11 inches or more deep. Check local code.
- Side forms: cut the step profile out of ¾-inch plywood for each side. Brace them with 2x4 stakes and cleats.
- Riser boards: use 2x8 or 2x lumber the height of each riser, bevel the bottom edge so you can finish the tread underneath, and screw them between the side forms.
- Brace the risers: add a 2x4 cleat across the middle of wide risers to stop bowing.
- Fill: large steps can be partly filled with compacted gravel or clean broken concrete in the center to save concrete, keeping at least 4 inches of concrete on all faces.
- Tie to the foundation: drill and epoxy rebar dowels into the house foundation or slab if the code or design calls for it.
See concrete steps cost for prices.
How to Build Curved Concrete Forms
- Use ¼-inch hardboard, bender board or thin plywood, which bend around curves.
- Mark the curve on the ground with a garden hose or spray paint.
- Drive stakes every 1 to 2 feet along the curve, closer on tight bends.
- Screw the bendable material to the stakes, doubling up layers for stiffness.
- For straight lumber on gentle curves, make saw kerfs (cuts partway through) every inch or two on the inside face so it bends.
Forms for Sidewalks and Driveways
Long, straight forms for walks and driveways use the same method as a patio, but straightness matters more. Use long, straight boards, stretch a tight string to align them, and check with a long level. Sidewalks are often 4 feet wide with joints every 4 to 5 feet. Driveways need thicker slabs and often thickened edges where vehicles cross the edge. See concrete sidewalk cost and concrete driveway cost.
Forms for Small Walls and Curbs
Short garden walls, curbs and planter walls use two plywood faces held apart by spacers and tied together so wet concrete does not push them apart. Snap ties or form ties through the wall hold the faces at the right width; wood cleats and diagonal braces to stakes keep them plumb. Concrete pressure grows with height, so walls above a couple of feet need engineered tie spacing or ready-made forming systems. For taller structural walls, use a contractor or an engineered system.
Pour Day Tips
- Recheck stakes, braces and slope the morning of the pour.
- Have extra stakes, screws and a drill on hand in case a form starts to move.
- Place concrete close to its final spot; do not drag it long distances, which separates it.
- Tap the outside of forms with a hammer to settle concrete against them and reduce voids on edges.
- Screed with a straight board riding on the tops of the forms.
- Run an edging tool along the forms for a rounded edge.
Stripping and Reusing Forms
Remove slab forms after the concrete has hardened enough not to chip at the edges, usually 24 to 48 hours in warm weather and longer in cold weather. Back out screws, pull stakes, and pry boards away gently. Keep curing the concrete after the forms come off; see how long concrete takes to cure. Clean boards with a scraper while concrete residue is soft, and store them flat so they stay straight for reuse.
Tips From the Job Site
- Use screws, not nails, for DIY: screws pull out cleanly when you strip, and you can adjust a board without hammering it out of line.
- Mark stake spots before you dig: spray paint dots along the outside of your string so you remember to leave room.
- Pre-drill hard stakes: in rocky ground, steel stakes drive more easily than wood and do not split.
- Pick the straightest lumber: sight down each board at the store and skip anything bowed or twisted. A crooked board becomes a crooked slab edge.
- Protect door thresholds: keep the finished slab at least a little below thresholds, and slope away, so water never runs toward the house.
- Plan joints now: mark where control joints will go on the tops of the boards so the finisher can line up the groover; spacing is usually 2 to 3 times the slab thickness in feet.
- Think about access: make sure a wheelbarrow or the truck chute can reach every corner without stepping on the forms.
- Leave a cleanout: on step forms, leave the bottom of riser boards open enough to finish and tool the tread under them.
Most of the hard work happens before a drop of concrete arrives. An extra hour spent checking height, slope and stakes saves a lot of trouble while the concrete is setting and there is no time to fix mistakes.
Forms Against an Existing Slab or House
When a new slab meets an existing one, a foundation wall or steps, that side usually does not need a form board. Instead, glue or nail a strip of asphalt-impregnated fiber or foam expansion joint material to the existing surface, with its top set at the finished height. It lets the two pieces move separately and keeps the new slab from bonding and cracking. If the new slab must line up flush with an old one, drill and epoxy smooth dowels into the edge of the old slab where needed so the two do not shift up and down.
Common Mistakes
- Too few stakes, causing bulges or blowouts.
- Stakes left sticking above the forms, blocking the screed.
- No slope, leaving puddles.
- Leaving topsoil or soft spots under the slab.
- Rebar lying on the dirt instead of on chairs.
- Not checking square, leaving a crooked patio.
- Skipping release oil, making forms hard to strip.
- Gaps under forms that let concrete leak out.
How Strong Do Concrete Forms Need to Be?
Wet concrete behaves like a heavy liquid. At about 150 pounds per cubic foot, it presses outward on concrete forms with a force that grows with depth. A 4-inch slab puts modest pressure on a 2x4 form board, which is why slab forms need only stakes every few feet. A 3-foot-tall step or wall form faces many times that pressure at the bottom, which is why step forms and wall forms need plywood, cleats, ties and diagonal braces.
Pressure also rises when concrete is poured fast, when it is very wet, and in cold weather when it stays fluid longer. Vibrating concrete increases pressure on forms too. On anything taller than a slab, build concrete forms stronger than you think you need, and pour in layers rather than all at once.
Concrete Forms Checklist Before the Truck Arrives
- Form boards straight, at the right height, with the planned slope.
- Corners square; diagonals equal.
- Form stakes every 3 to 4 feet, at corners and at joints, screwed tight.
- Stakes cut flush or below the top of the form boards.
- Braces on corners, tall forms and step forms.
- Gaps under concrete forms sealed with soil on the outside.
- Base compacted and level to the right depth.
- Rebar or mesh on chairs; expansion strips in place.
- Release oil on all inside faces of the forms.
- Clear path for the truck chute, wheelbarrows or pump.
- Tools ready: screed board, bull float, edger, groover, extra screws and stakes.
Cost of Building Concrete Forms
For a typical DIY patio or walkway, concrete forms are one of the cheapest parts of the job. You need enough 2x4 or 2x6 lumber for the perimeter, a bundle of stakes, a box of exterior screws and a jug of release oil. Steel form stakes cost more than wood but last for many projects. Hardboard for curves is inexpensive. Rental tools you may need include a plate compactor and a laser level. Contractors include forming in their per-square-foot slab price; see concrete cost per square foot.
Weather and Timing
Build concrete forms a day or two before the pour so you have time to check them without rushing. Rain before the pour can soften the base and wash soil under forms; cover the area with plastic if rain is coming. In hot weather, set forms early and dampen the base before the pour. In cold weather, never pour on frozen ground, and plan to keep forms on longer because concrete gains strength slowly. See pouring concrete in cold weather.
Quick Reference
- How to build concrete forms for a patio: string layout, 3-4-5 corners, 2x4 form boards on edge, stakes every 3 to 4 feet, 1/8 to 1/4 inch per foot slope.
- How to build concrete forms for steps: plywood side forms with the step profile, braced 2x riser boards with beveled bottoms.
- How to build concrete forms for curves: hardboard or kerfed boards, stakes every 1 to 2 feet.
- How to build concrete forms for footings: trench forms in firm soil, or paired boards with spreaders, below the frost line.
- Is it okay to put filler before you pour concrete: yes for compacted gravel or clean granular fill; no for topsoil, organics, loose dirt and debris.
Is It Okay to Put Filler Before You Pour Concrete?
It depends on the filler. The material under a slab must be firm, stable and well drained so the slab does not settle or crack.
| Fill material | OK under concrete? | Notes |
|---|---|---|
| Compacted crushed stone or gravel base | Yes, recommended | Compact in layers about 4 in thick |
| Compacted sand | Sometimes | Used in some regions; needs confining and compaction |
| Clean, compacted granular fill to raise grade | Yes | Place and compact in lifts; thick fill may need testing |
| Broken concrete rubble | With care | Only clean, compacted, with fines filling voids; can leave voids if not done well |
| Topsoil, sod, mulch, roots | No | Decays and settles |
| Loose dirt fill, clay chunks | No (unless engineered) | Settles unevenly |
| Wood, trash, bricks thrown in loosely | No | Leaves voids; rots |
| Foam blocks (geofoam) in engineered systems | Yes, if designed | Used to lighten loads in some projects |
The key rule: anything under concrete must be compacted and will not decay. Deep holes are best filled with compacted gravel in lifts rather than one big dump of material. Never pour over frozen ground.
Frequently Asked Questions
What wood do you use for concrete forms?
Straight 2x4s for 4-inch slabs and 2x6s for thicker slabs, with wood or steel stakes. Plywood is used for walls and steps.
How far apart should form stakes be?
About every 3 to 4 feet, plus at corners and board joints. Use more on taller forms.
How long do forms stay on concrete?
Slab forms are often removed after 1 to 2 days. Wall and elevated forms stay longer, as engineered.
Is it okay to put filler before you pour concrete?
Compacted gravel or clean granular fill is fine. Topsoil, organic material, loose dirt and debris are not.
Do I need gravel under a concrete slab?
A compacted gravel base is strongly recommended for drainage and support, especially on clay soils.
What slope should a concrete slab have?
About 1/8 to 1/4 inch per foot away from buildings.
Can I use 2x4s for a 4-inch slab?
Yes. A 2x4 is 3½ inches tall, so set it about ½ inch into the base or accept a 3½-inch edge. Use 2x6s for thicker slabs.
Should stakes go inside or outside the forms?
Outside, screwed to the boards and cut flush or below the top.
What can I use as form release?
A commercial form release agent works best. Some people use vegetable oil on small projects; avoid used motor oil, which stains and pollutes.
Can I pour concrete without forms?
For footings in firm soil, trenches can act as forms. Slabs and walks need forms to keep straight edges and the right thickness.
Sources
- American Concrete Institute, guidance on residential concrete, subgrade and formwork. concrete.org
- Portland Cement Association, concrete basics and slab construction. cement.org
- Image credits: slab form photo by Beams&Lintels (CC BY-SA 4.0), footing form photo by Khaosaming (CC BY-SA 3.0), both Wikimedia Commons; diagram by Asphapro.com.
Check local codes for footings, structural slabs and permits. Checked November 2026.
Related Guides
- Can you pour concrete in the rain? — risks and how to protect a pour
- Can you pour concrete in the winter? — cold weather rules and protection
- Why does concrete crack? — causes, joints and prevention